GoodSync Manual
A printable version is available in PDF.
Applies to both GoodSync for Windows and GoodSync for Mac unless noted otherwise.
- Preface
- Introduction
- What is GoodSync?
- Backup vs. Synchronization
- Why Synchronization is not trivial
- Chained Synchronization
- Embedded Jobs
- GoodSync Account
- GoodSync Account creation and setup
- Getting started with GoodSync
- Installation
- Synchronization step-by-step
- Backup files incrementally: One-Way Sync
- Synchronization algorithm
- Using GoodSync
- Jobs
- Job selection
- Job Templates
- Groups
- User Interface overview
- Server Accounts and Account Sync
- GoodSync Connect
- GoodSync Storage
- Actions
- Copy File action
- Copy Time / Attributes action
- Copy Name Case action
- Sync State action
- Do Not Copy action
- Error action
- Conflict action
- Filters
- Exclude Filters (empty by default)
- Include Filters (empty by default)
- Adding Filters from the Context Menu after Analyze
- Preset Exclude Filters
- Copying and pasting Filters
- Filter syntax and parameters
- Any and All qualifiers
- Filter composition
- Absolute Paths Only match
- Commands and Keyboard Shortcuts
- Job commands
- All commands
- View commands
- Sync Tree Projection View commands
- Sync Tree Node Expand commands
- Sync Tree Node Action commands
- Sync Tree Node Filter commands
- Sync Tree Node Direction Change commands
- Tools commands (Windows only)
- GoodSync commands (Mac only)
- Help commands
- File Systems: Local and Remote
- Windows File System (Windows only)
- Mac File System (Mac only)
- GoodSync Connect (GSTP protocol)
- GoodSync Storage
- Net Shares (Sib-SMB)
- Net Shares (Win-SMB) (Windows only)
- Apple Filing Protocol (AFP)
- Media Devices (MTP) (Windows only)
- Google Drive
- Google Team Drive
- Google Docs
- Google Photos
- Google Cloud Storage
- Apple iCloud Drive
- Apple iCloud Photos
- Amazon S3
- Dropbox
- Box.com
- Backblaze B2
- OneDrive Office365 SharePoint
- Microsoft Azure Blobs
- Microsoft Azure Files
- MEGA
- SFTP (Secure FTP)
- FTP
- WebDAV
- One File
- Job Options
- General
- Filters
- Auto
- Analyze
- Sync
- Recycled / History
- Speed / Limits
- Errors / Conflicts
- Scripts
- Left Side/Right Side
- Program Options
- General
- Account
- License
- Auto
- Filters
- SMTP
- Shared by me
- Shared with me
- Storage
- Proxy
- Logs
- Server
- Syncing specific applications
- Advanced Topics
- Managing time shifts
- Environment variables in paths
- Case-sensitivity
- Portable paths
- GoodSync GUI Command Line
- Windows Installer options
- GoodSync mass deployment
- GSYNC
- License activation
- Profile and Logging options
- Run options
- Global commands
- Job commands
- Job options
- Return codes
- TIX: Readable Job descriptors
- TIX, File, and Registry: Who decides
- General rules
- Job properties
- Folder properties
- Connectoid properties
- Program options
- SMTP options
- Proxy options
- Policies
- GoodSync2Go: Portable version
- GSCP: Command-line File System client
Preface
This document is intended to serve as a guide for advanced GoodSync users who are utilizing the many powerful and customizable features of GoodSync.
As this is a Reference Manual, it is not meant for a new GoodSync user.
GoodSync provides friendly instructional information during installation.
Most users will be able to start syncing data immediately without needing to reference this document.
For those seeking guidance on getting started with GoodSync, check out the overview of how GoodSync works and the GoodSync Tutorial.
Introduction
What is GoodSync?
GoodSync is a software application that is used for data synchronization and backup purposes. It allows synchronizing files and folders between different devices or locations, ensuring the data is up-to-date and consistent across all of them.
That is, GoodSync makes sure that folders and all files in synchronizing folders are the same by copying the new or updated files from the folder where they appeared to the folder where they are old or not present and by propagating deletions.
- GoodSync can be used for a variety of purposes, including:
- Synchronization: Maintain synchronization of files and folders across various devices, including computers, servers, or mobile devices, ensuring access to the most current file versions from any location.
- Backup: GoodSync can be used to create backup copies of files and folders, either on external drives, NAS, or in the cloud. That ensures that data is protected in case of hardware failures, accidental deletions, or data corruption.
- Data Migration: When transitioning to a new computer or storage device, GoodSync can help migrate files and settings to the new device, ensuring a smooth transition.
- File Sharing and Collaboration: GoodSync can be used to share files and collaborate with others by synchronizing shared folders between the team or family members.
- Cloud Integration: GoodSync integrates with various cloud storage services like Dropbox, Google Drive, OneDrive, and more, making it easy to sync and backup data to and from these services.
- Automated Tasks: GoodSync supports automation and scheduling, allowing to set up regular synchronization or backup tasks without manual intervention. That is especially useful for routine data management.
- Server Backup: Businesses can use GoodSync to create backups of server data, ensuring data availability and recoverability in case of server issues.
- Version Control: GoodSync provides versioning options, allowing one to keep multiple versions of files. That can be crucial for reverting to previous versions of files.
- Cross-Platform Sync and Backup: GoodSync works on Windows, macOS, Linux/NAS, and mobile platforms, making it versatile for users on different operating systems.
In this chapter, we discuss challenges that synchronization programs face and that GoodSync successfully addresses.
Backup vs. Synchronization
Synchronization ensures that two folders remain in sync while a user may change files on both sides. That is achieved by copying changes made on the Left side to the Right side, and changes made on the Right side are copied to the Left side.
Backup is one-way synchronization. That is, the changes made on the Left side are propagated to the right side, but changes made on the Right side are not propagated to the Left side.
GoodSync one-way Jobs enforce the backup scenario.
Why Synchronization is not trivial
The synchronization task would appear to be trivial (compare file modification files and let the newer file win) if it was not for deletions that need to be propagated. If a file gets deleted on one side, GoodSync will propagate this deletion to the other side of the sync Job by deleting this file on the other side. The sophistication of the GoodSync algorithm allows us to propagate deletions correctly through multiple chained folders.
Another complication is that the user may decide to replace the newer version of the file with its older version. GoodSync can handle this situation correctly. It will propagate the older file version if it detects that the user made such a replacement.
Chained Synchronization
Chained syncing is a process when the contents of several folders (e.g., A, B, C, and D) are synchronized by performing synchronization of pairs in a sequence that results in propagation of changes (e.g., sync A and B, then B and C, then C and D results in changes in A propagating to folder B, then C, then D).
GoodSync can perform chained synchronization correctly.
One can use GoodSync chains to synchronize files between computers that are not connected.
- For instance, synchronization of files between work and home computers can be achieved using a USB disk as an intermediary:
- Insert a USB disk (or any portable disk) into the work computer.
- Start GoodSync on the work computer and sync between the work folder and the USB disk.
- Pull out the USB disk from the work computer and insert it into the home computer.
- Start GoodSync on the home computer and sync between the USB disk and the home folder.
Embedded Jobs
Several Jobs can synchronize one folder with many other folders. Furthermore, additional Jobs can synchronize subfolders or super-folders of this folder. GoodSync accurately records file changes in the states of all affected folders.
For example, consider a folder named "C:\Work\Project" that contains a project whose files change often. Within "C:\Work," there are other projects that experience fewer modifications.
One Job, "Project to Server," synchronizes project files with an SFTP server daily. From this server, team members synchronize the files further.
Another Job, "Work to PortHD," backs up the entire contents of the "C:\Work" folder to a portable hard drive weekly.
GoodSync ensures that all changes made by the "Project to Server" Job are reflected in the "Work to PortHD" Job and vice versa.
GoodSync Account
To access all the features and benefits offered by GoodSync, obtaining a GoodSync Account is necessary. GoodSync Account serves as a universal access point across the range of GoodSync products.
- A GoodSync Account is used for:
- License and Device Management: Manage GoodSync licenses, register devices, and assign licenses to them.
- Remote Access and Data Management: Use GoodSync Connect, a feature that relies on the GoodSync Account, to connect all devices, synchronize and access data on them from anywhere with an Internet connection.
- Cross-Device Jobs and Options: Back up and sync GoodSync Jobs, Groups, Options, and Server Accounts across all GoodSync devices.
- GoodSync Cloud Storage: Use GoodSync Storage, our proprietary cloud storage that offers the fastest, safest, and most affordable way to securely and easily back up and restore data from any of the devices directly from the GoodSync interface.
- Sharing Folders: Share folders located on any device enrolled into the Account with other GoodSync users.
- Getting support and more.
These features and possibilities are described later in this Manual.
GoodSync Account creation and setup
- A new GoodSync Account can be created either:
- During the installation of the GoodSync application.
- On an already installed GoodSync application, by clicking the "Tools" menu in the top left and selecting "GoodSync Account Setup" or by clicking "GoodSync" in the Menu Bar and selecting "GoodSync Account Setup" on Mac.
- Online on the GoodSync Account creation page.
The above options within the GoodSync application will also allow one to log in with an existing GoodSync Account, enroll the device to it, and assign that device a license.
Using GoodSync Account Setup, the GoodSync Account employed on this computer can be changed at any time.
The GoodSync Account Setup dialog is covered further in the Installation chapter.
Getting started with GoodSync
Installation
Refer to the corresponding Help Center articles for comprehensive instructions on installing GoodSync on various platforms:
Installing GoodSync on Windows
Installing GoodSync on Mac
Installing GoodSync on Linux
Installing GoodSync on NAS
Installing GoodSync on Android/iOS
Synchronization step-by-step
- Typical GoodSync user experience consists of these stages:
-
Create a Job and select sync folders:
- The user selects the Left and Right folders to synchronize.
- That is done only once when the Job is initially set up.
-
Comparative Analysis:
- Happens when the user clicks the "Analyze" button.
- GoodSync computes the changes that must be made to make folders the same.
-
Review proposed actions:
- The results of the analysis are presented to the user in the form of a file/folder tree.
- Left or right arrows point in the direction of the file copy. The circle in the middle means Do Not Copy, i.e., the items are equal.
- Crossed Arrow means Propagate Deletion. For instance, the left-to-right Crossed Arrow means that GoodSync detected the deletion of a file on the Left side, and it wants to propagate it to the Right side.
- The current effective direction is indicated by an arrow or circle being green and thick.
- Other possible directions are indicated with gray and disabled arrows or the circle.
- The user can change the direction of Sync by clicking on the desired arrow.
-
Synchronization:
- Happens when the user clicks the "Sync" button.
- File actions proposed in Analysis and possibly changed by the user are applied to actual files.
- After Synchronization, folders and all files in them become the same.
Backup files incrementally: One-Way Sync
- Backup is essentially a one-way synchronization process. It only transfers changed files and file deletions to the backup folder. Here's how to set up a backup:
- Start by creating an empty backup destination folder. It can be on a removable disk (such as a USB drive or portable hard drive), another computer, or a remote server.
- Allow GoodSync to perform the initial backup by synchronizing the backup source folder with the backup destination folder.
- Going forward, when the necessity arises to back up the files, simply sync the backup source folder with the backup destination folder.
- In the event of file restoration, the backup destination folder will contain an exact copy of the backup source folder as of the last backup.
- To ensure that the backup always occurs in one direction (from the original folder to the backup folder and never the other way around), navigate to "Jobs" >> "Options" and choose the "1-way" Job Type.
Synchronization
The actual GoodSync synchronization algorithm is complex and contains several important inventions and trade secrets that cannot be disclosed here.
- This is a general outline of the algorithm:
- Compute the difference between the current file state and the stored file state for the Left folder.
- Compute the difference between the current file state and the stored file state for the Right folder.
- Propagate changes that appeared on the Left to the Right side.
- Propagate changes that appeared on the Right to the Left.
- If the change happens to the same file on both sides, declare a Conflict.
Using GoodSync
Jobs
A "Job" serves as the fundamental operational unit within GoodSync.
- Jobs comprise of:
- Job name that allows one to tell apart one Job from another.
- Left and Right folders - the two folders that are being synced by this Job.
- General and Advanced Options that control the behavior of the Job.
- Filter Options that control the file/folder inclusion and exclusion rules for the Job.
- Auto Options that control how the Job is started.
- Script Options that control how results of Job run are reported.
- Left/Right Folder Options that control options specific to the Left and Right sides of the Job.
GoodSync retains a record of Jobs along with all their associated settings for each computer. Jobs can be established, removed, renamed, assessed, and synchronized.
- All job commands are in the "Job" menu:
- To create a new Job, select "Job" >> "New," or click the "New Job" button in the Toolbar.
- To rename a Job, select "Job" >> "Rename."
- To delete a Job, select "Job" >> "Delete."
To switch between Jobs, click the Job in the Job List on the left.
To initiate the execution of a Job, click on the "Analyze" button located in the Toolbar or choose "Job" >> "Analyze" from the menu.
After the Analysis, the tree of difference between the Left and Right folders will be shown. Examine it and click the arrow buttons near the center column to change direction if needed.
To apply the changes, click the "Sync" button in the Toolbar or select "Job" >> "Sync" The sync process will propagate the changes detected from the Analysis and revised by the user.
Job selection
All Job commands can be applied to several selected Jobs.
- To select several Jobs, follow the same procedure employed in Windows Explorer for selecting multiple files:
- Ctrl + Click (Cmd + Click on Mac) adds to the selection.
- Shift + Click selects the range of Jobs.
- Right-click shows commands that apply to selected Jobs.
Job Templates
A Job Template is an incomplete Job, usually with the Right folder not set. Its purpose is to preserve a favorite set of Job options as a Template for easily creating other Jobs.
To create a Template from a Job, select the Job from the Jobs list and select "Job" >> "Advanced" >> "Save as Template."
To create a new Job from a saved Template, select "Job" >> "New." In the New Job dialog, select the "From Template" option. Then select the Template from which the Job should be created.
Groups
Several Jobs can be grouped together.
All Jobs in a Group can be started or stopped with a single command.
To create a new Group, click the "New Group" button.
To switch between Groups, click the Group in the Group Tree View on the left.
To delete the current Group, select it, then select "Job" >> "Delete."
To rename the current Group, select it, then select "Job" >> "Rename."
To add a Job to a Group, right-click the Job, and in the Groups sub-menu select a Group to which the Job will be added.
If a Job is checked in the Groups sub-menu, then selecting it will remove it from the Group.
User Interface overview
- The main GoodSync window contains these elements (Full Mode):
- Job Tree and Job List pane (left side): Shows a list of all Jobs and Groups and their status.
- Sync Tree (right side): This is where modified files and their sync directions are shown.
- Toolbar (top): Provides quick access to the frequently used commands.
- Log pane (bottom): Log of the Job actions. Hidden by default. To show, select "View" >> "Log."
- Filters pane (right side, Windows only): Displays the Include and Exclude Filters. To show, select "View" >> "Filters."
- Browse dialog: Used to choose the Left and Right sync folders.
- Mini Mode (Windows only) is a compressed summary of what is going on in GoodSync. It shows only the status of all running Jobs.
- Select "View" >> "Mini Mode" to switch to Mini Mode.
- Double-click Mini Window to switch back to Full Mode.
- Tray Icon Mode reduces GoodSync GUI to just one icon floating in the System Tray (Menu Bar on Mac).
- Select "View" >> "Tray Icon" to switch to Tray Icon Mode.
- Double-click the Tray Icon to switch back to Full Mode on Windows. On Mac, click the Tray Icon, click the gear icon, and select "Full Mode" to switch back to Full Mode.
- When GoodSync is closed with Auto Jobs configured to run, it automatically switches to Tray Icon Mode.
Job Tree and Job List
Jobs and Groups form a two-level Job Tree. It is shown by default.

Jobs can be dragged and dropped between Groups.
Click the "More" button in the Job Tree view to switch to the Job List view.
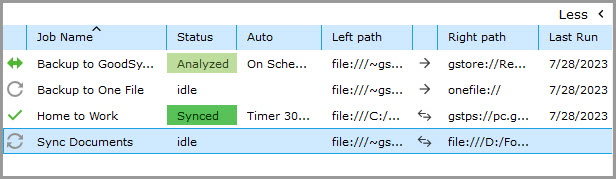
- For each Job, GoodSync shows these columns in the Job List:
- Job Status icon.
- Job Name.
- Job Status and Progress Bar.
- Auto Mode of the Job.
- Left Folder path.
- Job direction.
- Right Folder path.
- Last Run time.
Jobs can be organized by any of these columns simply by clicking on the header of the desired column. There is the flexibility to sort them either in ascending or descending order.
Sorting by Left/Right folders facilitates the grouping of files by source (Left) or destination (Right) folder, providing an easy way to identify which Jobs are associated with a specific folder.
Initially, Jobs are sorted by Job Name. If manual sorting of Jobs is desired, go to "Tools" >> "Program Options" (or "GoodSync" >> "Preferences" on Mac), disable the "Sort job names by alphabet" setting, and then restart GoodSync.
A better idea for forcing preferred order would be to give the Job Name a numeric prefix, as in "01 - Work File to NAS" or "02 - Photos to Dropbox."
To switch back to the Job Tree view, click the "Less" button.
Sync Tree
The Sync Tree is one of the main elements of the GoodSync User Interface. It shows the Analyze results and the actions proposed by GoodSync in the Analyze and provides controls for setting the user-desired actions.

See the Actions chapter for a detailed explanation of each possible action.
Toolbar
The Toolbar provides quick access to the most frequently used GoodSync commands.

- The Toolbar contains the following buttons:
- New Job: Create a new Job.
- New Group: Create a new Group.
- Account Sync ON/OFF: Enable/disable the Account Sync.
- AutoRun ON/OFF: Enable/disable the starting of the Jobs by Auto options.
- Analyze: Start Analyze.
- Sync: Start Sync.
- Left Folder: Open the Browse dialog.
- Job Direction: Select the Job direction.
- Right Folder: Open the Browse dialog.
- Options: Show all Job options.
- Auto: Show Job Auto options.
Browse dialog
The Browse dialog is employed for selecting the Left and Right synchronization folders. It is displayed upon clicking the "Please click here to select folders" button on either the Left or Right side of the Toolbar.
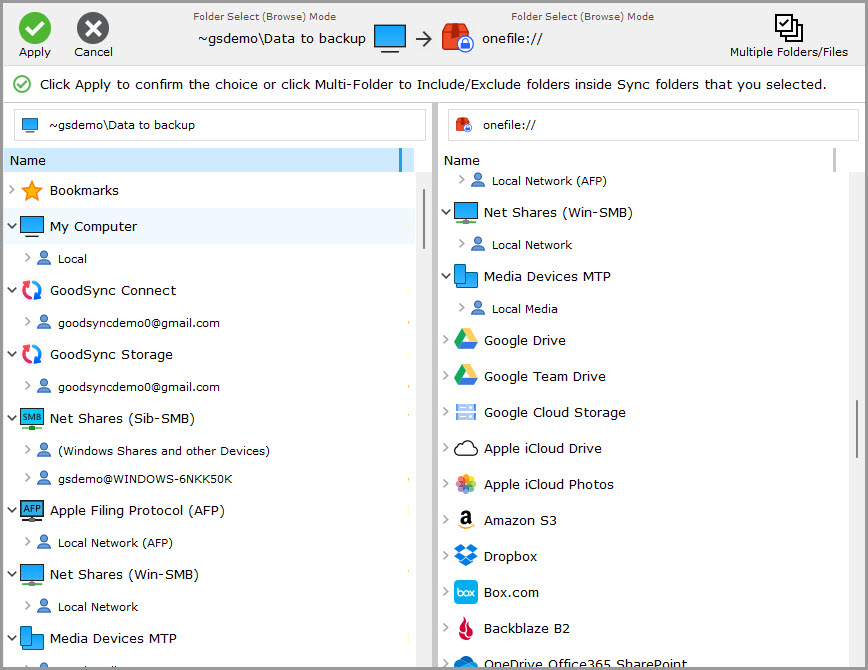
The Browse dialog facilitates the input of credentials (such as UserId and Password), enables folder navigation on the server post-login, and allows for the selection of the folder to be synchronized.
- Browse dialog has several stages:
- File system selector: Begin by choosing the File System (protocol) for the local or remote storage.
- Account Options: Here, one inputs the credentials. The provided credentials are stored in the Server Account Manager and are displayed as a list of Accounts for each supported File System. Refer to the Server Accounts and Account Sync section for more information.
- Folders: After selecting a specific server, a tree displaying servers and folders becomes visible.
- NOTE: Some stages may not be present in certain File Systems:
- The Local File System has only one account and server, so these stages are not shown.
- Most OAuth online storages have only one server, so the server stage is not shown.
- Older file protocols (FTP, SFTP) have multiple servers without discovery.
- GoodSync Connect has multiple servers but with discovery.
Select Multiple Folders
When in the Browse dialog, multiple folders can be selected for backup or sync.
After selecting the Left and Right Folders at the root level, an option for Multiple Folders/Files will appear on the top right.
Multiple folder selection is turned into Include and Exclude Filters that enforce copying only the selected folders. To understand what the result of multiple-folder selection is, look into what Left and Right Folders are and into "Job" >> "Options" >> "Filters."
- With the "Multiple Folders/Files" option checked, one can see:
- Unchecked checkbox: Means that the folder has not been included and will not appear in the Filters. If the root folder is unchecked, it will be synced entirely with no exclusions.
- Checked checkbox: Means that the folder has been included. It will appear in the Include filters.
- Gray checked checkbox: Means that the folder is a child of an included folder. It will not appear in the Filters.
- Red cross checkbox [x]: Means that the folder has been excluded. It will appear in the Exclude filters.
Check the "Show Files and Links" ("Show Files" on Mac) box to include and exclude individual files in the folders.
Multiple folders can be selected for synchronization only on one side of the Job (typically the Left side). On the other side of the Job (usually the Right side), the folder corresponding to the Longest Common Ancestor of all the selected folders on the Left side is chosen.
Only in a 1-way Right to Left Job, multiple folders are selected on the Right (source side), along with a destination folder on the Left (destination side). In all other types of Jobs, multiple folders are selected on the Left, along with a destination folder on the Right.
Example: 2-way Job:
On the Left side, select multiple folders:
~User Name\Documents\My RoboForm Data\Default Profile
~User Name\Documents\Outlook Files
~User Name\Documents\TaxACT 2021
On the Right side, Browse to the folder:
gdrive://www.googleapis.com/Backups
This will result in these pairs of folders being synced:
~User Name\Documents\My RoboForm Data\Default Profile - gdrive://www.googleapis.com/Backups/My RoboForm Data/Default Profile
~User Name\Documents\Outlook Files - gdrive://www.googleapis.com/Backups/Outlook Files
~User Name\Documents\TaxACT 2021 - gdrive://www.googleapis.com/Backups/TaxACT 2021
NOTE: Having multiple folders from different disks in one Job is not possible, as it would require their common parent to be above the disk level. To sync or back up folders on another disk, create another Job.
Icon Descriptions
In the table below, descriptions for Action icons, Job Status icons, and other icons encountered while using the GoodSync application can be found.
Server Accounts and Account Sync
What happens when several Jobs reference the same sync folder and server credentials are changed in one Job? It would be nice if changed credentials were automatically used in all other Jobs that refer to this folder without changing them manually in each Job.
Another nice thing to have would be sticky Folder Options. So, if the encryption password for a folder changes in one Job, it would automatically be changed in all Jobs that refer to the same folder.
Server Account Manager achieves both of these goals.
Jobs do not store Server Account credentials directly. Instead, each Job references the Server Account for its Left and Right side by Server Account Key.
A Server Account contains the address of an online folder and the credentials needed to access it. When the credentials of the Server Account change, each Job gets the changed credentials automatically.
By default, GoodSync retains a local copy of Server Accounts. A list of Accounts for a File System becomes visible when the File System is selected in the Browse dialog.
Utilize the Account Sync feature to secure backups of all Jobs, Groups, Options, and Server Accounts to the GoodSync Account. These backups will be synchronized across all devices connected to the Account, eliminating the need to configure them individually on each device.
To turn on Account Sync, press the "Account Sync" button on the Toolbar to switch it to the "ON" state or use the "Tools" >> "Account Sync Auto" ("GoodSync" >> "Account Sync Auto" on Mac) menu item.
The "Tools" >> "Account Sync Once" ("GoodSync" >> "Account Sync Once" on Mac) command will perform this action once without having to leave the "Account Sync ON" enabled.
GoodSync Connect
GoodSync Connect allows direct, fast, and secure peer-to-peer (P2P) data transfer between all devices, including servers, NAS, and mobile.
Refer to the GoodSync Connect Manual to learn about GoodSync Connect and GoodSync Server.
GoodSync Storage
GoodSync Cloud Storage is GoodSync's proprietary cloud storage.
It offers the fastest, safest, and most affordable way to securely and easily backup and restore data from any device directly from the GoodSync interface.
Refer to this Help Center section for the instructions on how to claim and use GoodSync Storage.
Actions
- Action is a file/folder operation that is:
- Recommended by GoodSync after the Analysis is complete,
- Changed by the User, and, finally,
- Executed when the "Sync" button is clicked.
Each Action gets an icon in the 3 central columns of the Sync Tree.
See the Icon Descriptions chapter for the detailed list of Action icons.
Copy File action
This is the most fundamental action of GoodSync. It copies a file from Left to Right or from Right to Left.
Copy of a file deleted on the Left from Left to Right means that this file will be deleted on the Right.
Copy of a file deleted on the Right from Right to Left means that this file will be deleted on the Left.
That is, the Copy File action of a deleted file simply propagates a deletion.
Copy Time / Attributes action
If a file has the same length on the Left and Right sides but the modification time is not the same, then the Copy File action offered by GoodSync can be turned into a Copy Time action.
Copy Time action copies file modification time from Left to Right or from Right to Left, but not file contents.
A recommended way of applying it is to select "View" >> "SameLength DiffTime." That will show all files having the same length but different file times.
If it is believed that these files are the same, right-click any of the files and choose either "Copy Time L to R" or "Copy Time R to L." Alternatively, by right-clicking the folder, "Copy File" can be changed to "Copy Time" for all applicable files in the folder.
NOTE: See Help Center: Resolving time-based conflicts.
Copy Name Case action
If the files on the Left and Right differ only by the case of file names, then this action is used to propagate name case change.
This action can be overridden by right-clicking the file and selecting "Name Case L to R" or "Name Case R to L" or by using the corresponding item of the "Action" menu.
Sync State action
If the file is the same on the left and right side of the sync but the stored state of the file is not the same, then GoodSync would recommend a special Sync State action for such files.
The results of the Analyze step will indicate whether a Sync State operation will be required if deemed necessary.
The direction of the Sync State action cannot be altered, as it is a non-directional action.
- The potential causes of the described Sync State situation include:
- Synchronizing two folders using programs other than GoodSync.
- Manual file copying.
- Deleting State Files within GoodSync.
Do Not Copy action
This action tells GoodSync not to do anything for this pair of files because the files are the same on both sides.
Error action
The file or folder cannot be read, see the status area for details.
Conflict action
If a file is changed on both sides of the synchronized folder pair, then GoodSync cannot determine which version is preferred (because it does not know which set of changes should win and which should be dropped), and GoodSync then declares a Conflict.
By default, Conflict is a Do Not Copy action. But the Conflict can be altered to Left To Right or Right To Left Copy, thus declaring one side a winner.
Types of Conflicts
- GoodSync may produce these types of conflicts:
- Modified On Both Sides: The file was modified or deleted by the user on both the Left and Right sides. This is a resolvable Conflict, the user may select the Sync Direction.
- Vertical Delete - Change Conflict: The user deleted the folder on the Left (Right) and modified or deleted files in this folder on the Right (Left). This is a resolvable Conflict, the user may select the Sync Direction.
- Case Conflict: Items (files or folders) on one side differ only by case. This is a non-resolvable conflict, the user must correct the problem.
- ACL/Extended Attributes Conflict: Items (files or folders) on one side differ only by the ACL (Extended Attributes), file bodies are the same. This is a minor Conflict, the user may select the Sync Direction.
Filters
By default, GoodSync synchronizes all files and folders that are not hidden and are not system. Hidden and system files can be synchronized if the option to exclude them is turned off.
To review and configure the Filters, use the "Job" >> "Options" menu item, or right-click a Job and select "Options," and switch to the "Filters" tab.
Exclude Filters (empty by default)
Files and folders that match an Exclusion Filter will be excluded from synchronization.
For instance, object files *.OBJ and editor backup files *.BAK are usually excluded.
NOTE: By design, Exclusions will take priority over Inclusions.
Include Filters (empty by default)
Files and folders whose names match an Inclusion Filter - and do not match any Exclusion Filters - are included in the synchronization.
Include Filters are applied before the Exclude Filters. An Include Filter with no lines includes everything. That is, it is effectively ignored.
Adding Filters from the Context Menu after Analyze
- The easiest way to exclude or include a file or group of files is to perform an Analysis and then right-click the file or folder and select one of the Exclusion/Inclusion commands:
- Exclude "/FolderName/FileName" file or folder: Exclude only this file or folder, as specified by its complete path "/FolderName/FileName".
- Exclude All "ItemName" files or folders: Exclude all files or folders (in any of the subfolders) that are named "ItemName".
- Exclude All "*.ext" files: Exclude all files having the extension "ext" in all sub-folders.
- Include Only "/FolderName/FileName" file or folder: Include only this file or folder, as specified by its complete path "/FolderName/FileName".
- Include Only "*.ext" files: Include all files having the extension "ext" in all sub-folders.
These commands add a line to the list of Exclusions/Inclusions in "Jobs" >> "Options" >> "Filters."
Preset Exclude Filters
- There is a list of preset Exclude Filter Options with corresponding checkboxes allowing to turn them on or off:
- Exclude empty folders (unchecked by default): If checked, exclude folders that are empty or contain only empty folders. Folders are considered empty if they contain no files or only files excluded by the Filters.
- Exclude Hidden files and folders (checked by default): Exclude files and folders having the "Hidden" attribute.
- Exclude System files and folders (checked by default): Exclude files and folders having the "System" attribute.
- Exclude Temporary files and folders (checked by default, Windows only): Exclude temporary files and folders that are not worth saving.
Copying and pasting Filters
Use the "Copy All" and "Paste" buttons to copy and paste Filters between the Include and Exclude sections and between Jobs.
Filter syntax and parameters
Wildcards
* matches any sequence of characters.
? matches an arbitrary single character.
[a-z] matches a range of characters, such as a to z.
\c matches the character "c." Use it when the character to match is * or ? or [.
/ separates folders (do not use \ as folder separator, not even in Windows).
path /folder/file
A line that starts with "path /" (or just "/") matches the file or folder path (relative to the sync folder) to a specified wildcard or string.
Examples:
path /folder1/file2.ext - matches file by its path.
path /Parent* - matches all paths whose top-level folder is "Parent."
path /[a-z0-9]* - matches all paths whose top-level folders start with characters "a" to "z" or "0" to "9".
path /\[Originals\] - matches all paths whose top-level folder is "[Originals]."
NOTE: An Include Filter "path /folder" includes only the /folder itself, but not the files inside. To include files inside this folder, write this clause as "path /folder/*".
name filename/foldername
A line that starts with "name" matches the file or folder name (last object of the path) to a specified wildcard or string.
Examples:
name *.xls - Excel files.
name *kiss* - files or folders that contain "kiss" in their name.
name *.??? - all files and folders with a 3-character extension.
name *.[a-z][a-z][a-z] - all files and folders with 3-letter extension.
name \[Originals\] - matches all files and folders named "[Originals]."
*** Lines that start with "any size" or "all size" allow exclusion/inclusion of files by file size:
any size<N
means size.left<N OR size.right<N
all size<N
means size.left<N AND size.right<N
any size>N
means size.left>N OR size.right>N
all size>N
means size.left>N AND size.right>N
any size=N
means size.left=N OR size.right=N
all size=N
means size.left=N AND size.right=N
any size!=N
means size.left!=N OR size.right!=N
all size!=N
means size.left!=N AND size.right!=N
any size>=N
means size.left>=N OR size.right>=N
all size>=N< br>means size.left>=N AND size.right>=N
any size<=N
means size.left<=N OR size.right<=N
all size<=N
means size.left<=N AND size.right<=N
any size[S1,S2]
means S1 <= size.left < S2 OR S1 <= size.right < S2
all size[S1,S2]
means S1 <= size.left < S2 AND S1 <= size.right < S2
Size constant can be a number of bytes, or include suffixes:
K = kilobytes
M = megabytes
No spaces are allowed in the "size" match line.
The size of non-file items (folder, link, deleted or not-present file) is considered to be 0 for "size" comparisons.
Examples:
all size>=100 - files on both sides that contain 100 bytes or more.
any size<2K - files that contain less than 2,048 (1K = 1024) bytes on either the left or right side, links, and deleted files are OK too.
all size=3M - files that contain exactly 3,145,728 bytes (1M = 1024 * 1024) bytes on both sides.
*** Lines that start with "any time" or "all time" allow exclusion/inclusion of files by modification date:
any time<T
means time.left<T OR time.right<T
all time<T
means time.left<T AND time.right<T
any time>T
means time.left>T OR time.right>T
all time>T
means time.left>T AND time.right>T
any time=T
means time.left=T OR time.right=T
all time=T
means time.left=T AND time.right=T
any time!=T
means time.left!=T OR time.right!=T
all time!=T
means time.left!=T AND time.right!=T
any time>=T
means time.left>=T OR time.right>=T
all time>=T
means time.left>=T AND time.right>=T
any time<=T
means time.left<=T OR time.right<=T
all time<=T
means time.left<=T AND time.right<=T
any time[S1,S2]
means S1 <= time.left <= S2 OR S1 <= time.right <= S2
all time[S1,S2]
means S1 <= time.left <= S2 AND S1 <= time.right <= S2
Where T is a date in one of these formats:
YYYY/MM/DD - year/month/day
-Nd - N days ago
+Nd - N days in the future
-Nh - N hours ago
+Nh - N hours in the future
-Nm - N minutes ago
+Nm - N minutes in the future
No spaces are allowed in the "time" match line.
Only existing (not deleted) files are meant to take part in "time" comparisons.
The modification time of non-file objects (folders, links, deleted files) is NullTime (Jan 1, 1970).
Examples:
any time>=2008/7/4 - files modified at 00:00 on July 4, 2008, or later on either side.
all time<-5d - files older than 5 days ago on both sides.
time>=+7d - files modified 7 days in the future or later on either side
*** Lines that start with "is" match file and folder attributes:
isfolder
matches a folder
isfile
matches a file
issymlink
matches symbolic link or junction
ishidden
matches files and folders with a hidden attribute
issystem
matches files and folders with a system attribute (Windows only)
isarchive
matches files and folders with an archive attribute (Windows only)
isreadonly
matches files and folders with a read-only attribute (Windows only)
isoffline
matches files and folders with an offline attribute (Windows only)
iscompressed
matches files and folders with a compressed attribute (Windows only)
isencrypted
matches files and folders with an encrypted attribute (Windows only, EFS encryption)
*** Lines that start with "exist" match facts of the presence and absence of files and folders.
existboth
file or folder exists both on the Left and Right side
existany
file or folder exists on the Left, Right side, or both sides
existone
file or folder exists only on one side
Any and All qualifiers
When file modification times differ between Left and Right, "any" or "all" qualifiers must be used to achieve the desired result.
Example: Exclude Filter "time<-30d" is true for all files where "left time < tNow - 30d OR right time < tNow - 30d."
So, if the goal is to Exclude all files older than 30 days on both sides, utilize an Exclude line such as "all time<-30d," which is equivalent to "left time < tNow - 30d AND right time < tNow - 30d".
Filter composition
There is an implicit OR between the lines of the Filters.
Each line can contain more than one clause separated by a semicolon ";". There is an implicit AND between clauses in the line.
Example:
ishidden; name *.bak; all time <-60d
all size<1k
matches hidden files with a .BAK extension older than 60 days on both sides or files whose size is less than 1024 bytes on both sides.
If both Exclude and Include Filters are specified, then the Include Filter is used first, then the Exclude Filter is applied to the Include results.
More specifically, an Exclude Filter of
ExcludeLine1
ExcludeLine2
ExcludeLine3
and an Include Filter of
IncludeLine1
IncludeLine2
IncludeLine3
computes as
(IncludeLine1 OR IncludeLine2 OR IncludeLine3) AND
NOT (ExcludeLine1 OR ExcludeLine2 OR ExcludeLine3)
Absolute Paths Only match
If all lines in the Include Filter are absolute path matches ("/folder" or "path /folder"), then Absolute Paths Only match is applied, so only paths that match Filter lines are included.
If any Include line contains a non-path match ("name pattern," "time -Nd," "size N," etc.), then all folders are included in the match so that files inside these folders can be matched against non-path Filters.
Commands and Keyboard Shortcuts
This chapter describes GoodSync commands that may be triggered by clicking buttons and selecting menu items.
Job commands
"Analyze" button or "Job" >> "Analyze" Alt+A, F5 ⌘+A
Analyze this Job. Show proposed changes.
Files are considered the same if their size and modification time are the same.
"Sync" button or "Job" >> "Synchronize" Alt+S, F7 ⌘S
Synchronize this Job.
Execute (commit) changes that Analyze has proposed.
"Job" >> "Analyze and Sync" Alt+Y, F9 ⌘Y
Analyze and then Sync this Job.
"Stop" button or "Job" >> "Stop" Alt+T, ESC ⎋
Stop Analysis or Synchronization of this Job.
Sync can be continued after Stop, Analyze will run anew after Stop.
"Clear Tree" button or "Job" >> "Clear" ESC ⎋
In an already stopped Job, this command clears the Sync Tree, thus saving memory.
"Pause" / "Resume" button or "Job" >> "Pause" / "Resume" Alt+Z ⌥Z
Pause / Resume Analysis or Synchronization in this Job.
"Job" >> "Options" Alt+O ⌘O
Show Options dialog for this Job.
"Job" >> "Logs On Left Side" Alt+L
Open the log file browser for the Left folder for this Job.
Logs record all actions done by all GoodSync Jobs to this folder and its sub-folders.
"Job" >> "Logs on Right Side" Alt+R
Open the log file browser for the Right folder for this Job.
Logs record all actions done by all GoodSync Jobs to this folder and its sub-folders.
"Job" >> "Groups"
Add (or Remove) this Job to/from one of the groups listed in the sub-menu.
"Job" >> (Select Listed Group)
If the Group is unchecked in the menu, add the current Job to the selected Group.
If the Group is checked in the menu, remove the current Job from the selected Group.
"Job" >> "New" Alt+N ⌘N
Create a New Job.
The first Job, named "Job1," is created automatically when GoodSync is run for the first time.
"Job" >> "Delete" Alt+D, DEL ⌘D
Delete current Job.
"Job" >> "Rename" F2 ⌘↩
Rename current Job.
"Job" >> "Clone" Alt+C ⌥C
Clone current Job.
That is, create a new Job with a different name that is a copy of this Job.
"Job" >> "Advanced" >> "Swap Job Sides" Alt+W ⌃W
Swap the Left and Right folders in this Job.
"Job" >> "Save as Template"
Save this Job as a template. Templates may be used when creating a New Job.
"Job" >> "Advanced" >> "Analyze: Compare CheckSums" Alt+M
Analyze: Compare CheckSums.
Files are considered the same if their MD5 checksums are the same.
File Systems on the Left and Right must support MD5 computation for this to work.
"Job" >> "Advanced" >> "Analyze: Compare Bodies" Alt+B ⌘B
Analyze: Compare Bodies.
Files are considered to be the same if their bodies are the same.
Files from remote File Systems will be downloaded, so this will run slowly.
"Job" >> "Advanced" >> "List of Changes" Alt+I (Windows only)
Show a printable list of changes.
Works after Analyze, when changes become available.
"Job" >> "Advanced" >> "Delete State Files"
Delete the GoodSync state files on both sides of this Job.
Causes GoodSync to forget state and history info that GoodSync collected on files in the sync folders, such as which files were deleted and when.
"Job" >> "Advanced" >> "Delete Recycled & History Folders"
Delete the recycled files located in the folder _gsdata_\_saved_ and history files located in the folder _gsdata_\_history_.
"Job" >> "Advanced" >> "Delete _gsdata_ Folders"
Delete the GoodSync _gsdata_ folder and all files contained in it on both sides of this Job.
Removes everything removed by "Delete Recycled & History Folders" and "Delete State Files," plus all Job log files.
"Job" >> "Advanced" >> "Cleanup Recycled & History Folders"
Clean up the Recycle Bin or history: delete files older than the prescribed time (one month by default).
The time to keep the Recycle Bin files is specified in "Job" >> "Options" >> "General" >> "Clean _saved_/_history_ folder after this many days."
"Job" >> "Advanced" >> "Left trash bin" (Mac only)
Open the Recycle Bin folder location for the Left side of this Job in Finder.
"Job" >> "Advanced" >> "Right trash bin" (Mac only)
Open the Recycle Bin folder location for the Right side of this Job in Finder.
"Job" >> "Advanced" >> "Make gsdata invisible" (Mac only)
Make the _gsdata_ folder invisible in Finder on both sides of this Job.
"Job" >> "Exit" Alt+X, Alt+F4 (Windows only)
Exit GoodSync.
All commands
These commands control All Jobs.
"All" >> "Analyze All" F6
Analyze all Jobs.
"All" >> "Synchronize All" F8
Synchronize all analyzed Jobs.
"All" >> "Analyze and Sync All" F10
For all Jobs: Analyze and then Sync each Job.
"All" >> "Stop All"
Stop analysis or synchronization for all running Jobs.
"All" >> "Auto Run ON/OFF" F4
If checked, temporarily disable the starting of Jobs by Auto Options.
Jobs that have been started already, will continue to run.
If unchecked, then AutoRun is enabled.
View commands
"View" >> "Full Mode"
View the full GoodSync User Interface. Default view.
"View" >> "Mini Mode" (Windows only)
View GoodSync in Mini Mode.
A small window is shown that displays the status of active Jobs.
"View" >> "Tray Icon"
GoodSync is represented only by the System Tray (Menu Bar on Mac) icon.
This mode is used for background operations.
"View" >> "Job Groups" / "Job Table" ⌘1 / ⌘2 (Mac only)
Switch between the Job Tree and Job List panes.
"View" >> "Filters" (Windows only)
Show/Hide the Filters pane. Not shown by default.
It shows all Exclude and Include Filters for this Job.
"View" >> "Log"
Show/Hide the Log pane. Shown by default.
It shows an automatically scrolled log for this Job.
Sync Tree Projection View commands
These commands are enabled following the Job Analyze step.
These are also available by clicking the "Views" button ("Others" button on Mac) in the Analyze results.
"All" button or "View" >> "All"
Shows All live files and folders, that is, items not deleted on both sides.
"Changes" button or "View" >> "Changes" Alt+G
Show Changes, that is, only files and folders that are different and to which the Copy File command will be applied.
"Conflicts" button or "View" >> "Conflicts" Alt+F
Show Conflicts, that is, files that were changed on both sides of the Job.
"Errors" button or "View" >> "Errors" Alt+E
Shows Errors that occurred during Analyze or Sync.
Errors are not Conflicts, they originate from the File System. Example: file is locked, and GoodSync cannot drill into a folder.
"View" >> "Included" (Windows)
"View" >> "Views" >> "Included" (Mac)
Show files and folders included in Analyze.
That is, not excluded by the Exclude/Include Filters.
"View" >> "Excluded" (Windows)
"View" >> "Views" >> "Excluded" (Mac)
Show files and folders excluded by the Exclude/Include Filters.
"View" >> "Create" (Windows)
"View" >> "Views" >> "Create" (Mac)
Show files and folders that will be created.
That is, files and folders that exist on one side and do not exist on the other side and copy action will copy them to this other side.
"View" >> "Overwrite" (Windows)
"View" >> "Views" >> "Overwrite" (Mac)
Show files that will be overwritten.
That is, files that exist on both sides and copy action will copy files from one side to another.
"View" >> "Delete" (Windows)
"View" >> "Views" >> "Delete" (Mac)
Show files and folders that will be deleted.
That is, files and folders that exist on one side and do not exist on the other side, and Copy Action will delete them on the other side.
"View" >> "Copy Left to Right" (Windows)
"View" >> "Views" >> "Copy Left to Right" (Mac)
Show files that will be copied from Left to Right by the Copy File action.
"View" >> "Copy Right to Left" (Windows)
"View" >> "Views" >> "Copy Right to Left" (Mac)
Show files that will be copied from Right to Left by the Copy File action.
"View" >> "Delete on Right" (Windows)
"View" >> "Views" >> "Delete on Right" (Mac)
Show files and folders that will be deleted on the Right side.
"View" >> "Delete on Left" (Windows)
"View" >> "Views" >> "Delete on Left" (Mac)
Show files and folders that will be deleted on the Left side.
"View" >> "Rename/Move on Right" (Windows)
"View" >> "Views" >> "Rename/Move on Right" (Mac)
Show files and folders that will be renamed/moved on the Right side.
"View" >> "Rename/Move on Left" (Windows)
"View" >> "Views" >> "Rename/Move on Left" (Mac)
Show files and folders that will be renamed/moved on the Left side.
"View" >> "Copy Time L to R" (Windows)
"View" >> "Views" >> "Copy Time L to R" (Mac)
Show files whose modification time will be copied from Left to Right by the Copy Time action.
"View" >> "Copy Time R to L" (Windows)
"View" >> "Views" >> "Copy Time R to L" (Mac)
Show files whose modification time will be copied from Right to Left by the Copy Time action.
"View" >> "Name Case L to R" (Windows)
"View" >> "Views" >> "Name Case L to R" (Mac)
Show files whose name case will be copied from Left to Right by the Copy Name Case action.
"View" >> "Name Case R to L" (Windows)
"View" >> "Views" >> "Name Case R to L" (Mac)
Show files whose name case will be copied from Right to Left by the Copy Name Case action.
"View" >> "Sync State" (Windows)
"View" >> "Views" >> "Sync State" (Mac)
Show files whose states will be synced without copying the files themselves.
"View" >> "SameLength DiffTime" (Windows)
"View" >> "Views" >> "SameLength DiffTime" (Mac)
Show files that exist on both sides and have the same length but different modification times.
These are candidates for the Copy Time action if it is believed that the files are actually the same.
"View" >> "Countable Changes" (Windows)
"View" >> "Views" >> "Countable Changes" (Mac)
Show all changes counted only once.
This will not show file renames caused by parent folder renames.
"View" >> "File To Sync" (Windows)
"View" >> "Views" >> "File To Sync" (Mac)
Show only files whose bodies will be synced.
"View" >> "All To Sync" (Windows)
"View" >> "Views" >> "All To Sync" (Mac)
Show files whose bodies and states will be synced.
"View" >> "All Live + Dead" (Windows)
"View" >> "Views" >> "All Live + Dead" (Mac)
Show both existing files and files that were previously deleted.
Sync Tree Node Expand commands
These commands are enabled once the Job is Analyzed and a node (file or folder) in the Sync Tree is clicked.
These commands are available through keyboard shortcuts and are standard for Windows trees.
"Gray +" means the "+" key on the numeric keypad.
Gray +
Open one level of the tree. The focus must be on the node to open.
Gray -
Close one level of the tree. The focus must be on the node to close.
Gray *
Open all levels of the tree starting from here. The focus must be on the node to open.
Sync Tree Node Action commands
These commands are enabled once the Job is Analyzed and a node (file or folder) in the Sync Tree is clicked.
All Action commands are also available from the node context menu.
"Action" >> "Open Left Files / Folders"
Open the file/folder on the Left using Windows Explorer (Finder on Mac).
GoodSync Explorer will be used to open remote folders.
"Action" >> "Open Right Files / Folders"
Open the file/folder on the Right using Windows Explorer (Finder on Mac).
GoodSync Explorer will be used to open remote folders.
"Action" >> "Delete Left File / Folder"
Delete the file/folder on the Left side.
"Action" >> "Delete Right File / Folder"
Delete the file/folder on the Right side.
"Action" >> "Delete Both Files / Folders"
Delete the file/folder on the Left and Right sides.
"Action" >> "Compare Files"
Compare the file on the Left to the file on the Right using compare diff-like program
defined in the "Tools" >> "Program Options" >> "File Compare" program.
It also works for local folders and will run "diff -r"' on the Left and Right folders.
Sync Tree Node Filter commands
These commands are enabled once the Job is Analyzed and a node (file or folder) in the Sync Tree is clicked.
All Action commands are also available from the node context menu and by clicking the "File/Folder Ops" button ("Filters" button on Mac) in the Analyze results.
"Action" >> "Exclude '/...' File / Folder"
Exclude this file or folder from the Analyze results.
File or folder will be excluded by its exact path.
"Action" >> "Exclude All '...' Files / Folders"
Exclude all files or folders that have the same name as this file (folder), no matter what folders inside sync folders these files are located.
"Action" >> "Exclude All '*.ext' Files"
Exclude all files that have the extension .ext, in all folders inside the sync folder.
"Action" >> "Include Only '/...' File / Folder"
Include this file or folder in the Analyze results. File or folder will be included by its exact path.
If one or more Include Filters are defined, then only files and folders Included in this way will be Analyzed, everything else will be excluded.
"Action" >> "Include Only '*.ext' Files"
Include only files having the extension .ext, in all folders inside the sync folder.
Sync Tree Node Direction Change commands
These commands are enabled once the Job is Analyzed and a node (file or folder) in the Sync Tree is clicked.
All Action commands are also available from the node context menu and by clicking "File/Folder Ops" >> "Change Direction to" ("Directions" button on Mac) in the Analyze results.
"Action" >> "Change Direction to" >> "As Recommended" (Windows)
"Action" >> "As Recommended" (Mac)
Set Action to what was recommended by Analyze.
Enabled only after the actions proposed by Analyze are altered.
"Action" >> "Change Direction to" >> "Copy Left to Right" (Windows)
"Action" >> "Copy Left to Right" (Mac)
Set the Action to Copy File Left to Right.
"Action" >> "Change Direction to" >> "Copy Right to Left" (Windows)
"Action" >> "Copy Right to Left" (Mac)
Set the Action to Copy File Right to Left.
"Action" >> "Change Direction to" >> "Do Not Copy" (Windows)
"Action" >> "Do Not Copy" (Mac)
Set the Action to Do Not Copy.
"Action" >> "Change Direction to" >> "Copy Time L to R" (Windows)
"Action" >> "Copy Time L to R" (Mac)
Set the Action to Copy Time Left to Right.
"Action" >> "Change Direction to" >> "Copy Time R to L" (Windows)
"Action" >> "Copy Time R to L" (Mac)
Set the Action to Copy Time Right to Left.
"Action" >> "Change Direction to" >> "Name Case L to R" (Windows only)
Set the Action to Name Case Left to Right.
"Action" >> "Change Direction to" >> "Name Case R to L" (Windows only)
Set the Action to Name Case Right to Left.
"Action" >> "Change Direction to" >> "Copy State L to R" (Windows only)
Set the Action to Copy State Left to Right.
"Action" >> "Change Direction to" >> "Copy State R to L" (Windows only)
Set the Action to Copy State Right to Left.
"Action" >> "Properties"
Show detailed information about the selected file or folder.
It helps understand how GoodSync made a sync decision for this file.
Tools commands (Windows only)
"Tools" >> "Program Options" Alt+P
Show the Program Options dialog.
"Tools" >> "GoodSync Account Setup"
Run the GoodSync Account Setup dialog.
It is used to enroll the computer to the GoodSync Account and set up GoodSync as a client or a server to use in P2P sync via GoodSync Connect.
"Tools" >> "GoodSync Account Manage"
Open the GoodSync Account Web UI in the default web browser.
That automatically logs the user into their Account to manage Devices, Licenses, GoodSync Storage, Account settings, and more.
"Tools" >> "Runner Service Setup"
Run the Runner Service Setup dialog.
GoodSync Runner is a Windows/Mac Service that runs Jobs that have Auto Unattended mode enabled in the Job Options.
"Tools" >> "Advanced" >> "Server Advanced Options"
Open the local GoodSync Server Web UI in the default web browser.
Learn more from the GoodSync Connect Manual.
"Tools" >> "Account Sync Auto"
Automatically sync the Jobs, Groups, Options, and Server Accounts with the GoodSync Account and other devices enrolled in it.
Learn more from the Server Accounts and Account Sync chapter.
"Tools" >> "Account Sync Once"
Sync the Jobs, Groups, Options, and Server Accounts with the GoodSync Account and other devices enrolled in it once.
Learn more from the Server Accounts and Account Sync chapter.
"Tools" >> "Export All Jobs"
Export all Jobs, Groups, and Server Accounts to a *.TIX file selected by the user.
"Tools" >> "Export Selected Jobs"
Export selected Jobs to a *.TIX file.
If only one Job is selected (current Job), then export this Job.
If a Group is selected, export all Jobs in this Group.
Also, all Server Accounts are written to the exporting *.TIX files, as they may be referred to by the exported Jobs.
A TIX file comes in a text-based format, which is used for export and import, and also can be edited.
"Tools" >> "Import Job List"
Import Jobs from a *.TIX file that was previously written by the Export command.
Imported Jobs are added to the existing Jobs.
If an imported Job has the same name as an existing Job, the import of this Job fails.
"Tools" >> "Import from Allway Sync"
Import Jobs from an Allway Sync profile. This command is intended for users migrating from Allway Sync.
GoodSync will also prompt to import Allway Sync Jobs upon installation and the first run if Allway Sync is detected in the system.
GoodSync commands (Mac only)
The "GoodSync" command menu appears on the Menu Bar in GoodSync for Mac. It is similar to the "Tools" command menu in GoodSync for Windows.
"GoodSync" >> "About"
Show the About dialog with credits and version info.
"GoodSync" >> "Preferences" ⌘,
Show the Program Options dialog.
"GoodSync" >> "GoodSync Account Setup"
Run the GoodSync Account Setup dialog.
It is used to enroll the computer to the GoodSync Account and set up GoodSync as a client or server for use in P2P sync via GoodSync Connect.
"GoodSync" >> "GoodSync Account Manage"
Open the GoodSync Account Web UI in the default web browser.
That automatically logs users into their Accounts to manage Devices, Licenses, GoodSync Storage, Account settings, and more.
"GoodSync" >> "Server Advanced Options"
Open the local GoodSync Server Web UI in the default web browser.
Learn more from the GoodSync Connect Manual.
"GoodSync" >> "Account Sync Once"
Sync the Jobs, Groups, Options, and Server Accounts with the GoodSync Account and other devices enrolled in it once.
Learn more from the Server Accounts and Account Sync chapter.
"GoodSync" >> "Account Sync Auto"
Automatically sync the Jobs, Groups, Options, and Server Accounts with the GoodSync Account and other devices enrolled in it.
Learn more from the Server Accounts and Account Sync chapter.
"GoodSync" >> "Grant Full Disk Access to GoodSync"
Run the Grant Full Disk Access dialog.
To back up Application Data (Mail, Calendars, etc.) and system-protected folders on Mac, grant GoodSync access to that data.
"GoodSync" >> "Runner Service Setup"
Run the Runner Service Setup dialog.
GoodSync Runner is a Windows/Mac Service that runs Jobs that have Auto Unattended mode enabled in the Job Options.
"GoodSync" >> "Export All Jobs"
Export all Jobs, Groups, and Server Accounts to a *.TIX file selected by the user.
"GoodSync" >> "Import Job List"
Import Jobs from a *.TIX file that was previously written by the Export command.
Imported Jobs are added to the existing Jobs.
If an imported Job has the same name as an existing Job, the import of this Job fails.
"GoodSync" >> "Check for Updates"
Check for the new GoodSync version.
GoodSync also automatically checks for its new version upon start.
"GoodSync" >> "Quit" ⌘Q
Exit GoodSync.
Help commands
"Help" >> "Manual"
Show this Manual online.
"Help" >> "FAQ"
Show Frequently Asked Questions online.
"Help" >> "Buy License" / "Renew License"
Buy/renew a GoodSync License.
"Help" >> "Activate License"
Activate the GoodSync License on this computer after a purchase.
Requires the Order ID and name as it appears in the Order.
"Help" >> "Contact Support"
Create a ZIP file that contains Job logs and other diagnostic information.
Upload this file to the GoodSync Support server and create a support ticket.
"Help" >> "Check for Updates" (Windows only)
Check for the new GoodSync version.
GoodSync also automatically checks for its new version upon start.
"Help" >> About" (Windows only)
Show the About dialog with credits and version info.
File Systems: Local and Remote
GoodSync can synchronize not only disk and network shares mounted on the computer. It can also synchronize with Remote File Systems accessible through multiple online protocols such as FTP, SFTP, Amazon S3, Google Drive, etc.
- The following are general steps to set up synchronization or backup from any of the file systems supported by GoodSync:
- Сlick the "Please click here to select folders/Change Folder" (Browse) button on the Left or Right side of the Job to select or change the sync folder. The Browse dialog appears, both for the Left and Right sides simultaneously.
- Click the (+) user icon right to the File System type to create a new Server Account (Address + Credentials + Options of the remote File System).
-
In the dialog that appears, enter the remote server name or address.
NOTE: Some File Systems, such as Google Drive or Dropbox, have only one virtual top server, so it cannot be entered. - Next, enter UserID, Password, and possibly other data required for connection.
-
Then click the "Test" button to connect to the server and test whether the provided credentials are correct.
If the connection is successful, the home folder of the specified user or the storage root in the Remote File System is shown, and all folders above it. - Navigate to the desired folder for synchronization in the folder tree. If the folder intended for synchronization doesn't exist, create it by finding its parent folder, right-clicking, and selecting "New Folder."
NOTE: Multiple Server Accounts can be present within a single File System, enabling the browsing and synchronization of various remote accounts.
Below, we provide a detailed description of the Local and Remote File Systems that GoodSync supports.
Windows File System (Windows only)
Windows disks mounted directly on this computer, listed under "My Computer -> Local."
Official URL: file:///disk:/folder1/file2.ext, example: file:///C:/folder1/folder2
Display URL or Windows folder path: X:\folder1\files2.ext, example: C:\folder1\folder2
Plus two other naming conventions for Portable and Computer-specific paths, see below.
User folder
The User folder can be specified as part of the folder path, as follows:
~UserName\folder1
Here, "UserName" is the name of the Windows user, it is translated to the full path of this user profile.
Example: on Windows 7/10/11, "~John Smith" is translated to "C:\Users\John Smith."
Hidden and System folders are not displayed when browsing the "~John Smith" folder, but they become visible when drilling down from the root folder to "C:\Users\John Smith."
Portable path
The disk can be specified by its volume name, like so:
=VolumeName:\folder1\folder2
Here, "VolumeName" is the volume name that can be set in volume properties in Windows Explorer.
Use it to designate removable volumes that can be mounted to different disk letters.
Computer-specific path
One can specify the path that works only on a designated computer, like so:
\\=ComputerName\x:\folder1\folder2
This path will only be found on a computer named "ComputerName."
Utilize computer-specific paths in GoodSync2Go when employing identical Jobs across different computers, and there is a need for certain Jobs to execute exclusively on specific computers rather than on all of them.
Music and media players
Syncing with music and media players and other media devices, which present themselves as Portable Disks through a USB Mass Storage Devices interface, is also possible. These devices will appear in the "My Computer" tab.
Mac File System (Mac only)
Mac disks that are available directly on this computer, listed under "My Mac -> Local."
Official URL: file:///folder1/file2.ext, example: file:///Users/user/my-notes.txt
Display URL or Mac folder path: /folder1/files2.ext, example: /Users/user/my-notes.txt
GoodSync Connect (GSTP protocol)
Remote GoodSync server, accessed via GoodSync Connect or directly, using GSTP protocol.
Credentials: GoodSync Account UserID and Password are always required.
Main GoodSync Account credentials are pre-filled as GoodSync knows them already.
Other non-main GoodSync Accounts may be added.
- Two addressing schemes of GSTP:
- Mediator Addressing: GoodSync servers have dynamic IP addresses tracked by GoodSync Mediator.
URL format: gstps://server.userid.goodsync/folder1/folder2
A secure communication (SSL) prefix gstps:// is mandatory.
Presence of a virtual top-level domain .goodsync tells GoodSync to look up computer IP address via Mediator.Each GoodSync Server checks in to Mediator every 5 minutes to tell it what IP address it has now.
If there is no direct connection from the GoodSync Client to the GoodSync Server, then an intermediate Forwarder server is used. - Direct Addressing: IP name or IP address of the server is specified, resolved using traditional DNS.
URL format: gstps://server.company.goodsync[:port]/folder1/folder2
A plain-text prefix gstp:// may be used but not recommended.
Examples: gstp://server.domain.com or gstps://192.168.1.12
Learn more about GoodSync Connect from the GoodSync Connect Manual.
In Direct Addressing Mediator and Forwarders are not used, connecting Client to Server is your responsibility.
Direct Server Address
Specify GSTP Server IP name or address here, when in Direct Addressing mode.
In Direct Addressing one GSTP Server Account refers only to one GSTP server.
Use plain-text protocol on direct connections
You may use non-encrypted plain text version of GSTP protocol on Local Network.
Allowed only in Direct Addressing, not recommended due to low security.
Certificate File
The path to a file containing a TLS certificate private key pair in PEM format.
Use only in Direct Addressing.
Connect via Proxy set in Program Options -> Proxy
If checked, then connect via Global Proxy specified in Program Options -> Proxy.
If unchecked, then connect directly even if Global Proxy is specified in Program Options -> Proxy.
Enryption
TLS 1.3 or 1.2 is used to encrypt GSTP traffic that is going via TCP/IP sockets.
TlS 1.1 or SSL (older protocols)) are NOT allowed.
These ciphers are allowed: ECDHE-RSA-AES256-GCM-SHA384:ECDHE-ECDSA-AES256-GCM-SHA384:ECDHE-RSA-AES128-GCM-SHA256:ECDHE-RSA-AES256-SHA384
GoodSync RealDisk Online Storage
GoodSync RealDisk (TM) Online Storage server, accessed via GoodSync Connect protocol.
URL format: gstore://storage-N.userid.goodsync/folder1/folder2
This File System has several Virtual Servers, each translated into a real Storage server via Mediator.
Credentials: GoodSync Account UserID and Password are required.
Main GoodSync Account credentials are pre-filled as GoodSync knows them already.
Other non-main GoodSync Accounts may be added.
GoodSync Storage is requested and maintained in the GoodSync Account.
Net Shares Sib-SMB (Windows, Mac, Linux)
Windows Net Shares (remote Shares on an SMB server)
connected via Siber Systems own implementation of SMB client.
Official URL: smbd://server/share/folder1, for example: smbd://server/share/folder1
Display URL: same as official.
Sib-SMB utilizes a more effective combination of discovery protocols (comparing to Windows SMB), resulting in the detection of more SMB servers than what is displayed on the Windows Network folder.
Click (Windows Shares and Other Devices) to see list of SMB servers discovered on your Local Network.
If the desired server does not appear in the list, click "Add Unlisted Server" and enter its name or IP address.
Credentials: If a server or a share needs credentials to login, they will be requested in a popup dialog.
Enter UserID and Password of the SMB server if credentials are requested.
Going deeper into the Share, separate credentials for Share credentials may be requested.
Windows SMB saved auth: Sib-SMB client disregards auth data saved (often incorrectly) by Windows.
So each SMB server in Sib-SMB must have its credentials entered explicitly.
That results in a predictable and portable SMB client that works in the same way on all computers.
Net Shares Win-SMB (Windows only)
Windows Net Shares (remote Shares on an SMB server) that are available through Microsoft Networking.
Official URL: smb://server/share/folder1, for example: smb://server/share/folder1
Display URL: Windows UNC path \\server\share\folder1, for example: \\server\share\folder1
Click Local Network to see list of SMB servers discovered by Windows Network discovery.
If the desired server does not appear in the list, click "Add Unlisted Server" and enter its name or IP address.
Credentials: Enter UserID and Password if requested by a popup dialog.
Share Auth Problems:
After logging in to a share, Windows caches authentication data.
Therefore, if different shares on the same SMB server have different credentials, or if Share credentials have changed,
Windows client may continue using originally entered credentials and they may be hard to change.
Virtual Servers:
Windows SMB may show Virtual Servers that are not related to SMB protocol.
For instance, when RDC client connects to RDC server, RDC client may also export its Disk to Server
and these disks will appear as Shares in \\TSCLIENT virtual server.
Apple Filing Protocol (AFP)
Apple remote disks that are available via AFP protocol.
Official URL: afp://server/share/folder1
Display URL: same as official
A list of available network shares is displayed, and from there, it's possible to navigate to the sync folder.
If the desired server does not appear in the list, click "Add Unlisted Server" and enter its name or IP address.
Credentials: Enter UserID and Password if the share is password-protected.
Media Devices (MTP) (Windows only)
MTP (Media Transfer Protocol) devices that are usually connected via USB.
URL format: mtp://Apple_iPhone/Device/Internal Storage
The device should be physically connected to the computer.
Usually, it is a camera or a phone plugged into the USB port.
Google Drive
Google Drive server.
Consumer, V3 API.
URL format: gdrive://www.googleapis.com/my-folder
Credentials - OAuth2
Google Drive uses secure delegated access (OAuth2) authentication.
To enter credentials in the Server Account settings (Browse dialog), click "Sign In to Google."
Google will then ask in the default web browser whether to allow GoodSync to access it.
Approve it, and then GoodSync will be able to Sync with Google Drive.
Private Browser Mode: By default GoodSync calls regular default browser for OAuth2. So if you are logged in to a Google Account in this default browser, this is the Account that will be used in OAuth2. To not use logged in accounts and force a new login, use Private Browser Mode.
Google Files only
This File System shows only actual Google Drive files and not Google Docs.
For Google Docs, it shows a .url file that leads to the doc, as recommended by Google.
Google Team Drive
Google Team Drive server.
Corporate, V3 API.
URL format: gteamdrive://www.googleapis.com/my-folder
Credentials - OAuth2
Google Team Drive uses secure delegated access (OAuth2) authentication.
To enter credentials in the Server Account settings (Browse dialog), click "Sign In with Google."
Google will then ask in the default web browser whether to allow GoodSync to access it.
Approve it, and then GoodSync will be able to Sync with Google Team Drive.
Google Team Files only
This File System shows actual files from Google Team Drive and not Google Docs.
Google Docs
Google Docs server. V3 API
URL format: gdocs3://www.googleapis.com/my-folder
Credentials - OAuth2
Google Docs uses secure delegated access (OAuth2) authentication.
To enter credentials in the Server Account settings (Browse dialog), click "Sign In with Google."
Google will then ask in the default web browser whether to allow GoodSync to access it.
Approve it, and then GoodSync will be able to Sync with Google Docs.
Google Docs only
This File System shows Google Docs only, not Google Drive files.
Docs are Not Files: Google Doc is a document that exists only on Google servers (Word and Excel docs).
Google Docs cannot be Uploaded and Downloaded as an exact byte copy.
They only can be Exported and Imported to MS file formats, each time producing a slightly different result.
Google Docs File System implements Upload as Export, and Download as Import.
Also, file size is not known for Google Docs, so GoodSync shows it as (Unknown).
Google Photos
Google Photos server.
URL format: gphotos://photoslibrary.googleapis.com/album
Credentials - OAuth2
Google Photos uses secure delegated access (OAuth2) authentication.
To enter credentials in the Server Account settings (Browse dialog), click "Sign In with Google."
Google will then ask in the default web browser whether to allow GoodSync to access it.
Approve it, and then GoodSync will be able to Sync with Google Photos.
Picture Files Only: It is possible to sync only picture format files (JPEG) with Google Photos.
Use a one-way sync (backup) Job with Google Photos storage set as a source.
Check the "No _gsdata_ folder here" option in "Job" >> "Options" >> "Left/Right Side" for the Google Photos side,
as GoodSync state files are not allowed in Google Photos too.
Google Cloud Storage (GCS)
Google Cloud Storage server.
URL format: gcp://storage.googleapis.com/project-id/bucket-id/folder
This is an object storage File System that uses native JSON API.
Credentials - OAuth2
GCS uses secure delegated access (OAuth2) authentication.
To enter credentials in the Server Account settings (Browse dialog), click "Sign In with Google."
Google will then ask in the default web browser whether to allow GoodSync to access it.
Approve it, and then GoodSync will get access to your GCS storage.
Cloud Resource Manager must be activated, or project-id must be specified in the Initial Path.
Upload Chunks of Large File in Parallel threads
If not zero, upload chunks of large files in this many parallel threads.
If zero, upload chunks of large files sequentially.
Preferred Region
Preferred Region for new buckets.
Default is us-east-1
Google Cloud Storage via S3 (GCS S3)
Google Cloud Storage server via S3 protocol.
URL format: gcs://storage.googleapis.com/my-bucket/my-folder
This is an object storage File System similar to Amazon S3.
Uses Amazon S3-like XML API.
The HMAC Access Key and HMAC Secret are always required.
Obtained from Google Cloud Console >> "Cloud Storage" >> "Settings" >> "Inseparability."
Enter the Bucket Name and (optionally) a sync folder within it in the "Initial path" field, like so: /bucket/folder1/folder2
Bucket Name must comply with the Google Cloud Storage bucket naming rules.
Apple iCloud Drive
Apple iCloud Drive online storage.
URL format: icloud://www.icloud.com/my-folder
Credentials: The UserID and Password are always required.
These are the Apple ID Email Address and Password.
New Apple Account: If employing a new Apple ID account,
you must SignIn with the Apple ID to any Apple device, before using iCloud Drive in GoodSync.
Multi-factor authentication
After clicking Save or Test button in the Server Account,
an OTP (2FA) code will be sent to the devices authorized with the Apple ID.
Alternatively, an OTP code can be sent via SMS by clicking "Send OTP code via SMS."
Enter the code received in the "Enter your 2FA code" field, and click "OK."
China iCloud Servers
If checked, use China iCloud Servers.
If unchecked, use standard US/Euro iCloud Servers.
Apple iCloud Photos
Apple iCloud Photos online storage.
URL format: iphotos://www.icloud.com/album
Credentials: The UserID and Password are always required.
These are the Apple ID Email Address and Password.
Only JPEG: Only JPEG media format is allowed for uploading to iCloud Photos.
No _gsdata_: The "No _gsdata_ folder here" option must be checked
for the iCloud Photos side in "Job" >> "Options" >> "Left/Right Side."
Multi-factor authentication
After clicking Save or Test button in the Server Account,
an OTP (2FA) code will be sent to the devices authorized with the Apple ID.
Alternatively, an OTP code can be sent via SMS by clicking "Send OTP code via SMS."
Enter the code received in the "Enter your 2FA code" field, and click "OK."
China iCloud Servers
If checked, use China iCloud Servers.
If unchecked, use standard US/Euro iCloud Servers.
Amazon S3
Amazon S3 server (default) or non-Amazon S3 server.
URL format: s3s://s3.amazonaws.com/mybucket/my-folder
Credentials: The AWS Access Key ID and AWS Secret Access Key are always required.
Get them from Amazon S3 Console >> "Account name" >> "Security credentials" >> "Access keys."
Initial path: Enter the AWS bucket name and maybe a sync folder within it, like so: /mybucket/folder1/folder2.
The bucket name must NOT be entered in the Server Address field like so: s3s://bucket.s3.amazonaws.com/folder
The Bucket Name must comply with the S3 bucket naming rules.
S3 Storage Model in GoodSync
- S3 does not have a notion of folders and files, they have buckets, keys (file path), and values (file body).
- (empty) (default): Regular Access Tier, with fast downloads.
- archive: An offline tier optimized for storing data that is rarely accessed, and that has flexible latency requirements, on the order of hours. Data in the archive tier should be stored for a minimum of 180 days.
- cold: An online tier optimized for storing data that is infrequently accessed or modified. Data in the cold tier should be stored for a minimum of 90 days. The cold tier has lower storage costs and higher access costs compared to the cool tier.
- hot: An online tier optimized for storing data that is accessed or modified frequently. The hot tier has the highest storage costs, but the lowest access costs.
Therefore the folders and files model has to be translated to buckets, keys, and values model.
Different programs may do this translation differently. GoodSync model follows standard approach:
* A folder is a key whose name is a folder path that ends with "/" and the content is empty.
* A file is a key whose name is the path of the file and content is the content of the file.
* A bucket is a top-level folder.
Amazon S3 and non-Amazon S3 servers
By default we use Amazon S3 service, with Server Address of s3.amazonaws.com
However you can specify any non-Amazon S3 service by specifying different endpoint in Server Address.
Example: s3.wasabisys.com s3.sirv.com s3.oraclecloud.com r2.cloudflarestorage.com
Advanced Options
Host-based vs URL-based Addressing
If checked, use host-based addressing for buckets.
In Host-based addressing, bucket names must be lowercase latin letters and digits.
No uppercase or mixed-case bucket names are allowed.
If not checked, use URL-based addressing for buckets. Bucket names can be mixed-case.
Host-based is the only model available in newer regions, such as Europe or Japan.
Do NOT use URL-based addressing, except for really old legacy US buckets.
US Govt Cloud
If checked, use US Government Cloud servers, separate from other S3 endpoints.
If unchecked, use standard non-Govt S3 servers.
Storage Class
Specify Storage class for new files that GoodSync writes:
- STANDARD (default)
- STANDARD_IA
- REDUCED_REDUNDANCY
- ONEZONE_IA
- EXPRESS_ONEZONE
- GLACIER
- GLACIER_IR
- DEEP_ARCHIVE
- SNOW
- OUTPOSTS
- INTELLIGENT_TIERING
By default STANDARD storage class is used.
Deep-freeze classes DEEP_ARCHIVE, GLACIER, GLACIER_IR will have limitations on Downloading files.
Require MD5 Checksum to be present in Content-MD5 headers for uploaded files
If checked, compute the MD5 checksum and
specify it in the Content-MD5 headers in all upload operations for single-chunk files (< 10 MB).
If unchecked, do not supply checksums to S3.
Preserve File Mod Time in Cache file
If checked, then save File Mod Time of all files in the bucket
to cache file gs-metadata._gs in the top of the bucket.
If unchecked, do not cache real File Mod Time.
Background: S3 does not save file mod time when uploading file to S3.
So we save File Mod Time to property named x-amz-meta-gs-mod-t.
But listing of all files in bucket does not return properties, this is where caching file mod time comes in.
Upload/Download Chunks of Large Files in Parallel Threads
If checked, then upload large files in 8 Mb chunks, in this many Parallel threads (default of 5).
If unchecked, then upload large files in 8 Mb chunks, sequentially.
Preferred Region
Preferred S3 region where new buckets will be created.
Also used for the region of existing buckets when ?location is Forbidden.
May be set to one of these:
(empty) for us-east-1
af-south-1
ap-east-1
ap-northeast-1
ap-northeast-2
ap-northeast-3
ap-south-1
ap-south-2
ap-southeast-1
ap-southeast-2
ap-southeast-3
ca-central-1
cn-north-1
cn-northwest-1
EU
eu-central-1
eu-central-2
eu-north-1
eu-south-1
eu-south-2
eu-west-1
eu-west-2
eu-west-3
me-south-1
sa-east-1
us-east-2
us-gov-east-1
us-gov-west-1
us-west-1
us-west-2
Access Policy
Amazon S3 Access Control List (canned).
Can be one of the Canned ACLs:
private (default)
public-read
public-read-write
authenticated-read
aws-exec-read
bucket-owner-read
bucket-owner-full-control
log-delivery-write
All files are uploaded with the specified ACL.
Server Side Encryption
If checked, encrypt files on the Amazon S3 server using the S3 server-side mechanism.
The Encryption Key is optionally specified in the "Server Encryption Key" field.
If unchecked, store files unencrypted.
Server Encryption Key
Customer-specified Encryption Key for Server Side Encryption.
If empty, and Server Side Encryption is checked, then use an S3-provided Encryption Key.
Dropbox
Dropbox online storage.
URL format: dropbox://api.dropbox.com/my-folder
Credentials - OAuth2
Dropbox uses secure delegated access (OAuth2) authentication.
To enter credentials in the Server Account (Browse dialog), click "Connect to Dropbox."
Dropbox will then ask in the default web browser whether to allow GoodSync to access it.
Approve it, and then GoodSync will be able to Sync with Dropbox storage.
Advanced Options
Upload Chunks of Large File in Parallel threads
If not zero, then upload chunks of large files in this many parallel threads.
If zero, then upload chunks of large files sequentially.
Box.com
Box.com online storage.
URL format: box://api.box.com/my-folder
Credentials - OAuth2
Box.com uses secure delegated access (OAuth2) authentication.
To enter credentials in the Server Account settings (Browse dialog), click "Connect to Box.com."
Box.com will then ask in the default web browser whether to allow GoodSync to access it.
Approve it, and then GoodSync will be able to Sync with Box.com storage.
Backblaze B2
Backblaze B2 online storage.
URL format: backblaze://api.backblazeb2.com/my-folder
This is an object storage File System.
Credentials:
The B2 Account ID (Application Key ID) and B2 Application Key are always required.These are obtained from Backblaze B2 Dashboard >> "My Account" >> "Application Keys."
Upload Chunks of Large File in Parallel threads
If not zero, then upload chunks of large files in this many parallel threads.
If zero, then upload chunks of large files sequentially.
OneDrive Office365 SharePoint
OneDrive/Office365/SharePoint (Microsoft Graph) storage by Microsoft.
URL format: msgraph://graph.microsoft.com/my-folder
Credentials - OAuth2
OneDrive/Office365/SharePoint use secure delegated access (OAuth2) authentication.
To enter credentials in the Server Account settings (Browse dialog), click "Connect to OneDrive Office365 SharePoint."
A Microsoft page will then ask in the default browser whether to allow GoodSync to access it.
Approve it, and then GoodSync will be able to Sync with OneDrive/Office365/SharePoint storage.
Advanced Options
Location (Nation Cloud)
Used to specify the National Cloud location. Possible values:
(empty) (default): Use International.
US: Use Microsoft Cloud for the US Government.
DE: Use Microsoft Cloud Germany.
CN: Use Azure and Office365 operated by 21Vianet in China.
Request Group.Read.All scope, which is Admin-restricted
If checked, request the "Group.Read.All" scope for GoodSync on behalf of the signed-in user.
This will allow GoodSync to browse Groups and associated Document Libraries.
Re-authentication may be necessary to apply this option. Admin consent is mandatory.
If unchecked, do not request the Group.Read.All scope.
Microsoft Azure Blobs
Microsoft Azure Blob server.
URL format: azures://account-id.blob.core.windows.net/my-folder
This is an object storage File System similar to Amazon S3.
Credentials: The Storage Account and Primary Access Key are always required.
These are obtained from Azure Dashboard >> Storage Accounts >> Access Keys.
US Govt Cloud
If checked, use US Government Cloud servers, separate from other endpoints.
If unchecked, use standard non-Govt servers.
Upload Chunks of Large File in Parallel threads
If not zero, then upload chunks of large files in this many parallel threads.
If zero, then upload chunks of large files sequentially.
Access Tier (Storage Class)
- Use the specified Azure Storage access tier. Possible values:
Microsoft Azure Files
Microsoft Azure File server.
URL format: azurefiles://account-id.file.core.windows.net/my-folder
Credentials: The Storage Account and Primary Access Key are always required.
These are obtained from Azure Dashboard >> Storage Accounts >> Access Keys.
US Govt Cloud
If checked, use US Government Cloud servers, separate from other endpoints.
If unchecked, use standard non-Govt servers.
MEGA
MEGA online storage.
URL format: mega://g.api.mega.co.nz/my-folder
Credentials: Mega Account ID and Password are always required.
These are the credentials associated with the MEGA Account.
pCloud
pCloud online storage.
URL format: pcloud://pcloud.com/my-folder
Credentials: pCloud Account Email and Password must be specified.
Upload Chunks of Large File in Parallel threads
If not zero, then upload chunks of large files in this many parallel threads.
If zero, then upload chunks of large files sequentially.
SFTP (Secure FTP)
Remote SSH server with SFTP capability, has nothing to do with FTP.
URL format: sftp://server.domain.com[:port]/folder1/folder2
SSH-2 only: Works only with SSH-2 servers, not with SSH-1 servers, due to low security of SSH-1.
Credentials:
Authentication data is always required, and it comes in two different varieties:
* SFTP UserID + Password. UserID and Password are required to log in.
* SFTP UserID + Private key file [+ Password].
Private Key and Public Key
A private key file is a small (1-2 Kb) file that contains the "private key" part of the public-private key pair.
A public key is located on the server and only the server administrator can put it there.
The private key may additionally be protected by a pass phrase.
Enter Private Key Pass phrase into the Password / Private Key Passphrase field
or use a private key caching program such as Pageant.
We accept private key files in OpenSSH and PuTTY formats. PuTTY format looks something like this:
  PuTTY-User-Key-File-2: ssh-rsa
  Encryption: aes256-cbc
  Comment: [1024-bit rsa, First Last@computer, Wed Jun 04 2003 23:28:59] Public-Lines: 4
  encodedpublickeyencodedpublickeyencodedpublickeyencodedpublickey
  encodedpublickeyencodedpublickeyencodedpublickeyencodedpublickey
  encodedpublickeyencodedpublickeyencodedpublickeyencodedpublickey
  encodedpub==
  Private-Lines: 8 encodedprivatekeyencodedprivatekeyencodedprivatekeyencodedprivat
  encodedprivatekeyencodedprivatekeyencodedprivatekeyencodedprivat
  encodedprivatekeyencodedprivatekeyencodedprivatekeyencodedprivat
  encodedprivatekeyencodedprivatekeyencodedprivatekeyencodedprivat
  encodedprivatekeyencodedprivatekeyencodedprivatekeyencodedprivat
  encodedprivatekeyencodedprivatekeyencodedprivatekeyencodedprivat
  encodedprivatekeyencodedprivatekeyencodedprivatekeyencodedprivat encodedprivatekeyxxxxx==
  Private-MAC: abxxxxxxxxxxxxxxxxxxxxxxxxxxxxxxxxxxxb3a
Connect via Proxy set in Program Options -> Proxy
If checked, then connect via Global Proxy specified in Program Options -> Proxy.
If unchecked, then connect directly even if Global Proxy is specified in Program Options -> Proxy.
UTF-8 file names (off: ANSI encoding)
If checked, use UTF-8 to encode file and folder names on the server. Recommended and is the default.
If unchecked, use ANSI to encode file and folder names. Client and server must use the same ANSI encoding.
Do not check HostKey of Server
If unchecked (default), then HostKey of Server is stored on initial connection. If HostKey changes, error message is issued, to prevent MITM attacks.
If checked, then do not check HostKey of SFTP server. It may be needed in some cluster server situations.
List of Features
Starting with GoodSync ver 12.9.6, our SFTP client provides increased support for various SFTP features:
** Security features
SSH Strict KEX extension (Terrapin mitigation)
RFC 8308 Extension Negotiation
RFC 8332 RSA-SHA2 Authentication
Agent Protocol support (ssh-agent/pageant)
** SFTP extensions
statvfs@openssh.com (free/available space)
** Key Exchange algorithms
curve25519-sha256/curve25519-sha256@libssh.org
ecdh-sha2-nistp256
ecdh-sha2-nistp384
ecdh-sha2-nistp521
diffie-hellman-group14-sha256
diffie-hellman-group14-sha1 (legacy)
** Host key algorithms
ssh-ed25519
ecdsa-sha2-nistp256
ecdsa-sha2-nistp384
ecdsa-sha2-nistp521
ssh-rsa
ssh-dss
** Ciphers
aes256-gcm@openssh.com
aes128-gcm@openssh.com
aes256-ctr
aes192-ctr
aes128-ctr
aes256-cbc (legacy)
aes192-cbc (legacy)
aes128-cbc (legacy)
** MACs
hmac-sha2-256
hmac-sha2-256-etm@openssh.com
hmac-sha2-512
hmac-sha2-512-etm@openssh.com
hmac-md5
hmac-md5-etm@openssh.com
** Public key authentication
ssh-ed25519
ecdsa-sha2-nistp256
ecdsa-sha2-nistp384
ecdsa-sha2-nistp521
ssh-rsa
rsa-sha2-256
rsa-sha2-512
** Private Key Formats
PuTTY version 2/3
OpenSSH (-----BEGIN OPENSSH PRIVATE KEY-----)
OpenSSH Legacy (-----BEGIN RSA PRIVATE KEY-----)
FTP
Remote FTP server.
URL format: ftp[s]://server.domain.com[:port]/folder1/folder2
Credentials:
FTP UserID and FTP Password are usually required.
If these are empty, GoodSync uses the FTP UserID anonymous and FTP Password gsuser@some.com
Secure Connection
If checked, encrypt the exchange of credentials and transmitted data using TLS or SSL.
If unchecked, do not encrypt UserID and Password as well as data. These will be transmitted as plain text.
Do not check SSL server certificates
If checked, allow self-signed, non-matching, expired server SSL certs, in Secure Connection.
If unchecked, do not allow elf-signed, non-matching, expired server SSL certs.
UTF-8 file names (off: ANSI encoding)
If checked, use UTF-8 to encode file and folder names on the server. Recommended and is the default.
If unchecked, use ANSI to encode file and folder names. Client and server must use the same ANSI encoding.
Connect via Proxy
If checked, connect using proxy settings specified in Tools >> Program Options >> Proxy.
If unchecked, then connect directly even if Global Proxy is specified in Program Options -> Proxy.
Active FTP mode (off: Passive mode)
If checked, use active FTP mode.
Check this option only if a passive mode connection is not allowed by the server.
Not recommended as firewalls usually do not allow the server to initiate an FTP data connection to the client.
If unchecked (default), GoodSync uses passive FTP mode when connecting.
Preferred mode, as no data connections from server to client are required, and these connections are not allowed by most firewalls.
Use EPSV command instead of PASV
If checked, use the EPSV command instead of PASV to start the data transfer.
Needed for IPv6 addresses and some FTP proxies.
If unchecked, use the old-style PASV command to start the data transfer.
Implicit FTPS (off: Explicit)
If checked, work in Implicit FTPS mode.
The connection to the server is open on port 990 in SSL/TLS mode right away without negotiation.
If unchecked, work in Explicit mode.
Connect on port 21 and negotiate with the server about what encryption to use.
Explicit mode is recommended and is the default.
Use MFMT/MDTM to get/set exact file mod time (slow)
If checked, use the MFMT/MDTM command to get/set the exact file modification time from the FTP server.
Analyze will take more time in this case. The newer MFMT is used instead of the MDTM set command if both are available on the server.
If unchecked (default), GoodSync gets file modification time from the human readable file listing.
File modification time will be rounded to the nearest minute or even day if the file is older than 3-6 months.
Use MLST/MLSD commands to get file lists
If checked, use the MLST/MLSD commands to get file lists.
It is a more precise way when implemented correctly by the FTP server.
If unchecked, use the old-style LIST command to get file lists.
Use LIST -la command
If checked, use the LIST -la command when listing the folder to show files whose names start with a dot and hidden ones.
If unchecked, use the standard (RFC 959) LIST command.
RENAME works only at one level
If checked, the RENAME (MOVE) command can rename files only in the folder where they are now, it cannot move them to another folder.
If unchecked, the RENAME command can move files to another folder.
Require TLS session reuse on data connection
If checked, require TLS session reuse on a data connection.
This is recommended and default mode, as it is more secure and increases performance.
If unchecked, no session reuse will be done (compatibility mode).
WebDAV
Remote WebDAV server. DAV is an upload-enabled extension of HTTP protocol.
URL format: http[s]://server.domain.com[:port]/folder1/folder2
Credentials: UserID and Password are always required.
WebDAV root: HTML vs WebDAV folders:
Some folders on the server may be HTML-only and some folders will allow DAV uploads.
This happens because the top folder of the HTTP server is usually not DAV enabled and
it will not list folders inside it for security reasons.
Therefore, the full path to the DAV folder must be entered in the WebDAV root field.
If given only HTTP read access to a folder with no DAV access, the folder may be visible in a browser, but it cannot be seen or modified via WebDAV.
Secure Connection
If checked, encrypt the exchange of UserID and Password and transmitted data using TLS or SSL.
If unchecked, do not encrypt UserID and Password as well as data. These will be transmitted as plain text.
Do not check SSL server certificates
If checked, allow self-signed, non-matching, or expired server SSL certificates.
If unchecked, return an error if server certificate is self-signed, missing, non-matching, or expired.
UTF-8 file names (off: ANSI encoding)
If checked, use UTF-8 to encode file and folder names on the server. Recommended and is the default.
If unchecked, use ANSI to encode file and folder names on the server. Client and server must use the same ANSI encoding.
WinInet-based (complex proxies, auth)
If checked, use WinInet-based WebDAV client implementation that can handle complex proxies and Windows-based authentication, but has limitations and is slower.
If unchecked, use a socket-based implementation that does not handle complex proxies and Windows-based authentication but is faster and more robust.
Connect via Proxy
If checked, connect using proxy settings specified in Tools >> Program Options >> Proxy.
If unchecked, then connect directly even if Global Proxy is specified in Program Options -> Proxy.
Certificate File
The path to a file containing a TLS/SSL certificate private key pair in PEM format. Used to authenticate to the server.
One File
A tree of folders and files stored in one file, with compression and encryption.
URL format: onefile://D:|test|DirFileA.ofz
Here "D:|test|DirFileA.ofz" represents the local file "D:/test/DirFileA.ofz" to which the entire folder is compressed/encrypted.
One File: Path to the file in which OneFile is stored.
Password: The password specified in the server account is used to encrypt the file using AES (if not empty).
How does it work:
All file operations are performed in memory, so these files cannot be too big.
The file is initially read, decrypted, and uncompressed.
When the File System closes, the file is compressed, encrypted, and written to disk.
So encryption is not block-oriented and applied after compression, therefore it is very good.
To backup data to One File, use it as a destination side for the Job.
To decrypt/decompress data from One File, use it as a source side.
A two-way Sync will treat the OneFile location as both source and destination, and
it will allow for both decryption and encryption as needed, depending on the data flow.
Job Options
Each Job has a set of options that modify the behavior of the synchronization algorithm for this Job.
General
Job type and File deletions
Job Type
- Job type can be one of the three choices below:
- Synchronize 2-way (default).
Propagate changes from Left to Right and from Right to Left.
Ensures that the content is kept identical on both sides. - Backup Left to Right (1-way).
Propagate changes only from the Left sync folder to the Right sync folder. - Backup Right to Left (1-way).
Propagate changes only from the Right sync folder to the Left sync folder.
Propagate Deletions (checked by default)
If checked, then deletion made by the user on one side of the Job is propagated to the other side.
If unchecked, then deletions are not propagated, and only changed files are propagated.
This modifier applies only to 1-way Jobs.
Create left/right Sync folders if they are not found (unchecked by default)
If checked, GoodSync will create the left/right sync folders if they are not present.
If unchecked, an error message is shown on Analyze if the chosen sync folders are not present.
Fast 1-way NoState NoLock (unchecked by default)
- If checked, the Fast 1-way mode is activated, characterized by the following:
- No State File is either read or updated.
- No locking mechanisms are employed, allowing multiple Jobs to copy from the same source folder (acceptable) or write to the same destination folder (not recommended, although Fast mode attempts to detect such scenarios).
- Neither the Recycle Bin nor the History folder is utilized to store files deleted or replaced by this Job.
Fast but Less Safe: While it operates more swiftly, it necessitates vigilant monitoring for conflicts between Jobs (due to the absence of locking), and there is no recycling feature in place. It can be compared to rsync but with a preview.
If unchecked, the Job will run in the regular mode, using State Files and folder locks.
This modifier applies only to 1-way Jobs.
Ignore Changes on Destination Side
If checked, GoodSync will ignore changes on destination side of 1-way job.
So if destination file changed and source file did not change then No Copy will occur.
If unchecked, changes on Destination side will not be ignored.
So if destination file changed and source file did not change then Source file will be copied to Destination.
Move Mode: Delete Source after Copy
After the file is copied from the source folder to the destination folder, delete it.
That is equivalent to moving the file from the source to the destination.
If the source folder becomes empty as a result of such deletions, it is also deleted.
This option works only for 1-way Jobs.
To be used by advanced users only.
Move Mode: Delete Empty Folders after Copy
After "Move Mode: Delete Source File after Copy" does its work, delete the folder if it is empty.
To be used by advanced users only.
Copy locked files using VSS snapshots (checked by default, Windows only)
If checked, copy locked files using the Volume Shadow Service (VSS).
Snapshot is done when first Locked file is detected during Sync.
If unchecked, return the "Cannot Copy Locked File" error for locked files.
Available on Windows XP, Vista, 7, 8, 10, 11 and later.
GoodSync can only copy from a locked file and never to a locked file.
GoodSync can only copy from a locked file on a local disk, never from a network-mounted locked file.
This feature does not work in GoodSync2Go.
Snapshot Sync Folder before Sync (off be default, Windows only)
If checked, then Snapshot of Source side in 1-way Job is done before Analyze (and therefor Sync).
It helps with consistency of resulting backup:
If GoodSync performs snapshot before Analyze and Sync then
files changes that happen during Analyze or Sync do not matter, as we will be copying files form Snapshot.
If unchecked, then no Snapshot is done when Job starts and
option 'Copy locked files using VSS snapshots' controls further snapshotting of locked files.
Filters options
A comprehensive explanation of the Include and Exclude Filters is provided in the Filters chapter.
It is recommended for a set of inclusions and exclusions to be the same for all Jobs that sync with one particular folder.
Keeping them different is possible, but it is likely to confuse as some Jobs will not Sync files that other Jobs would Sync.
Include (empty by default)
If not empty, files and folders whose names
match an Inclusion Filter and
do not match any Exclusion Filters
are included in the synchronization.
Exclude (empty by default)
Files and folders that match an Exclusion Filter
will be excluded from synchronization.
Priority: By design, Exclusions will take priority over Inclusions.
Exclude empty folders (unchecked by default)
If checked, exclude folders that are empty or contain only empty folders.
Folders are considered empty if they contain no files or only files excluded by the Filters.
Exclude Hidden files and folders (checked by default)
Exclude files and folders that have a "Hidden" attribute.
Exclude System files and folders (checked by default)
Exclude files and folders that have a "System" attribute.
Exclude Temporary files and folders (checked by default, Windows only)
Exclude temporary files and folders that are not worth saving.
Copying and pasting Filters
Use the Copy All and Paste buttons to copy and paste filters
between the Include and Exclude sections as well as between Jobs.
Auto options
Analyze and Sync can be configured to run automatically by using the options provided in this tab.
If a trigger is checked, Analyze and Sync for this Job will run when the trigger condition is satisfied.
One or more triggers may be checked to cause automatic Analyze and/or Sync of the Job:
On File Change (default delay: 20 sec)
Monitors source and/or destination for changes and replicates them in real-time.
'On File Change' can be specified for the following File Systems:
- Windows File System and local disks (except root folder).
- Windows Shares (except for some faulty NAS shares that do not report changes).
- Mac File System and local disks.
- Any of the above File Systems, remotely accessed via the GSTP protocol using GoodSync Connect.
- OneDrive MS Graph file system.
- Google Drive file system.
- pCloud file system.
Remote storage File Systems cannot usually be monitored: FTP, SFTP, Amazon S3, etc.
If only one side of the Job can be monitored, then GoodSync will get changes only from one side.
The "Delay" says how many seconds to wait from the last detected change to starting Analyze and Sync.
In case of multiple changes, the Delay countdown begins with the detection of the last change.
We recommend setting it to at least 20 sec so that syncing does not start until files have stabilized.
The maximum possible value of the Delay is 300 sec (5 min).
- More OFC rules: Please consider the following things about the "On File Change" option:
- If changes occur during Analyze/Sync, they are still detected and sent to the next Analyze interval.
- If these changes are the result of Sync by GoodSync, they will produce no new changes to be synced.
- On File Change initiates Analyze and Sync, which results in the locking of the sync folder by the lock files.
- GoodSync checks for new changes approximately every 3 seconds. This time quant is configurable.
- If changes keep coming, Sync will start after 5 minutes of non-stop changes, even with the Delay option.
On Folders Connect
Analyze and Sync this Job when a Sync Folder (left or right) is made available.
GoodSync checks every 3 minutes for the status of the left and right folders to determine availability.
- The following events speed up the detection of a connected/disconnected status:
- Insertion or ejection of a portable volume: detachable folders may connect or disconnect.
- Network connect or disconnect: FTP, SFTP, and DAV folders may connect or disconnect.
Should not be used together with the On File Change mode as the former overrides it.
On GoodSync start
Analyze and Sync this Job when GoodSync starts up.
The "Delay" value specifies the number of seconds to wait from folders appearing to Sync starting.
Should not be used together with the On File Change mode as the former overrides it.
This feature does not work in the Unattended mode since the GoodSync Runner Service always runs.
Periodically (On Timer) (default period: 2 hours 0 minutes)
Analyze and Sync this Job periodically, every HH hours and MM minutes.
Can be used together with the On File Change option if a Full Analyze is desired from time to time.
If GoodSync is closed and reopened, it still memorizes the Last Run Time of the Job in the registry.
On Logoff
Analyze and Sync this Job just before the logoff from Windows.
Note that Windows may try to close GoodSync on Logoff.
Normally, Windows sees that GoodSync is performing file operations and allows completion.
Does not work in the Unattended mode since the GoodSync Runner Service always runs.
On Schedule
Analyze and Sync this Job on a specified schedule.
- These time unit values can be set:
- Minute (0 to 59),
- Hour (0 to 23),
- Day of Month (1 to 31),
- Month (1 to 12),
- Day of Week (0=Sun to 6=Sat).
NOTE: Empty time unit value means that this time unit is not fixed in the schedule.
n1-n2 range matches the range of values from n1 to n2.
n1-n2/n3 stepped range matches the range n1 to n2 with step n3.
A list of values or stepped value ranges can be specified for each time unit, separated by a comma.
Example: Minute=15 Hour=03 Month=3-10/3 DayOfWeek=1,3,5 will run the job
at 03:15 AM every Mon, Wed, Fri in Mar, June, Sept.
If the computer goes to Sleep/Standby, GoodSync can wake it up for the "On Schedule" Job.
Ensure that Control Panel >> Power Options >> Change plan settings >> Change advanced power settings >> Sleep >> Allow wake timers is enabled.
Run without User Interface (Unattended)
This option applies to all auto modes except "On Start" and "On Logoff."
If checked, Jobs will run through the GoodSync Runner Service.
That will allow scheduled Jobs to execute even if the user is logged off or the application is closed.
GoodSync will start the Runner Service Setup and request the Windows/Mac account password for the currently logged-in user.
That will ensure that the runner may impersonate the user account and have appropriate access to the data.
Runner Service can also be setup via "Tools" >> "Runner Service Setup" on Windows or "GoodSync" >> "Runner Service Setup" on Mac)
If unchecked then Auto Jobs will be run here in GoodSync GUI.
To see logs of the Jobs run in the Unattended mode by Runner Service, use Job" >> "Open Left/Right Logs.
Advanced Auto
Do Not Sync if changed files more than (checked, 50% by default)
If checked, Automated sync (2-way mode only) is not performed
if more than the specified (in percent) fraction of files in the Job has changed.
An unusually high number of changed files typically indicates an event that requires user attention.
If unchecked, then Change Limit is not applied to Sync decision.
Wait for Locks to clear (checked by default)
If checked, the auto Jobs will wait for lock files to clear instead of producing an error.
A lock file is present in the sync folder when Sync is running in this folder.
This way two GoodSync on different computers cannot sync to the same folder at the same time, to avoid data corruption.
If not checked then the presence of the lock file in the sync folder produces an error.
The waiting duration in minutes can be specified, with zero indicating a default value of 20 minutes.
Auto Clear the tree after Analyze/Sync has finished
If checked, GoodSync automatically clears the Changes Tree after successful Sync or after Analyze that did not detect any changes.
If unchecked, Sync Tree remains in memory after Sync.
Memory Saving: Deleting a large Changes Tree conserves memory.
After the Changes Tree is deleted, the sync results become inaccessible because the changes are stored within the Tree.
Review the sync log to see the actions that have been performed.
Attended Auto options work only if GoodSync runs
GoodSync must be running for the Job to be started by the Auto mode when the "Run without User Interface (Unattended)" option is not checked.
-
Turn on the following global program options to keep GoodSync GUI running:
- "Tools" >> "Program Options" >> "Start GoodSync when Windows starts."
- "Tools" >> "Program Options" >> "Hide to System Tray when the Main Window is closed."
On Windows:
- On Mac:
- "GoodSync" >> "Preferences" >> "Start GoodSync when Mac starts."
- "GoodSync" >> "Preferences" >> "Start GoodSync in Menu bar."
The Unattended mode Jobs will run even if the GoodSync GUI does not run.
Job Scheduling Rules
- Each event that has just occurred flags the Job as "ready-to-run."
- Ready-to-run Jobs are run sequentially until all ready-to-run Jobs have been run.
- If several Jobs do not intersect by their sync folders, they can be auto-run in parallel, up to the value of the "Auto Job to Run in Parallel" option set via "Tools" >> "Program Options" >> "Auto" ("GoodSync" >> "Preferences" >> "Auto" on Mac).
- If the Job is ready-to-run and another trigger event occurs for the same Job, then this second event is ignored.
- The Full Mode (GUI) runs all Jobs in the Attended mode.
- GoodSync Runner Service runs all Jobs in the Unattended mode.
Auto Trigger Priority
- The "On File Change" (OFC) mode overrides most of the other Auto triggers:
- On GoodSync start: OFC does a full Analyze on start already.
- On Folder Connect: OFC will retry the Job after a connection has been lost.
- On Logoff: If the files are in sync all the time, there is no need to sync them on logoff.
- In general, triggers are checked in the order they appear in the Auto trigger list:
- If "On File Change" runs, then only "Periodically (On Timer)" and "On Schedule" triggers can be effective.
- All other triggers (except OFC) can appear together, one does not exclude the other.
- If one trigger has scheduled a Job to start then the other triggers cannot schedule it.
- If a Job is running already, auto triggers cannot start it.
Analyze options
Symbolic Links and Junctions
This option determines how symbolic links to files and folders are processed.
- Possible values:
- Ignore: Symlinks are ignored and not copied in any way.
- Copy as is (default): Symlink to file/folder is copied as the same symlink in the destination folder.
- Drill down: The target file/folder of the symbolic link is copied to the destination folder.
Windows: A symbolic link itself knows whether it is to a file or folder.
Linux/UNIX: A symbolic link does not know whether it is to a file or folder,
so drilling to the target is required to find out.
Advanced Analyze
Detect File and Folder Moves and Renames (checked by default)
If checked, detect file and folder move or rename and execute them as such, not as a deletion and recreation.
Folder moves are detected when all files inside a folder are moved to the same destination folder.
Detection: If a folder contains two or more files that are the same per file size and file mod time, rename/move of such files or their parent folders cannot be detected.
Estimate disk space required for Sync (checked by default)
If checked, compute how much free disk space is needed to complete the sync.
Compare Checksums of All Files (slow) (unchecked by default)
If checked, compare the MD5 checksum of all files on the Left and Right.
If MD5 checksum of the file differs but file size and file modification time are the same, declare a conflict.
After Sync, verifies that the checksum of the copied file is the same on both sides.
If unchecked, a file is considered to be changed if its file size or modification time has changed.
Sync options
Copy File Creation Time (unchecked by default)
If checked, copy the creation time of the file or folder, in addition to copying the modification time.
If unchecked, copy only file/folder modification time.
Copy Attributes (checked by default, Windows only)
If checked, copy the file/folder attributes (Read-only, Hidden, System) while it is being copied by GoodSync.
If unchecked, a "Normal" attribute is assigned to the copied files.
Copy Owner (unchecked by default)
If checked, copy the file/folder Owner while the file is being copied.
If unchecked, the Current Owner is assigned to the copied files.
The Current Owner for the Local Windows File System is the currently logged-in Windows user.
The Current Owner for the Local Mac File System is the currently logged-in macOS user.
The Current Owner for GoodSync Server is defined when GoodSync Connect is set up.
Copy ACL (unchecked by default)
If checked, copy the file/folder Access Control List (ACL) while the file is being copied.
If unchecked, an empty ACL is assigned to the copied files.
Copy original file system names (Mac only, checked by default)
If checked, GoodSync will not replace prohibited symbols (?\<>|*") in file names.
If unchecked, Copy/Rename files with the same content only if the file name has changed in a case-insensitive way.
Copy Permissions (Mac and Unix only, checked by default)
If checked, GoodSync will copy Unix file system permissions (rwxrwxrwx).
If not checked, the default permissions are assigned to copied files. See separate options for that.
Advanced Sync
Do not Sync files that changed between Analyze and Sync
If checked then Do not sync file that changed between Analyze and Sync, let them wait it out till the next Analyze.
If not checked then Sync such files anyway, and reflect changed state both in source and destination.
Wait between Analyze and Sync, in seconds
If not zero then wait this many seconds between Analyze and Sync.
It makes sense with conjunction with 'Do not Sync File that changed' option, to allow more time for files to change.
Uber-unlocked mode (unchecked by default)
If checked, source files may be deleted or moved during upload, as GoodSync does not lock them.
GoodSync will notice right away that the deletion/move occurred, and it will not continue uploading.
If unchecked, use the operating system unlocked mode for uploads, but this mode still locks source files against a move or delete. Even if the OS appears to allow deleting/moving the source file, GoodSync will continue uploading the file, and only when GoodSync finishes, the file will actually be deleted.
To be used by advanced users only.
Shutdown Computer After Job Finished (unchecked by default)
If checked, GoodSync will shut down this computer after the Job has finished syncing with no errors.
Both Manual and Auto job modes are subject to this option if specified.
Recycled / History options
Recycle Bin
Save deleted/replaced files to Recycle Bin, last version only (checked by default)
If checked, GoodSync retains the previous version of any overwritten or deleted file in the "_gsdata_\_saved_ folder" on the side of the Job where the modification occurs.
If unchecked, replaced/deleted files are removed permanently.
Only the most recent version of the file (the one just before the current version) is retained.
Hidden Folder: _gsdata_ is a hidden folder in Windows.
Enabling the "Show Hidden Files" option in Windows Explorer is necessary to view the contents of this folder.
Cleanup _saved_ folder after this many days
If checked (default 30 days), all files placed in the "_gsdata_\_saved_" folder
will be purged after the specified number of days.
If unchecked, all files in the "_gsdata_\_saved_" folder will be kept indefinitely.
Save deleted/replaced files to History folder, multiple versions
If checked, GoodSync retains a version for every modification made to a file.
These versions are saved to the "_gsdata_\_history_" folder on the side of the Job where writing occurs.
A timestamp is added to the file name before its extension so multiple versions of the file can be saved.
The directory structure is preserved. Deleted files will also be placed into this folder for recovery purposes.
This option cannot be used together with Save deleted/replaced files to Recycle Bin, last version only.
Cleanup _history_ folder after this many days
If checked, all files placed in the "_gsdata_\_history_" folder will be purged after a specified number of days.
If unchecked, all files in the "_gsdata_\_history_" folder will be kept indefinitely.
Speed / Limits options
Run Parallel Threads in Sync, this many (checked by default, 3 threads)
If checked, Sync will be run using the specified number of parallel threads.
Using this option speeds up file transfer for remote servers with high latency.
It does not increase speed, however, if the bandwidth is used up by a single-thread sync.
If unchecked or 0, then run sync in one sequential thread.
When it helps: uploading many small files to an FTP, GSTP, SFTP, WebDAV, or another remote server.
When it does not help: uploading several large files to an FTP, GSTP, SFTP, WebDAV, or another remote server.
Total seconds for Reconnect attempts (120 by default)
Total seconds allowed for reconnect attempts when the File System disconnects or returns connection errors.
If the file operation fails after this many seconds of retries,
the File System is declared disconnected, and the entire Job fails.
File Copy Speed Limit in KByte/sec (0 by default)
If not zero, limit the file copy speed by the specified value in KBytes/sec.
When the average file copy speed in sync exceeds the specified threshold,
GoodSync suspends Jobs for 1 second until the effective average speed falls below the limit.
Max Time to Run (unlimited by default)
If checked and not zero, then limit duration of this Job run to the specified number of minutes.
Analyze, Sync, or Analyze + Sync are limited by the specified number of minutes.
Both the Manual and Auto modes are subject to this limit if specified.
Errors / Conflicts options
Display balloon messages
This option controls if and when balloon (System Tray) messages are displayed:
Never:
Do not display balloon messages.
On Conflicts and Errors (default):
Display balloon messages only when conflicts or errors are detected during Analyze or Sync.
On Changes and Sync:
Display balloon messages when changes, conflicts, or errors are detected during Analyze or Sync.
Conflict resolution
If a file has changed on both sides of a 2-way sync before a scheduled run, this will create a Conflict.
Learn more about Conflicts from the Conflict Action chapter.
Automatically Resolve Weak Conflicts (checked by default)
A weak conflict happens when files on different sides have equal file size but not file modification time, and one side has no generations.
If checked, GoodSync will resolve such conflicts by letting the side with generations or a file having a file modification time win.
If not checked, weak conflicts are presented to the user.
Automatically Resolve Conflicts (strong ones) ("Do Not Copy" by default)
- Strong conflict happens when GoodSync cannot detect a winning file on its own.
- Do Not Copy (default): Leave Conflicts in an unresolved (Do Not Copy) state.
- Left Side Wins: Resolve to Left to Right propagation.
- Right Side Wins: Resolve to Right to Left propagation.
- Newer Files Win: Files with the most recent modification date win.
- Stop Sync: Stop Sync when Conflict is detected.
These conflicts may be resolved automatically with the following options:
Rename Losing File, not Delete (unchecked by default)
If the "Automatically Resolve Conflicts (strong ones)" option is enabled, then do not delete the file that loses as a result of the conflict resolution. Instead, rename it to "FileName (Conflicted Copy from COMPUTER on DATE).ext."
If the winning side of the Conflict deletes the file and this option is enabled, both files remain the same. If we renamed the file to "(Conflicted Copy ...)" then we would get no file on the winning side and renamed file on the losing side, so after a second sync, files will become the same, only now renamed. Instead, we just let them remain the same without renaming them.
Scripts options
The "Scripts" tab is used to call a program, script, or email alert during a certain phase of a Job run.
Pre Analyze
If the field is not empty, then take the action specified just before Analyze begins.
If the called program returns a non-zero return code or fails, do not start analyzing.
If the called program succeeds and returns a zero return code, proceed with Analyze.
Analyze no Sync
If the field is not empty, take the action specified just after Analyze finishes.
The action is taken only if Analyze finishes with no changes.
Use this option to take a custom action after Analyze with no changes, such as disconnecting the VPN.
Post Sync
If the field is not empty, take the action specified just after Sync finishes.
Action is taken when Sync finishes, and Sync follows Analyze which detects Changes.
So either Analyze with no changes or Sync with changes will happen, but not both.
Use this option to take custom action after Sync, such as notifying the system administrator.
Sending Emails
If the Scripts field value contains the "@" symbol,
GoodSync sends an email to the address(es) specified in the option.
Multiple email addresses must be separated by a comma or semicolon:
user1@server.com; user2@hotmail.com
If only email addresses are specified in the field(s), a default email text is sent.
To specify custom emails, prepend command(s) with some of the following options:
[noattach: ] [errors: ] email-addr-1 [, ..., email-addr-N] [: email-text-with-parameters]
Example:
noattach: user@example.com: Synced %SYNCOK% items, changed items were %CHANGED%
Here noattach specifies that a sync log will not be attached to the email.
The email will be sent to user@example.com and
it contain parameters %SYNCOK% (number of files/folders synced OK)
and %CHANGED% (number of changed items synced OK).
Calling Programs
If the Scripts field value contains no "@" symbol,
GoodSync runs the program specified in the option and arguments passed to this program:
program-name %ARG1% %ARG2% %ARG3%...
where arguments can be one of the following (all variable names are case-sensitive):
| Argument | Description |
| %JOBNAME% | job name |
| %RESULT% | Result: "" for OK or "terminal error message" |
| %LOGPATH% | Log file path in "..." |
| %LF% | Left folder path in "..." |
| %LF_ACT% | Resolved (=VolumeName\folder -> f:\folder) Left folder path in "..." |
| %RF% | Right folder path in "..." |
| %RF_ACT% | Resolved (=VolumeName\folder -> f:\folder) Right folder path in "..." |
| %CHANGED% | Number of Changed Items in Post-Analyze |
| %ERRORS% | Number of Errors in Post-Analyze or Post-Sync |
| %CONFLICTS% | Number of Conflicts in Post-Analyze or Post-Sync |
| %SYNCOK% | Number of Synced-OK items in Post-Sync |
| %SYNCCHG% | Number of synced-OK file changes in post-Sync |
| %TSTART% | Time when Job started |
| %TFINISH% | Time when Job finished |
| %TELAPSED% | Elapsed Job time, in minutes, from Start to Finish |
Program-name can be any executable file, for instance, .BAT or .EXE file in Windows.
If program-name is not absolute, it should be in the executable PATH.
If the program name contains spaces, it must be enclosed in double quotes like so:
"C:\Documents and Settings\John Smith\My Documents\myscript.vbs"
The program name may contain the %GSDISK% variable
replaced with the disk GoodSync is started from, like so:
"%GSDISK%\folder1\folder2\program.bat"
That allows to start the program from the disk on which GoodSync2Go resides.
Example: call Notepad to show the log file:
notepad %LOGPATH%
GoodSync waits for the program to finish before proceeding.
However, if the program name is prefixed with "nowait:", GoodSync will not wait.
- If a script or email alert is prefixed with "errors:", it is started only if:
- Terminal errors occurred in Analyze or Sync, OR
- Non-terminal errors occurred in Analyze or Sync, OR
- Conflicts occurred in Analyze.
Left Side/Right Side options
These options are specific to the Left and Right sync folders, not to the Job as a whole.
That is if Job A syncs folder X to folder Y and Job B syncs folder X to folder Z, and
if the Folder Options of folder X in Job A are altered, then
the Folder Options of folder X in Job B will automatically change to the same values as in Job A.
That effectively means that the Left/Right Side options are attached to a Folder, not a Job.
What Makes Files Differ
Compare Checksums when needed (slower) (unchecked by default)
If checked, compare the MD5 checksum of the old to the new file if the file size has not changed but the file modification time has.
If the MD5 checksum of the file differs but the file size and the file modification time are the same, declare a conflict.
After Sync, verify that the checksum of the copied file is the same on both sides.
If unchecked, the file is only considered to be changed if the file size or modification time has changed.
Compare Attributes (unchecked by default, Windows only)
If checked, changes in the file/folder Attributes are detected even when the file body does not change.
If unchecked, the Attributes are copied only when the changed file is copied.
Compare Permissions (Mac and Unix only, unchecked by default)
If checked, changes in file/folder permissions are detected even when the file body does not change.
If unchecked, permissions are copied only when the changed file is copied.
Compare Owner (unchecked by default)
If checked, changes in the file Owner are detected even when the file body does not change.
If unchecked, the file Owner is copied only when the file body has changed.
Compare ACL (unchecked by default)
If checked, changes in the ACL are detected even when the file body does not change.
If unchecked, the ACL is copied only when the file body has changed.
Compare Extended Attributes (Mac only, unchecked by default)
If checked, changes in Extended Attributes are detected even when the file body does not change.
If unchecked, Extended Attributes are copied only when the changed file is copied.
Client Side Encryption
These options govern file name and body encryption,
which GoodSync can execute on the client side using a key derived from the provided password.
Consequently, the server lacks the means to decrypt files.
(1) Do not use (default option)
If selected, GoodSync will not compress and encrypt files in this folder.
(2) Encrypt File Bodies and Names
If selected, encrypt file bodies and names before uploading them to this folder.
AES encryption algorithm with a 256-bit key is used for encryption, with all file blocks chained.
Random salt is applied, so different encryptions of the same file will produce different results.
The file size will increase by exactly 32 bytes.
Encrypted file names are Base64-encoded to readable strings.
This option would ignore up to 3 file names decrypted incorrectly.
(3) Compress and Encrypt files
If selected, compress and optionally encrypt the files before uploading them to this folder.
- The encryption options include:
- No encryption: Do not encrypt the files, only compress them.
- ZipCrypto: Encrypt compressed files using the ZipCrypto algorithm
which is less secure but has native Windows support. - AES-256: Encrypt compressed files using a stronger AES encryption algorithm with a 256-bit key.
If Encrypt File Names is checked, GoodSync will additionally encrypt the names of the compressed files.
Client Side Encryption:
The encryption password is memorized in Server Account manager.
Losing this password may result in the loss of encrypted data.
Test Encryption
Click this button to test the encryption of the Left/Right folder using the Encryption Password entered.
GoodSync will display a list of decrypted file names, and it should be verified that the list is readable.
That confirms that the correct Encryption Password has been entered.
Empty Sync Folder
Click this button to remove all contents of the Left/Right folder without trying to decrypt them.
This button should be utilized in cases of forgotten Encryption Passwords, requiring a fresh start.
Additionally, use it when changing the Encryption Password and needing to re-encrypt the folder.
More on Encryption and Decryption
This is how to encrypt all files in a backup:
- Assuming the Left folder of the Job serves as the source of the backup and the Right folder of the Job is the destination, follow these steps to produce an encrypted backup:
- Go to "Job" >> "Options" >> "Right Side," and check "Encrypt File Bodies and Names."
- Enter a complex password that still can be memorized.
- Go to "Job" >> "Options" >> "Left Side," and make sure "Encrypt File Bodies and Names" remains unchecked.
- The encryption on backup happens when GoodSync copies files from the Left to the Right.
- The decryption of restore happens when GoodSync copies files from the Right to the Left.
File System specific
Compress in NTFS (unchecked by default, Windows NTFS only)
If checked, compress file bodies using native File System functionality.
Works only in NTFS. Compression will be done by Windows. A "Compressed" file attribute will be set.
If un-checked, keep files on this side decompressed.
Encrypt using EFS (unchecked by default, Windows NTFS only)
If checked, encrypt file bodies on this side using EFS, a feature of NTFS.
Works only in NTFS. Encryption will be done by Windows. An "Encrypted" file attribute will be set.
If un-checked, keep files on this side un-encrypted.
FAT file system that does not reveal itself (unchecked by default)
If checked, use the special time adjustment designed to neutralize FAT time storage problems.
If unchecked and if FAT is not reported by the File System,
assume that the File System stores file modification time in UTC.
Exotic options (advanced users only)
No _gsdata_ folder here (unchecked by default)
If checked, do not create the "_gsdata_" folder in the sync folder on the Left/Right side of the Job.
Instead, create the "_gsdata_" folder in the GoodSync profile folder on this computer.
If unchecked, create the "_gsdata_" folder in the sync folder.
This option should be used only in situations where writing to the sync folder is not possible or undesirable (read-only source side of the 1-way Job).
Use this option only for sync folders not synced with any other folder (by any other Job on this or another computer).
If this option becomes checked, GoodSync removes the "_gsdata_" folder from the syncing folder and creates a "_mirrors_" folder in the GoodSync Profile folder instead. A custom location for the "_mirrors_" folder can be set via "Tools" >> "Program Options" >> "General" > "Mirror Folder.
Do not List Folders during Analyze (unchecked by default)
If checked, do not list folders to see what's in them during Analyze.
Instead, trust the GoodSync state file to provide file listings.
If unchecked, perform a full Analyze with a listing of all folders inside the sync folder.
This option can be used only if GoodSync (not the user or another program) changes files in the folder and sub-folders on this side.
To be used by advanced users only. Misuse of this option can result in data corruption or loss.
Safe Copy using temporary files (checked by default)
If checked, Sync does not copy the source file directly to the destination file on this side,
as any interruption of the file copy mid-sync would corrupt the file.
Instead, Sync copies the source file to a temporary file in the destination folder,
and once the copy operation is finished, the temporary file is renamed to the destination file.
This option can be unchecked for 1-way backups when the destination volume has limited free space.
This option is available only for File Systems that do not have atomic upload.
Atomic upload means that until upload is complete, interrupting will revert to the previous version of the file.
Program Options
General
This tab provides access to the general GoodSync options.
Language (restart required)
This option allows selecting a preferred language from the dropdown menu on the right.
Tree Display Density (restart required, Windows only)
Allows selecting the line spacing in the Sync Tree. Higher settings allow viewing more items per page.
Sort job names by alphabet (restart required) (checked by default)
If checked, GoodSync will list Jobs and Groups in alphabetical order.
If unchecked, GoodSync will allow the reordering of Jobs and Groups by dragging and dropping them in the Job List.
Show Backup / Sync Jobs groups (restart required) (unchecked by default)
If checked, GoodSync will show the backup and sync Jobs' Groups in the Job Tree.
If unchecked, GoodSync will not show the backup and sync Jobs' Groups in the Job Tree.
Show GoodSync icon in system tray (Windows) (checked by default)
Start GoodSync in Menu Bar (Mac) (checked by default)
If checked, GoodSync will show in the System Tray (Menu Bar on Mac) when running.
If unchecked, GoodSync will not show in the System Tray when running.
Hide to System Tray when Main Window is closed (unchecked by default, Windows only)
If checked, GoodSync will run in the background when closed.
If unchecked, GoodSync will unload from memory when closed.
Start GoodSync when Windows starts (Windows) (unchecked by default)
Start GoodSync when Mac starts (Mac) (unchecked by default)
If enabled, GoodSync will automatically launch upon logging into the System Account.
If disabled, GoodSync will not start automatically when logging into the System Account.
Add GoodSync shortcut to desktop (checked by default, Windows only)
If checked, GoodSync will add its shortcut to the desktop.
If unchecked, GoodSync will not add its shortcut to the desktop.
Use New SMB implementation in Gs-Server smb:/ virtual folder (checked by default, Windows only)
If checked, allows the use of the new Sib-SMB client implementation.
If unchecked, a Windows SMB client will be used.
Prevent System idle sleep (checked by default, Mac only)
If checked, GoodSync will prevent Mac from going to sleep while a Job is running or is scheduled to run.
NOTE: Force Sleep by selecting "Sleep" from the Apple menu or closing a laptop will still put the device to sleep and cannot be prevented.
Warn about Time Out Of Range (unchecked by default)
If checked, GoodSync will issue a warning if the file modification time is out of the 1980-2037 range.
Compare Program
In the "Compare Program" field, one may specify a program and command line arguments to compare files.
Mirror Folder
The Mirror Folder ("_mirrors_") serves as a local analog of the "_gsdata_" folder, established within the GoodSync Profile folder. It includes subfolders that align with Job sides, housing essential data for the functioning of GoodSync. This includes Job State Files, Job Logs, previous versions of deleted/overwritten files, and other technical files used and generated during synchronization.
Initially, Job Logs are written locally to the Mirror Folder. Logs of Analyze-only Jobs are available only in the local Mirror Folder. The "Job" >> "Logs on Left Side/Logs on Right Side" menu item shows the log files both from the syncing folders and the local Mirror Folder.
Account
This tab provides brief details about the GoodSync Account logged into within the GoodSync Application.
Manage Account button
Open the GoodSync Account Web UI in the default web browser.
That automatically logs the user into their Account to manage Devices, Licenses, GoodSync Storage, Account settings, and more.
Change Account button
Run the GoodSync Account Setup dialog to log in with another GoodSync Account.
License
On this tab, information about the GoodSync license activated on this computer can be found.
Activate License button
Run the GoodSync Activation dialog to activate an unused GoodSync license on this computer.
Request Account Password when GoodSync starts (unchecked by default)
If checked, ask to enter the GoodSync Account Password when the GoodSync application starts but do not do it when the Runner Service starts.
Use Private Default Browser for OAuth (unchecked by default, Windows only)
If checked, open the default web browser in Private mode for OAuth authentication when needed.
If unchecked, open the default web browser in the regular mode.
Auto
On this tab, global automation settings can be set up.
Auto Jobs to run in parallel max (1 by default)
This option allows specifying the number of automatically started Jobs that can be run simultaneously.
Auto Jobs quant, sec (3 by default)
GoodSync automatically reviews Jobs to see if any are scheduled to run. This option allows specifying the length of time between checks.
Auto-hide Mini Window when there is no active jobs (checked by default, Windows only)
If checked, the Mini Mode window will be automatically hidden when there are no active Jobs.
If unchecked, the Mini Mode window will always be shown in Mini Mode.
Keep Auto Options when doing Account Sync (unchecked by default)
If checked, retain the Auto Options set for the local Jobs during Account Sync.
If unchecked, the Auto Options configured for the local Jobs will be replaced by the Auto Options of the Jobs synchronized with the GoodSync Account.
Keep file generation history for months (12 by default)
This option allows setting the desired duration for GoodSync to retain file generation history. File generation history that is older than this period will be discarded.
Check for a new version daily (checked by default)
If checked, GoodSync will check for new versions daily.
Auto Install new version when found (checked by default)
If checked, new versions will be installed automatically.
Filters
On this tab, global Filter settings can be configured, which will be applied to all Jobs.
Read more about the Include/Exclude Filters in the Filters chapter of this Manual.
SMTP
This tab offers settings for configuring the SMTP server used to send emails.
Use SMTP server to send emails (checked by default)
If checked, GoodSync will use the SMTP server specified below to send the post-Analyze and post-Sync emails.
If unchecked, GoodSync will use the default MAPI client of the computer to send these emails.
SMTP Server and Port
Server: The IP name or address of the SMTP server that is used to send emails.
Port: The port on the SMTP server that is used to send emails.
Default port values:
SMTP over TLS - 587
SMTP over SSL - 465
Unsecured SMTP - 25
SMTP UserID and Password
If the SMTP server requires authentication, specify credentials here.
Senders Email
E-mail address of the sender that GoodSync will use when sending an email.
Secure SMTP always over TLS/SSL (port 465) (unchecked by default)
If checked, encrypt SMTP communication using TLS/SSL on port 465.
If unchecked, GoodSync will use plain text communication.
Secure SMTP switch to TLS using STARTTLS (port 587) (unchecked by default)
If checked, start on plain text port 587, then request TLS/SSL by STARTTLS command.
If unchecked, GoodSync will use plain text communication.
When finished configuration, use the "Test" button to test sending the emails with the settings specified above.
Shared by me
This tab facilitates the sharing of folders on the computer or local network with access granted to other GoodSync users.
- Here's the process for sharing a folder with another GoodSync user:
- Click the "Add" button to create a new shared folder.
- In the displayed dialog, locate the folder for sharing and provide the email address of the intended recipient for that folder.
The "Read-Only" option can also be toggled to manage write access to the shared folder. - Click "OK." The person whose email address was provided will receive an email notifying them about the shared folder.
- If they have a GoodSync Account, they will be able to view and access the shared folder right away by selecting the "GoodSync Connect" File System in the Browse dialog of the GoodSync application.
If they don't, a prompt will appear, asking to invite them to join GoodSync. They will need to create a GoodSync Account and install the GoodSync application on any supported device to access the share.
- All created shares appear in the table, displaying the following properties:
- From Computer: Specifies the computer name on which the share is located.
- From Folder: Specifies the path of the shared folder.
- To User: Specifies the User ID of the GoodSync Account with which the folder is shared.
- To Computer: Specifies the computer name as it will appear in GoodSync Connect.
- Read-Only: Specifies the Read-Only setting for the share.
Shared with me
Within this tab, GoodSync presents folders that other GoodSync users shared with the current user via the "Shared by me" tab described above.
Storage
This tab provides the ability to manage GoodSync Online Storage for the associated GoodSync Account.
If GoodSync Storage has not been requested or there's a need for additional storage space, use the "Add" button to request or purchase GoodSync Storage.
The available storage for the GoodSync Account is displayed in the table, indicating the storage plan and the allocated quota in GB.
Additionally, GoodSync Storage can be managed online through the GoodSync Account Web UI.
Proxy
This tab manages the GoodSync application's proxy settings.
Do not use Proxy
Use direct connections, without a proxy.
Use Proxy server used by Internet Explorer for remote connections (default)
If this option is selected, GoodSync will use the same proxy server as the one that Internet Explorer and WinInet use.
Use this Proxy server for remote connections
If this option is selected, use the proxy server specified in the fields below. After checking this box, the Proxy Server and Port can be entered.
Proxy UserID and Password
If these fields are not empty, use these credentials as UserID and Password for the proxy specified.
If these fields are empty and a specified proxy server will be used, provide the User ID and Password for the proxy.
Use the "Test" button to ensure the proxy is set up correctly.
FTP Proxy
Here, the Proxy Server and Port for FTP connections can be specified.
Trust System Root Certification Authorities (checked by default)
If checked, allow third-party programs to listen in on GoodSync communications over TLS if they add their certificate to the system storage.
Logs
Level of log detail (Actions by default)
Set the level of detail for the logs shown in the Log Window. Logs saved to files always have the highest level of detail.
Possible levels: 0 - Critical, 1 - Errors, 2 - Actions, 3 - Details.
Retain logs for this many days (15 by default)
Keep the Job and Global Logs for this many days. Delete older Global Log files.
Store logs in folder
Allows to specify a custom folder to store GoodSync logs. If empty, store logs in a GoodSync folder in the user application profile folder.
Server
This tab controls the local GoodSync Server settings.
Serve files to other devices
Based on this setting, GoodSync will act on this computer either as a server or a client.
If checked, GoodSync installed on this computer can accept incoming requests, i.e., it will act as a Server.
Data located on the computer may be accessed through GoodSync Connect from other devices with GoodSync installed.
If unchecked, GoodSync installed on this computer can make outgoing requests only and cannot accept incoming requests, i.e., it will act as a Client.
Enable server Web UI on port (11000 by default)
If checked, enable the local GoodSync Server UI (server management console).
It can be accessed by opening the URL http://localhost:11000 in the web browser.
Click the "Server Advanced Options" button to open the GoodSync Server Web UI in the default web browser.
If unchecked, the Web UI will be disabled while the GoodSync Server will continue running.
Server logs
Level of log detail (Transaction by default)
Set the level of detail for the server logs.
Possible levels: 0 - Critical, 1 - Errors, 2 - Actions, 3 - Details, 4 - Transaction, 5 - Debug.
Retain logs for this many days (15 by default)
Keep the server logs for this many days. Delete older log files.
Store logs in folder
Allows to specify a custom folder to store the server logs.
If empty, store logs in the folder, specified in the server settings file (
"C:/ProgramData/GoodSync/server" is the default for Windows, and "/Library/Application Support/GoodSync/server" is the default for Mac).
All the above-mentioned server settings can be changed in the server settings file.
See the details in the corresponding chapter of the GoodSync Connect Manual.
Syncing specific applications
This chapter explains how to configure syncing for popular applications.
RoboForm
The latest versions of RoboForm have the command RoboForm >> "Tools" >> "Sync Data" that sets up a sync Job and starts GoodSync automatically.
Outlook
Synchronize the .PST file that contains Outlook data.
By default, the .PST file is stored in the following folder:
C:\Users\<User Name>\AppData\Local\Microsoft\Outlook
We recommend enabling the "Copy locked files using VSS snapshots" option via the "Job" menu >> "Options" >> "Advanced." This will allow GoodSync to copy the .PST file even if it's in use.
Mozilla Thunderbird
Sync the Thunderbird profile folder. It is located at
C:\Users\<User Name>\AppData\Roaming\Thunderbird\Profiles
Windows Mail
Sync Windows Mail data folder. It is located at
C:\Users\<User Name>\AppData\Local\Microsoft\Windows Mail
Quickbooks
Quickbooks (QB) stores all its data in one file that has the format CompanyName.QBW. This is the file to sync. Quickbooks backup files have the extension .QBB.
We recommend backing up the QBW file using the native QB Backup command and syncing the backup file too, for extra protection.
We also recommend enabling the "Copy locked files using VSS snapshots" option via the "Job" menu >> "Options" >> "Advanced." This will allow GoodSync to copy the .QBW file even if it's in use.
NOTE: Even if the .QBW file was opened solely for viewing and not for modifications, QuickBooks will still make changes to the file. Consequently, 2-way syncing of .QBW files is not supported with GoodSync, only 1-way backup is possible.
ACT!
ACT! locks its data files, and even when ACT! is closed, they are still locked. This is because ACT! installs a SQL service that is active even when the ACT! application is not running. This service keeps ACT! data files locked.
- To be able to sync these files, the MSSQL ACT! Service should be temporarily stopped:
- Select Start >> "Run," or use the Win+R shortcut, type: services.msc, and press Enter.
- Locate the service named "MSSQL$ACT7" (or something similar), and stop it.
- Do the Sync, and then start the service again.
Advanced Topics
Managing time shifts
- The FAT File System is still used in Windows, and some FTP servers have these problems:
- Local file modification time is stored, so moving between time zones makes the file modification shift.
- Modification time is stored with only 2-second precision in FAT, so copying a file to FAT may give it a slightly different modification time. GoodSync ignores differences of +/- 2 seconds in modification time.
- GoodSync recognizes two types of Time Shifts:
- Old-New Time Shift: Current file modification time differs from stored modification time by a whole number of hours for a considerable number of files. Corrected by storing new modification time on the next Sync.
- Left-Right Time Shift: Files on the Left and Right have a whole hour difference in modification time for a considerable number of files. This time shift is turned into a Copy Time action.
Environment variables in paths
Windows environment variables can be used in folder paths, inserted as follows:
%VARIABLE%
An environment variable can be put in only by directly editing the folder path, not via the Browse dialog.
Popular environment variables are:
%GSDISK% - disk from which GoodSync.exe was started such as C: or F:.
Use this to refer to folders stored on the GoodSync2Go volume, in the portable version.
%USERNAME% - current Windows user account name.
%USERPROFILE% - current user profile directory.
%COMPUTERNAME% - Windows name of this computer.
Also, GoodSync substitutes these special variables:
%YYYY% - current year.
%MM% - current month, from 01 to 12.
%DD% - current day of the month, from 01 to 31.
%DOW% - current day of the week, from 0 to 6.
%WOM% - current week of the month, from 1 to 4.
%HH% - current hour, from 00 to 23.
%II% - current minute, from 00 to 59.
Case-sensitivity
GoodSync file and folder tree are case-insensitive. That is, for GoodSync, the path "Folder\File.txt" points to the same item as the path "FOLDER\file.TXT".
But GoodSync is case-preserving. That is, if the file (or folder) name is changed from "FilE.txt" to "fILe.txt" on one side, GoodSync will propagate it to the other side.
- These design choices reflect realities of the modern operating systems:
- On Windows, both NTFS and FAT32 are case-insensitive and case-preserving.
- On macOS, the default File System is case-insensitive and case-preserving.
- Some UNIX File Systems and FTP/SFTP servers based on them are case-sensitive, indeed.
But if we want to be able to sync case-insensitive Windows and macOS File Systems to them, our tree must remain case-insensitive.
Portable paths
A portable path can be specified in the Left or Right sync folder like so:
=VolumeName:\folder1\folder2
Here, VolumeName is a volume label that can be set in volume properties in Windows Explorer.
If the path is specified in the portable format, GoodSync will look for a volume named VolumeName in all portable (removable) drives attached to this computer. So if this volume gets a different drive letter next time it is inserted, GoodSync will still be able to find it.
When selecting a folder on a removable drive in the Browse dialog, GoodSync will prompt to save the path to this folder in the portable path format.
If a folder is chosen within the GoodSync2Go folder where GoodSync2Go was initiated, the drive letter will automatically be replaced with %GSDISK%.
So no matter what computer plug the removable drive into and no matter what letter the drive gets, GoodSync2Go will find its sync folders, as they will be on the %GSDISK% drive.
- NOTE: Please note the following rules:
- Computer-specific paths are used to refer to a path that is valid only for one computer.
- %GSDISK% can be used in the program specified in the Script Options, then the program is run from the GoodSync2Go disk.
GoodSync GUI Command Line
GoodSync GUI for Windows can be started with command line options that modify its behavior.
Command line call has the following format:
GoodSync.exe [<profile-option>...] [<run-option>...] [<global-option>...] [<job-command> and <job-options>]
<profile-option>, <job-command> and <job-options> are defined in the GSYNC chapter below.
<run-option> can be one of:
/?, /help
Show this help message.
/min or /tray
Run minimized to System Tray.
/forcetray
Run minimized to System Tray, do not allow to show the Main or Mini window.
/miniwin
Start in Mini Mode and allow the Main window to show.
/forceminiwin
Start in Mini Mode, do not allow the Main window to show.
<global-option> can be as described in GSYNC, plus these:
/exit
Exit GoodSync GUI after the Job started by the Command Line has finished.
/exit-ifok
Exit GoodSync GUI after the Job started by the Command Line has finished with no terminal error.
Windows Installer options
The GoodSync installer for Windows can be started with these command-line options:
/gs-userid=UserId
/gs-appkey=AppKey
- If /gs-userid and /gs-appkey options are specified, then after installing GoodSync:
- This Computer is enrolled into the GoodSync Account designated by UserId.
- A GoodSync license is activated on this computer from the GoodSync Account set by UserId.
That is a good way to automate the installation of GoodSync on multiple computers.
The Account AppKey can be specified in the GoodSync Account Web UI.
AppKey allows only computer registration and license activation, but not GoodSync Connect transactions.
NOTE: This is an online activation, so the GoodSync installer should be able to get to https://www.goodsync.com.
/gs-proxy=Host:Port
Sets the proxy address and port, used to connect to GoodSync servers.
/gs-proxy-auth=UserId:Password
Sets the proxy UserID and Password, used to connect to GoodSync servers.
/S
Run the installer silently, no input from the user is requested.
GoodSync mass deployment
Download the automated GoodSync installer for the respective platform using the provided link below. Afterwards, employ any preferred mass deployment tool to install GoodSync across all devices.
Windows
Mac
The shell script may run the following command line options:
-u|--update
Update GoodSync with the current GoodSync Connect configuration.
-i|--install login password [noDisco]
Install GoodSync with specified GoodSync Connect credentials. Use noDisco for No Discovery mode.
-k|--install-appkey gs-userid gs-appkey [noDisco]
Install and activate GoodSync with specified GoodSync gs-userid and gs-appkey. Use noDisco for No Discovery mode.
-c|--install-code username authcode [noDisco]
Install and activate GoodSync with the specified GoodSync username and authcode. Use noDisco for No Discovery mode.
-l|--local-only
Install GoodSync and gs-server (GoodSync Server) in local-only mode. gs-server will run as a system daemon and be used by GoodSync for inner uses.
-r|--remove
Uninstall GoodSync.
-d|--no-daemons
Install/update GoodSync with no daemons. No gs-server (GoodSync Server). gs-runner (Runner Service) is installed as a user agent without asking for permissions.
-n|--no-license-agreement
No license agreement on the first installation. Can be used in addition to other args like "GoodSyncInstaller -n -i login password".
-h|--help
Show help.
GSYNC
GSYNC is a command-line version of GoodSync.
GSYNC does not present any GUI (Graphical User Interface) at all, so it is ideal for calling from batch files and other programs. It is also the standard version for Linux environments.
On Windows and Mac, GSYNC is available under a Personal or higher license.
GSYNC does not exit until the specified Job or action is finished.
GSYNC runs all Jobs specified in the command line sequentially, in the order they appear in the Job List.
The command line to run a Job has this general format:
gsync [<profile-option>...] [<run-option>...] [<global-option>...] <job-command and job-option>
The command line to perform an action (other than running a Job) has this format:
gsync [<profile-option>...] <global-command>
The log file is written to stdout.
NOTE: The order of Options is enforced. So, for instance, Job Options cannot be mixed up with Global Options. Global Options cannot come before Profile Options.
License activation
Use the following command line options to activate a GSYNC license.
That is the only way to activate GoodSync on Linux, as there is no GUI version.
/activate
Activate the GoodSync license on this computer using the GoodSync Account on this computer.
NOTE: This is an online activation, so GoodSync should be able to get to mediator.goodsync.com.
By default, a standard browser proxy is used. Proxy authentication can be configured or an alternative proxy can be employed by adjusting the options detailed in the Proxy chapter below.
Profile and Logging options
Profile options set the GoodSync Profile Folder (where Accounts and Jobs reside) and where logs are stored.
<profile-option> can be one of the following:
/profile=<folder-path>
GoodSync profile folder. Accounts, Jobs, Groups, and Program Options are all loaded from the files "accounts-bookmarks.tic" and "jobs-groups-options.tic" in this folder.
Global Log files are written to this profile folder.
If not specified, the profile folder is "C:\Users\UserName\AppData\Roaming\GoodSync" on Windows.
On Mac and Linux/UNIX systems, the profile folder defaults to "~/.goodsync".
/lf=<log-folder>
Write Global Log to <log-folder>.
If not specified, write Global Log to the profile folder.
The path should be an absolute path on the local computer.
/ll=0|1|2|3|9
Set the log level to N, only for this run.
0 - Critical messages (Job start and stop).
1 - Error messages.
2 - Informational messages (default level).
3 - Detailed messages.
9 - No log at all.
/jobs-file=<job-list-file>
If specified, load the Job List and Global Options from the specified file in TIC or TIX format, depending on the file extension.
If specified, it should be the last option in Profile and Logging Options.
If not specified, load the Job List from the "jobs-groups-options.tic" file in the profile folder.
/no-load-tic
If specified, do not load Jobs, Groups, and Program options from the profile folder.
Instead, use the job-tmp command to build and run the Job in the command line.
If specified, it should be the last option in Profile and Logging Options.
The same effect may be achieved by specifying the environment variable NOLOADTIC = 1.
/no-save-tic
If specified, do not save Jobs, Groups, and Program Options to the profile folder after GSYNC changes them.
If specified, it should be the last option in Profile and Logging Options.
The same effect may be achieved by specifying the environment variable NOSAVETIC = 1.
Run options
<run-option> can be one of the following:
/progress=yes|no
Show progress messages when downloading or uploading files. Default: no.
/noprint=yes|no
Do not print command line arguments after parsing them.
/no-log-stamp
Do not add a timestamp to each log line.
/list-changes=yes|no
Print a list of changes detected by Analyze to the log.
/cleanup=yes|no
Clean up old log and temp files when GSYNC starts.
Old log files are defined as those older than the number of days to retain the logs option.
This option should be used only if no other GoodSync or GSYNC processes are running on this computer, as this option deletes all qualifying log and temp files, including those of other running GoodSync instances.
/override-locks=yes|no
Override lock files on Analyze. Default: no.
A lock file is created in the sync folder by a running Sync Job and deleted when the Job finishes.
When a lock file is present in the sync folder, another sync that involves this folder will not start.
/comp-cksums=yes|no
Compare Checksums of the files during Analyze. That will slow down the Job execution.
/comp-bodies=yes|no
Compare file bodies during Analyze. That will slow down the Job execution significantly.
Global commands
/help
Show a help message that lists command line options and exit.
/version or /license
Print the version and license details and exit.
/check-ver
Check whether this GSYNC version is current.
GoodSync Account
/gs-account-enroll=Email
Enroll this computer into the GoodSync Account identified by Email.
The account password will be requested from the console.
The account is verified by the Mediator, and the gs-server (GoodSync Server) service is restarted once the Account has changed.
/manage-account
Open the default web browser with a page to manage the GoodSync Account online.
/buy-license
Open the default web browser with a page to purchase a GoodSync license.
/activate
Activate the GoodSync license on this computer using the GoodSync Account on this computer.
/runner
Run as a Local Job Runner.
- This option models the behavior of GoodSync GUI as it relates to Auto Jobs:
- It starts and runs all Jobs that are in Auto Mode, such as "On File Change" Jobs.
- It does not show any GUI, so the job results become known through Global and Job Logs.
- It does not consume any graphical resources as it runs as a pure command-line process.
- To terminate GSYNC Runner, send CTRL+C to its console.
- If the /runner option is not specified, regular GSYNC options apply.
/cc-runner
Run as a Control Center Job Runner.
Learn more about GoodSync Control Center from its Manual.
Server Accounts and Account Sync
/sync-jobs-accts
Sync Jobs, Groups, Options, and Server Accounts between this Client and the GoodSync Account (a central Job repository on Mediator).
/sa-list [prefix]
List all Server Accounts. If the prefix is specified, list only Server Accounts that start with this prefix.
/sa-create ConnectOptions
Create a new Server Account and fill it up with ConnectOptions.
Example:
/sa-create /f=sftp://server.company.com /userid=myuser /pk="d:/keys/priv.key"
/sa-oauth
Perform Browser Authentication (OAuth2).
The resulting Refresh and Access Tokens will be added to Server Account Manager, defined by UserID extracted from the OAuth data.
A Server Account Key will be printed to use in the Job options.
Only a URL prefix is needed to indicate the File System, such as gdrive:// or msgraph://.
/sa-update AcctKey/AcctName ConnectOptions
Update a Server Account designated by AccountKey/AccountName with the new Connectoid Options.
Example:
/sa-update sftp://myuser@server.company.com /f=sftp://server.company.com /userid=myuser /pk="d:/keys/priv.key"
/sa-rename AcctKey/AcctName NewAcctName
Rename a Server Account to NewAcctName.
Example:
/sa-rename sftp://myuser@server.company.com "Company SFTP account"
/sa-delete AcctKey/AcctName
Delete a Server Account by its Key or Name.
Example:
/sa-delete "Company SFTP account"
Global options
These commands modify Program Options shown by GoodSync GUI in "Tools" >> "Program Options" on Windows and "GoodSync" >> "Preferences" on Mac.
<global-option> can be one of the following:
General
/sort-jobs-alpha=yes|no
Sort Jobs by alphabet in the Job List view. Default: yes.
/system-tray=yes|no
Show the GoodSync icon in the System Tray (Windows only). Default: yes.
/tray-on-close=yes|no
Minimize GoodSync to the System Tray on application close (Windows only). Default: no.
/compare-prog=<file-path>
Use the program specified by FilePath to compare two files diff-style when a user selects "Compare" from the item context menu.
If nothing is specified, then UNIX diff is used.
/warn-time-range=yes|no
Warn about file/folder modification time being out of range. Default: no.
/group-log-lines=yes|no
Group similar log lines. Default: yes.
/log-retain-days=<number>
Number of days for which old logs are retained. Older logs are deleted. Default: 7.
Auto
/auto-hide-mini-win=yes|no
Auto-hide the Mini Mode window when there is no Job activity (Windows only). Default: yes.
/months-old-gens=<number>
Retain item generation history for this many months.
/parallel-auto-jobs=<number>
The maximum number of Auto-mode Jobs to be run in parallel. Default: 1.
/auto-jobs-quant=<number>
Quant (in seconds) used in starting Auto Jobs. Default: 3.
/encrypted-passwords
Save the Connection Passwords locally encrypted.
Filters
/exclude=<file-mask>
Exclude Filter.
File Mask is a |-separated list of patterns such as *.obj or \folder\file.
Several /exclude options may be provided, and their values will be glued together, separated by "|".
/include=<file-mask>
Include Filter.
File Mask is a |-separated list of patterns such as *.obj or \folder\file.
Several /include options may be provided, and their values will be glued together, separated by "|".
/exclude-empty=yes|no
Exclude empty folders from the Job.
/exclude-hidden=yes|no
Exclude Hidden files and folders from the Job.
/exclude-system=yes|no
Exclude System files and folders from the Job.
SMTP
/smtp-host=hostname
Use the SMTP server set here by IP address or name for sending post-Analyze and post-Sync emails.
/smtp-port=port
Use this port on the SMTP server specified in /smtp-host.
/smtp-secure=yes|no
Use an SSL-encrypted connection when submitting an email to the SMTP server.
/smtp-starttls=yes|no
Use STARTTLS to switch to an encrypted connection when submitting an email to the SMTP server.
/smtp-userid=<userid>
UserID for the SMTP server.
/smtp-passwd=<password>
Password for the SMTP server.
/smtp-sender=<name-email>
The sender of the emails: "email@company.com" or "FirstName LastName <email@company.com>" that will be used by GoodSync.
Proxy
/proxy-auto=yes|no
Use the WinInet proxy (the one used by Internet Explorer).
/proxy-host=hostname
Use the proxy server set here by IP address or name. Negates the /proxy-auto option.
/proxy-port=port
Use this port on the proxy server specified in /proxy-host.
/proxy-userid=<userid>
Proxy server UserID for authenticated proxies.
/proxy-passwd=<password>
Proxy server Password for authenticated proxies.
Job commands
<job-command> can be one of the following:
analyze /all
Analyze all Jobs
analyze <job list>
Analyze listed Jobs. Job names are separated by a space.
Job names containing spaces must be enclosed in quotes: "Job Name".
sync /all
Analyze and Sync all Jobs.
sync <job list>
Analyze and Sync listed Jobs. Job names are separated by a space.
Job names containing spaces must be enclosed in quotes: "Job Name".
job <job name> [<job options>]
Create a Job or update an existing Job.
job-new <job name> [<job options>]
Create a Job with specified Job Options.
job-tmp <job name> [<job options>]
Create a temporary Job with specified Job Options and Analyze/Sync it.
This Job is never added to the list of Jobs and exists only in memory during execution.
job-update <job name> [<job options>]
Change the specified options in the existing Job.
job-delete <job name>
Delete an existing Job.
job-list
List all available Jobs.
Job options
<job-option> can be one of the following:
/analyze
Analyze the Job after it has been created or updated.
/sync
Analyze and Sync the Job after it has been created or updated.
/autoclear
Remove the Sync Tree after successful Sync or Analyze with no changes in Auto mode.
Connectoid options
Connectoid Options represent properties (such as URL, UserId, and Password) of a GoodSync connection to any supported File System (Server) within a Job.
- They can appear in one of 3 side-related formats (using the option /f as an example):
-
/f=URL
Set the Connectoid Option /f (URL) for /sa-.. commands that control Server Accounts. -
/f1=URL
Set the Connectoid Option /f (URL) for the Left Side of a Job, in Job Commands. -
/f2=URL
Set the Connectoid Option /f (URL) for the Right Side of a Job, in Job Commands.
- Correct combinations of a URL and Server Account options are:
-
/f=URL
The Full folder URL, not looked up in the Server Account. -
/n=AccountName /uN=URL
Server Account + InAccount URL. Server Account is looked up by AccountName in the Server Account Manager. -
/k=AccountKey /uN=URL
Server Account + InAccount URL. Server Account is looked up by AccountKey in the Server Account Manager.
Below is the complete list of Connectoid Options:
/f1=<full folder URL> /f2=<full folder URL>
Left and Right sync folder paths.
Examples:
file:///C:/folder1/folder2
file://share/disk/folder1/folder2
ftp://server.domain.com:port/folder
sftp://server.domain.com:port/folder
http://server.domain.com:port/folder
Check out the File Systems chapter for the proper URL formats for the corresponding File Systems.
NOTE: Use quotes around paths with spaces.
/u1=<account URL> /u2=<account URL>
Left/Right side URL of a Server Account, i.e., account saved using Server Account Manager.
Example:
/u1="gdrive://www.googleapis.com"
/k1=<AccountKey> /k2=<AccountKey>
Left/Right sync folder Account Key of a Server Account. Requires /uN.
Example:
/k1="gdrive://XDH1ABxaxXFmpUk3PJA@www.googleapis.com-n1"
/n1=<AccountName> /n2=<AccountName>
Left/right Server Account Name of a Server Account. Requires /uN.
Example:
/n2="DropboxAcct"
/d1=<folder path> /d2=<folder path>
Left/right folder path of a Server Account. Requires /kN or /nN.
Example:
/d2="/Work/Projects"
/userid1=<userid> /userid2=<userid>
UserID for the Left/Right sync folder.
/password1=<password> /password2=<password>
Password for the Left/Right sync folder.
/time-trans1=yes|no /time-trans2=yes|no
Use time translation if cannot copy/set file modification time.
/bad-certs1=yes|no /bad-certs2=yes|no
Do not check SSL server certificates on the Left/Right side.
/useproxy1=yes|no /useproxy2=yes|no
Use a Proxy on the Left/Right side.
/wininet1=yes|no /wininet2=yes|no
Use WinInet instead of native sockets on the Left/Right side for DAV, S3, FTP.
/utf8-1=yes|no /utf8-2=yes|no
Use UTF-8 (no: ANSI) file name encoding on the Left/Right side.
/temp-dest-file1=yes|no /temp-dest-file2=yes|no
Use temporary files when copying a file on the Left/Right side.
/hostbased1=yes|no /hostbased2=yes|no
Use the Host Based Addressing (S3) on the Left/Right side.
/reduced-redundancy1=yes|no /reduced-redundancy2=yes|no
Use the Reduce Redundancy option (S3) on the Left/Right side.
/server-encrypt1=yes|no /server-encrypt2=yes|no
Use the Server Side Encryption option (S3) on the Left/Right side.
/accesspolicy1=<policy> /accesspolicy2=<policy>
Use the specified Access Policy option (S3) on the Left/Right side.
/aws4-auth1=yes|no /aws4-auth2=yes|no
Use the AWS V4 Authentication option (S3) on the Left/Right side.
/show-native1=yes|no /show-native2=yes|no
Show native Google Docs/Drive files by converting them to external format (GDocs).
That makes Analyze and Sync run slowly, as even Analyze of a native file requires to convert it.
/active1=yes|no /active2=yes|no
Use Active (no: Passive) FTP mode on the Left/Right side.
/mdtm1=yes|no /mdtm2=yes|no
Use the MDTM command in FTP on the Left/Right side.
/mlsd1=yes|no /mlsd2=yes|no
Use the MLSD command in FTP on the Left/Right side.
/implicit1=yes|no /implicit2=yes|no
Use Implicit Mode (no: Explicit mode) in FTPS on the Left/Right side.
/listla1=yes|no /listla2=yes|no
Use the "LIST -la" command for listings (FTP) on the Left/Right side.
/move-level-only=yes|no
Set the MOVE command (FTP) to work at one folder level only on the Left/Right side.
/tls-sess-reuse=yes|no
Require TLS session reuse (FTPS) on the Left/Right side.
/pk1=<file-path> /pk2=<file-path>
Absolute path to an SFTP private key file for the Left/Right side.
Absolute path to a WebDAV/GSTP private certificate file for the Left/Right side.
/can-otp1=yes|no /can-otp2=yes|no
Use the OTP (One Time Password) authentication on the Left/Right side (GSTP, non-persistent).
/otp1=value /otp2=value
OTP value received for the Left/Right side (GSTP, non-persistent).
General options
/dir=2way | ltor | rtol
Job direction: 2-way, Left to Right (ltor), or Right to Left (rtol).
/deletions=yes|no
Propagate Deletions option.
/fast-1way=yes|no
Fast 1-way NoState NoLock mode.
/create-if-not-found=yes|no
Create the Job sync folder(s) if not found. Default: no.
/balloon-msg=none|errors|changes
Show Balloon option.
/save-prev-version=yes|no
Save files overwritten or deleted by GoodSync to the _gsdata_\_saved_ folder.
Only one last version of the file is saved.
/cleanup-prev-version=yes|no
Whether to clean up the previous file version.
/days-prev-version=<number>
Number of days for which to keep the previous file version.
/save-past-versions=yes|no
Save past versions of files overwritten or deleted by GoodSync to the _gsdata_\_history_ folder.
Many file versions are saved, one per every overwrite or delete of the file.
/cleanup-past-versions=yes|no
Whether to clean up past file versions.
/days-past-versions=<number>
Number of days for which to keep past file versions.
/reconnect-secs=<number>
Number of seconds for reconnect attempts.
/run-parallel-threads=yes|no
Run parallel worker threads when doing Sync.
/worker-threads=<number>
Number of worker threads to execute in parallel on Sync.
/speed-limit=<number>
File copy speed limit in Kb/sec.
Filters
Job Filter Options are equal to those of the Global Filter Options:
/exclude=<file-mask>
Exclude Filter.
File Mask is a |-separated list of patterns such as *.obj or \folder\file.
Several /exclude options may be provided, and their values will be glued together, separated by "|".
/include=<file-mask>
Include Filter.
File Mask is a |-separated list of patterns such as *.obj or \folder\file. Several /include options may be provided, and their values will be glued together, separated by "|".
/exclude-empty=yes|no
Exclude empty folders from the Job.
/exclude-hidden=yes|no
Exclude Hidden files and folders from the Job.
/exclude-system=yes|no
Exclude System files and folders from the Job.
Auto options
/on-file-change=analyze|sync|no
Automatically Analyze/Sync on any file change inside local sync folders.
/onfilechange-delay=<number>
Sets the delay for the /on-file-change option in seconds.
/on-folder-connect=analyze|sync|no
Automatically Analyze/Sync on Folder Connect.
/on-start=analyze|sync|no
Automatically Analyze/Sync on Start of GoodSync.
/autostart-delay=<number>
On Start delay in seconds.
/on-timer=analyze|sync|no
Automatically Analyze/Sync on a timer (every N minutes set by /timer-period).
/timer-period=<number>
Timer period in minutes for /on-timer option.
/on-logout=sync|no
Automatically Sync on Logoff from Windows account.
/on-schedule=analyze|sync|no
Automatically Sync on Schedule.
/schedule-min=list-of-number-ranges (0 to 59)
Minutes on which to run in /on-schedule.
/schedule-hour=list-of-number-ranges (0 to 23)
Hours on which to run in /on-schedule.
/schedule-day=list-of-number-ranges (1 to 31)
Days of the month on which to run in /on-schedule.
/schedule-month=list-of-number-ranges (1 to 12)
Months on which to run in /on-schedule.
/schedule-dow=list-of-number-ranges (0=Sun to 6=Sat)
Days of week on which to run in /on-schedule.
/auto-unattended=yes|no
Run Job without user interface (Unattended).
/limit-changes=<number>
Do not Sync if too many files have changed.
The number may range from 0 to 100.
/wait-for-locks=yes|no
Wait for Locks instead of producing an error.
/wait-for-locks-minutes=<number>
Waiting period for Wait for Locks, in minutes.
/autoclear=yes|no
Auto Clear Sync Tree after Sync.
Conflict Resolving options
/resolve-weak-conflicts=yes|no
Auto-Resolve Weak Conflicts (when one side has no item generations).
/autoresolve=no|left|right|newer
Auto-Resolve Conflicts option: Do Not Copy, Left wins, Right wins, Newer wins.
/rename-losing-file=yes|no
Rename the losing file in the conflict instead of deleting it.
Script options
/pre-analyze-action=<email-addr|program-path>
Pre-Analyze Email address or Program path.
/post-analyze-action=<email-addr|program-path>
Post-Analyze Email address or Program path.
/post-sync-action=<email-addr|program-path>
Post-Sync Email address or Program path.
Advanced options Sync Time
/copy-create-time=yes|no
Copy File/Folder creation time.
/copy-attrs=yes|no
Copy Attributes (a la rwxrwxrwx).
/copy-ext-attrs=yes|no
Copy Extended Attributes (Mac only).
/copy-owner=yes|no
Copy File Owner: not needed if Copy ACL is on.
/copy-acl=yes|no
Copy ACL security attributes.
/move-mode=yes|no
Move Mode: Delete source files after Copy.
/delete-empty-folders-on-move=yes|no
Move Mode: Delete empty source folders after Copy.
/copy-locked=yes|no
Copy locked files using the Windows Shadow Copy Service (Windows only).
/uber-unlocked=yes|no
Uber-unlocked mode for files being read.
/copy-original-fs-names=yes|no
Do not change prohibited symbols (works well on Mac to Mac Jobs only).
Advanced options Analyze Time
/compare-md5=yes|no
Compare MD5 checksums in Analyze for all files.
/detect-moves=yes|no
Detect file and folder Moves and Renames instead of doing Copy + Delete.
/est-req-space=yes|no
Estimate the required free space needed for Sync.
/links=ignore|copy-asis|drill-down
Folder symbolic links processing mode.
Left/Right Folder options
/compare-checksums1=yes|no /compare-checksums2=yes|no
Compare Checksums when needed on the Left/Right side.
/compare-ext-attrs1=yes|no /compare-ext-attrs2=yes|no
Compare Extended Attributes on the Left/Right side.
/compare-attrs1=yes|no /compare-attrs2=yes|no
Compare Attributes on the Left/Right side.
/compare-owner1=yes|no /compare-owner2=yes|no
Compare Owner on the Left/Right side.
/compare-acl1=yes|no /compare-acl2=yes|no
Compare ACL on the Left/Right side.
/no-gsdata1=yes|no /no-gsdata2=yes|no
No _gsdata_ folder on the Left/Right side.
/no-listdir1=yes|no /no-listdir2=yes|no
No ListDir (trust state file) on the Left/Right side.
/temp-dest-file1=yes|no /temp-dest-file2=yes|no
Use temp files to copy files on the Left/Right side.
/compress-type1=no|plain|deflate /compress-type2=no|plain|deflate
Method to compress file bodies on the Left/Right side.
/cipher-type1=no|zipcrypto|aes-256 /cipher-type2=no|zipcrypto|aes-256
Method to encrypt file bodies on the Left/Right side.
/encrypt-files1=yes|no /encrypt-files2=yes|no
Encrypt file bodies on the Left/Right side.
/encrypt-paths1=yes|no /encrypt-paths2=yes|no
Encrypt file paths on the Left/Right side.
/encrypt-password1=str /encrypt-password2=str
Encryption Password on the Left/Right side.
/fat-like1=yes|no /fat-like2=yes|no
A FAT-like File System on the Left/Right side.
/compress1=yes|no /compress2=yes|no
Compress files using NTFS compression on the Left/Right side.
/uncompress1=yes|no /uncompress2=yes|no
Uncompress files using NTFS compression on the Left/Right side.
Return codes
Return (Exit) Code for the last Job that was run is returned by GSYNC:
0 - Normal completion: Analyze with No Change or Sync with Success.
1 - Analyze did not finish: Stopped by the user.
2 - Analyze did not finish: Terminal Error such as No Sync Folder.
3 - Analyze finished with Non-terminal Errors and maybe Conflicts.
4 - Analyze finished with Conflicts but No Errors.
11 - Sync did not finish: Stopped by the user.
12 - Sync did not finish: Terminal Error such as No Sync Folder.
13 - Sync finished with Non-terminal Errors and maybe Conflicts.
14 - Sync finished with Conflicts but No Errors.
Negative - error when starting GSYNC.
Non-terminal errors do not return an error code, these are logged to the log file.
TIX: Readable Job descriptors
GoodSync can export, import, write, and read the list of its Jobs in an XML-like text format called TIX.
Use the "Tools" >> "Export All Jobs" or "Tools" >> "Export Selected Jobs" menu item to export Jobs to a .TIX file. On Mac, only the "GoodSync" >> "Export All Jobs" option is available.
- Using TIX provides several benefits:
- Automation: Programs can generate GoodSync Jobs without starting GoodSync GUI.
- Archiving: Readable and printable backup format for Job List.
- A TIX file includes all GoodSync settings:
- Program Options;
- Server Account list (for Server Account Manager);
- Job list;
- Group list.
A typical TIX file looks like this:
  <GoodSyncSettings>
  ProgOptions = <ProgramOptions>
  GlobalFilterIncluded = <FileMask>
  Matches = ( ) </FileMask>
  GlobalFilterExcluded = <FileMask>
  Matches = (
      "name *._gstmp"
      "/System Volume Information"
      "Thumbs.db"
      ".DS_Store"
  ) </FileMask>
    WarnAboutTrayOnClose = Yes
    SaveMonthsOldGens = 12
    InstallNewVersion = No
  SmtpServer = <SmtpServer>
      Host = "mail.com"
      Port = 465
      UserID = "user"
      PasswordEncrd = "password-garbled"
      SecureSSL = Yes
      SenderEmail = "user@mail.com"
  </SmtpServer>
  ProxyServer = <ProxyServer> Port = 3128 </ProxyServer>
  AutoJobQuantSec = 3
  </ProgramOptions>
  ServerAccounts = <AccountManager>
  Servers = { | <ServerAcct>
    Key = "gdrive://user@www.googleapis.com"
  Conn = <Connect> </Connect>
  ServerBmks = {
  | <AcctBmk>
    Url = "gdrive://www.googleapis.com/dir-1"
    Opts = <FolderOptions> </FolderOptions>
  </AcctBmk>
  | <AcctBmk>
    Url = "gdrive://www.googleapis.com/Dir-B"
    Opts = <FolderOptions>
      EncryptFiles = Yes
      EncryptPaths = Yes
      EncryptionPassword = "..."
  </FolderOptions>
  </AcctBmk>
  } </ServerAcct>
  ... (more accounts) ...
  </AccountManager>
  Jobs = {
  | <Job>
  Name = "My Job Name"
  Side1 = <SideOptions>
    Conn = <Connect>
      Url = "file:///D:/test/FTP"
    </Connect>
    AcctKey = "file://@"
    AcctUrl = "file:///D:/test/FTP"
  </SideOptions>
  Side2 = <SideOptions>
    Conn = <Connect>
      Url = "ftp://ftp.company.com/folder"
      UserID = "user"
      PasswordEncrypted = "alshjdkasjhd/s="
    </Connect>
    AcctKey = "ftp://mdpro@quickdesigner.mk-group.com"
    AcctUrl = "ftp://quickdesigner.mk-group.com/USImages"
  </SideOptions>
  Direction = 1
  PropagateDeletions = No
  SavePreviousVersion = No
  CleanupPreviousVersion = No
  FiltersExcluded = <FileMask>
  Matches = (
    "*.jpg"
    "*.docx"
    "*.zip"
    "*.txt"
    "*.xml"
  ) </FileMask>
  ExcludeHidden = Yes
  ExcludeSystem = Yes
  LimitChangesPercent = 100
  AutoResolveConflicts = 1
  CopyCreateTime = Yes
  CopyLockedFiles = No
  RetrySyncIfFileChanges = Yes
  DetectMovesAndRenames = Yes
  LinksOption = 1
  </Job>
  ... (more jobs) ...
  }
  Groups = {
  | <Group>
    Name = "MyGroup"
    JobsInGroup = {
   | "Job 1"
   | "Job 2"
   | "Job N"
   } </Group>
  ... (more groups) ...
  } </GoodSyncSettings>
  </listing>
TIX, File, and Registry: Who decides
These registry values control the format and source of loading and saving of the Job List and Program Options. These values are taken from the registry key "HKEY_CURRENT_USER\Software\Siber Systems\GoodSync" and they are DWORDs.
JobsLoadRegistry = 1: Load/save Job List and Program Options from registry values in TIX format.
JobsLoadRegistry = 0: Load/save Job List from the jobs.tix file, and Program Options from the options.tix file. Default setting.
If the option to load/save Job List from the Registry is set, then registry values "HKEY_CURRENT_USER\Software\Siber Systems\GoodSync\Jobs\job-name\tix" are used. Each Job gets its registry key, and a value named "tix" in that key contains a TIX string that describes the Job. The TIX string does not have newline characters.
General rules
Newline characters can be used to improve readability, but they are not required.
Each property is recorded as "name = value", where the value can be a single constant, an object in object brackets, or a list presented as "(element1 element2 ... elementN)".
Boolean constants can appear as "Yes", "No", "T" or "F".
Strings appear as "text" (double quotes required).
Special characters within the string can be represented as follows:
\n new line
\\ backslash
\" double quote character
\NNN; a non-printable character whose decimal code is NNN.
Job properties
Appear in <Job> ... </Job> brackets.
General
Name = "Job Name"
Side1 = <SideOptions> SiberOptions </SideOptions>
Side2 = <SideOptions> SiberOptions </SideOptions>
Direction = 0 for 2-way | 1 for Left to Right | 2 for Right to Left
PropagateDeletions = Yes | No
ShowBalloon = 0 for Never | 1 for On Errors | 2 for On Errors and Info
SavePreviousVersion = Yes | No
SaveDaysPreviousVersion = Ndays
CleanupPreviousVersion = Yes | No
SavePastVersions = Yes | No
SaveDaysPastVersions = Ndays
CleanupPastVersions = Yes | No
CleanupOldGenerations = Yes | No
SaveMonthsOldGens = Nmonths
ReconnectSeconds = Nseconds
SyncParallelThreads = Yes | No
DeleteEmptyFoldersMove = Yes | No
WorkerThreads = Nthreads
SpeedLimit = number
UpSpeedLimit = number
LimitRunTime = Yes | No
MaxTimeToRun = Nminutes
ShutdownAfterRun = Yes | No
Filters
ExcludeEmptyFolders = Yes | No
ExcludeHidden = Yes | No
ExcludeSystem = Yes | No
FiltersIncluded = Matches <FileMask> ( "string" ... ) </FileMask>
FiltersExcluded = Matches <FileMask> ( "string" ... ) </FileMask>
Auto
OnFileChangeAction = 0 for No | 1 for Analyze | 2 for Analyze and Sync
OnFileChangeDelay = Nseconds
OnFolderConnectAction = 0 for No | 1 for Analyze | 2 for Analyze and Sync
OnStartAction = 0 for No | 1 for Analyze | 2 for Analyze and Sync
AutoStartDelay = Nseconds
OnTimerAction = 0 for No | 1 for Analyze | 2 for Analyze and Sync
TimerIntervalHours = Nhours
TimerIntervalMinutes = Nminutes
OnLogoutAction = 0 for No | 2 for Analyze and Sync
LimitChangesPercent = Npercent
AutoResolveConflicts = 0 for disable | 1 for LtoR | 2 for RtoL | 3 for Newer Wins
WaitForLock = Yes | No
WaitForLocksMinutes = Nminutes
AutoClearTree = Yes | No
Scripts
PreAnalyzeScriptOrEmail = "string"
PostAnalyzeScriptOrEmail = "string"
PostSyncScriptOrEmail = "string"
Advanced
CopyCreateTime = Yes | No
CopyAttrs = Yes | No
CopyExtendedAttrs = Yes | No
CopyACL = Yes | No
CopyOwner = Yes | No
CopyLockedFiles = Yes | No
UberUnlockedUpload = Yes | No
CompareMD5crc = Yes | No
DetectMovesAndRenames = Yes | No
EstimateRequiredSpace = Yes | No
LinksOption = 0 for Ignore | 1 for Copy As Is | 2 for Drill Down
RenameLosingFile = Yes | No
Folder properties
Appear in <FolderOptions> ... </FolderOptions> brackets.
CompareCheckSums = Yes | No
CompareAttrs = Yes | No
CompareOwner = Yes | No
CompareACL = Yes | No
NoGsData = Yes | No
NoListDirTrustStateFile = Yes | No
Compress = Yes | No
Uncompress = Yes | No
FatLike = Yes | No
Connectoid properties
Appear in <Connect> ... </Connect> brackets.
GoodSync connectoid describes how to connect to the Server.
Url = "string"
UserID = "string"
PasswordEncrypted = "string"
DisplayName = "GoodSync string"
Utf8 = Yes | No (all server File Systems)
UseProxy = Yes | No (all server File Systems)
BadCerts = Yes | No
PrivateKey = "file-path"
WinInet = Yes | No (DAV only)
UploadChunksThreads = Nthreads
ActiveMode = Yes | No (FTP only)
UseMDTM = Yes | No (FTP only)
UseLISTla = Yes | No (FTP only)
ImplicitMode = Yes | No (FTP only)
UseEPSV = Yes | No (FTP only)
MoveLevelOnly = Yes | No (FTP only)
HostBasedAddr = Yes | No (S3 only)
AccessPolicy = private | public-read | public-read-write | authenticated-read
ServerEncrKey = "file-path"
ReducedRedundancy = Yes | No (S3 only)
InfrequentAccess = Yes | No (S3 only)
ServerSideEncryption = Yes | No (S3 only)
RequireCheckSum = Yes | No (S3 only)
AwsUsGovCloud = Yes | No (S3 only)
GraphLocation = (empty) for us-east-1 | af-south-1 | ap-east-1 | ap-northeast-1 | ap-northeast-2 | ap-northeast-3 | ap-south-1 | ap-southeast-1 | ap-southeast-2 | ca-central-1 | cn-north-1 | cn-northwest-1 | EU | eu-central-1 | eu-north-1 | eu-south-1 | eu-west-1 | eu-west-2 | eu-west-3 | me-south-1 | sa-east-1 | us-east-2 | us-gov-east-1 | us-gov-west-1 | us-west-1 | us-west-2 (S3 only)
GraphGroupReadPermissions = Yes | No (MSGraph only)
GraphLocation = (empty) for International | US | DE | CN (MSGraph only)
StorageClass = archive | cold | hot (MS Azure only)
Program options
Appear in <ProgramOptions> ... </ProgramOptions> brackets.
GlobalFilterIncluded = Matches <FileMask> ( "match-string" ... ) </FileMask>
GlobalFilterExcluded = Matches <FileMask> ( "match-string" ... ) </FileMask>
HideToTrayOnClose = Yes | No
WarnAboutTrayOnClose = Yes | No
ShowTrayIcon = Yes | No
ShowJobListWindow = Yes | No
ShowFiltersWindow = Yes | No
ShowLogWindow = Yes | No
ShowStatusBar = Yes | No
GroupSimilarLogLines = Yes | No
CheckNewVersion = Yes | No
CreateFolderIfNotFound = Yes | No
DeleteSourceAfterCopy = Yes | No
AutoHideMiniWindow = Yes | No
LogLevel = 0 for critical | 1 for errors | 2 for info | 3 for details
LogRetainDays = N (number of days)
LogFolder = "folder-path"
MirrorFolderPath = "folder-path"
CompareProgramPath = "file-path"
UseSmtpToEmail = Yes | No
SmtpImported = Yes (imported already) | No (import from windows)
SmtpServer = <SmtpServer> SmtpServer-property ... </SmtpServer>
ProxyServer = <ProxyServer> ProxyServer-property ... </ProxyServer>
SMTP options
Appear in <SmtpServer> SmtpServer-property ... </SmtpServer> brackets.
Host = "IP name of SMTP server"
Port = N (recommended: 587 for No SSL, 465 for SSL)
UserID = "user-id for authenticated SMTP"
Password = "password for authenticated SMTP"
SecureSSL = Yes | No
StartTls = Yes | No
SenderEmail = "sender@company.com"
Proxy options
Appear in <ProxyServer> ProxyServer-property ... </ProxyServer> brackets.
UseWinInetProxy = Yes (use the proxy of Internet Explorer / WinInet) | No (no auto proxy)
UseProxyBelow = Yes (use the proxy specified below) | No (no proxy)
Host = "IP name of proxy server"
Port = N (port on proxy server)
UserID = "user-id for authenticated proxy"
Password = "user-id for authenticated proxy"
Policies
Policies are used by system administrators to enforce enterprise-wide rules that limit or change GoodSync behavior.
Policies are available in GoodSync Enterprise only.
Policies are defined by registry values located in this registry key:
HKEY_LOCAL_MACHINE\SOFTWARE\Policies\Siber Systems\GoodSync
The Administrator would set these values via Active Directory to affect GoodSync behavior.
- The Administrator can also use the GoodSync policy template that helps in setting the Registry:
- Select Start >> "Run," or use the Win+R shortcut, type: gpedit.msc, and press Enter.
- In the tree, go to "Local Computer Policy" >> "Computer Configuration" >> "Administrative Templates."
- Right-click "Administrative Templates," select "Add/Remove templates" >> "Add...".
- Browse for goodsync.adm in "Program Files\Siber Systems," and click "Close."
- The new sub-tree with GoodSync policies will appear under "Administrative Templates."
- To enable a policy, select this policy in Editor, right-click it, select "Enabled."
- The policy will become effective after GoodSync restart.
The following policies are available:
ProfilePath: Custom GoodSync Profile path.
ForceMiniMode: Start GoodSync in MiniMode and do not allow expanding it to the full size.
ForceTray: Start GoodSync minimized to tray and do not allow expanding it to the full size.
NoProgramOptions: Do not allow to change program options.
NoAutoUpdate: Disable AutoUpdate.
NoJobListEdit: Do not allow to add/delete/rename Jobs.
NoJobEdit: Do not allow to change Job paths or options.
NoJobExport: Do not allow exporting Jobs.
NoJobImport: Do not allow importing Jobs.
NoJobOptions: Do not allow change any Job Options.
NoOptionsGeneral: Do not allow to change General Job Options.
NoOptionsFilters: Do not allow to change Job Filters.
NoOptionsAuto: Do not allow to change Job Auto Options.
NoOptionsScript: Do not allow to change Job Script Options.
NoOptionsAdvanced: Do not allow to change Job Advanced Options.
DisableAzure: Disable Azure Blobs File System.
DisableAzureFile: Disable Azure Files File System.
DisableBackblaze: Disable Backblaze B2 File System.
DisableBox: Disable Box.com File System.
DisableDAV: Disable WebDAV File System.
DisableDropbox: Disable Dropbox File System.
DisableEncrypted: Disable Encrypted File System addon.
DisableFTP: Disable FTP File System.
DisableGDocs: Disable Google Docs File System.
DisableGDrive: Disable Google Drive File System.
DisableGoogleCloud: Disable Google Cloud S3-like File System.
DisableGPhoto: Disable Google Photo File System.
DisableGsStorage: Disable GoodSync RealDisk Online Storage File System.
DisableGstp: Disable GSTP File System.
DisableGTeamDrive: Disable Google Team Drive File System.
DisableICloud: Disable iCloud File System.
DisableICloudPhotos: Disable iCloud Photos File System.
DisableLocalNet: Disable SMB Shares (WindowsClient-based) File System.
DisableMega: Disable MEGA File System.
DisableMSGraph: Disable OneDrive Office365 SharePoint File System.
DisableMTP: Disable MTP File System.
DisableOneFile: Disable OneFile File System.
DisableS3: Disable Amazon S3 File System.
DisableSFTP: Disable SFTP File System.
DisableSibAfp: Disable AFP (SiberClient-based) File System.
DisableSMBD: Disable SMB Shares (SiberClient-based) File System.
GoodSync2Go: Portable version
- GoodSync2Go is a portable version of GoodSync that is:
- Installed on a removable drive (USB key or portable Hard Drive), not on a computer.
- Runs from the removable drive on which it is installed.
- Stores the Jobs and other settings on the removable drive.
- Licensed per removable drive, no per-computer license is required.
Otherwise, it does the same things as the regular GoodSync version.
- Advantages of GoodSync2Go:
- Portable list of Jobs, residing on a USB device.
- Portable license, residing on a USB device.
- Limitations of GoodSync2Go:
- Automatic elevation after Access Denied error is not done, because there is no GoodSync Server.
- The GoodSync Connect server part does not work, because GS2Go cannot install a service.
- The "On Schedule" Auto option does not work, because GS2Go cannot install a service.
- The "Start GoodSync when Windows starts" Auto option does not work.
- The "Copy locked files using VSS snapshots" feature does not work, because GS2Go cannot install a service.
GSCP: Command-line File System client
GSCP is a command-line interface to GoodSync File Systems, similar to a classic command-line FTP client.
GSCP can be used to script file operations in all File Systems that GoodSync supports.
These are GSCP commands:
gscp URL
Open the specified URL, and execute post-open commands.
UserID and Password may be embedded in the URL or specified separately after the URL.
Example:
gscp "sftp://user:password@myserver.com"
These commands are accepted by GSCP once it connects to the server:
| Command | Argument(s) | What it does |
| quit | Exit program | |
| ls | List the current remote directory | |
| pwd | Print current remote directory | |
| cd | dir-name | Change remote directory (no name means connect root) |
| pld | Print current local directory | |
| lcd | dir-name | Change local directory |
| md | dir-name | Create remote directory |
| rm | file-name | Delete remote file |
| rmd | dir-name | Delete remote folder |
| rmrf | dir-name | Recursively delete remote files and folders |
| mv | file-name-1 file-name-2 | Rename or move remote file/folder |
| put | file-name | Upload local file to remote folder |
| get | file-name | Download remote file to local folder |
| mstart | Start monitoring the current folder for changes | |
| mstop | Stop monitoring the current folder for changes | |
| mlist | List changes from monitoring | |
| help | Show this list of available commands | |
| info | Remote file system info | |
| open | url | Connect to another file system |
| close | Disconnect from current file system |
gscp get remote-file-url local-file-or-folder-path
Download a file from the remote File System to a local file or folder.
gscp put local-file-path remote-file-or-folder-url
Upload local file to remote File System file or folder.
gscp copy remote-file-url remote-file-or-folder-url
Copy a file from one remote File System to another.
gscp md remote-folder-url
Make a folder in the remote File System.
gscp rm remote-file-url
Delete a file in the remote File System.
gscp rmd remote-folder-url
Delete a folder in the remote File System.
gscp compare remote-file-url-1 remote-file-url-2
Compare two files, possibly in different remote File Systems.
Global proxy options
The following proxy options may be used. They must follow the main URL and credentials.
/proxy-auto=yes|no
Use the WinInet proxy (the one used by Internet Explorer).
/proxy-host=<host-name>
Use the proxy server set here by IP address or name, negates /proxy-auto option.
/proxy-port=<port-number>
Use this port on the proxy server specified in /proxy-host.
/proxy-userid=<userid>
UserID for proxy.
/proxy-passwd=<password>
Password for proxy.