GoodSync Control Center Manual
Applies to GoodSync for Windows, Mac, Linux, and NAS unless noted otherwise.
GoodSync Control Center Manual
- Introduction
- Administrator Guide
- Company Creation
- Navigation
- Dashboard
- Getting Started
- Job Runners
- Jobs
- Server Accounts
- Job Runs
- Reports
- Administrators
- Settings
- Runner Deployment
- Getting Company ID
- Deploying Runners on Windows
- Deploying Runners on Mac
- Deploying Runners on Linux/NAS
- Deploying Runners on Android
Introduction
GoodSync facilitates the synchronization of two or more folders containing files, ensuring that they are exactly the same after Sync. This process involves copying new or modified files from the source folder to the destination folder and, when needed, removing files to maintain identical content between the folders.
GoodSync Control Center centralizes the management of all GoodSync Clients (Windows, Mac, Linux, NAS, Server, Workstation), centrally distributes GoodSync Jobs, and Reports on Job Run statuses.
For more information about GoodSync, what it can do, and how to use it, please see the GoodSync Manual.
Administrator Guide
The GoodSync Control Center is an online service designed to enable companies to create and oversee jobs for runners installed on client devices. All company management tasks are performed online and are seamlessly integrated with GoodSync Workstation and Server installations.
To set up your company effectively, an administrative user should initiate the company creation process. Subsequently, runners are added to the company. Once authorized, these runners will be assigned specific jobs. As jobs are executed, their status is relayed back to the Control Center, providing a centralized platform for effortless monitoring and reporting.
Getting started with the GoodSync Control Center is easy. Follow the steps below from top to bottom.
Company Creation
-
Start by creating a Company Account here:
https://jobs.goodsync.com/ui/signup -
Fill in the form information provided.
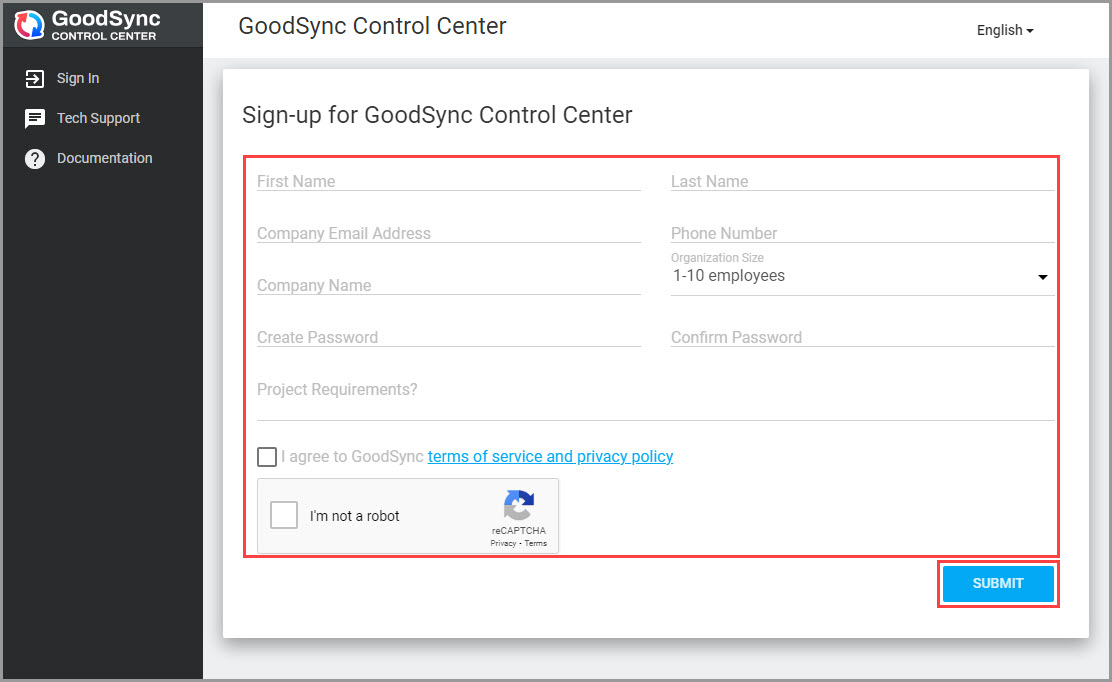
- Click "Submit" to submit the Company information.
-
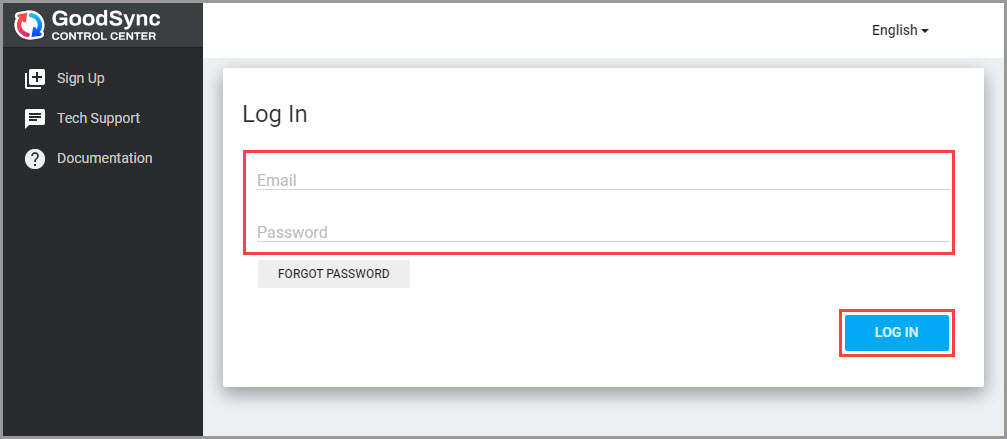
Once the Company Account is created, log in and proceed.
Navigation
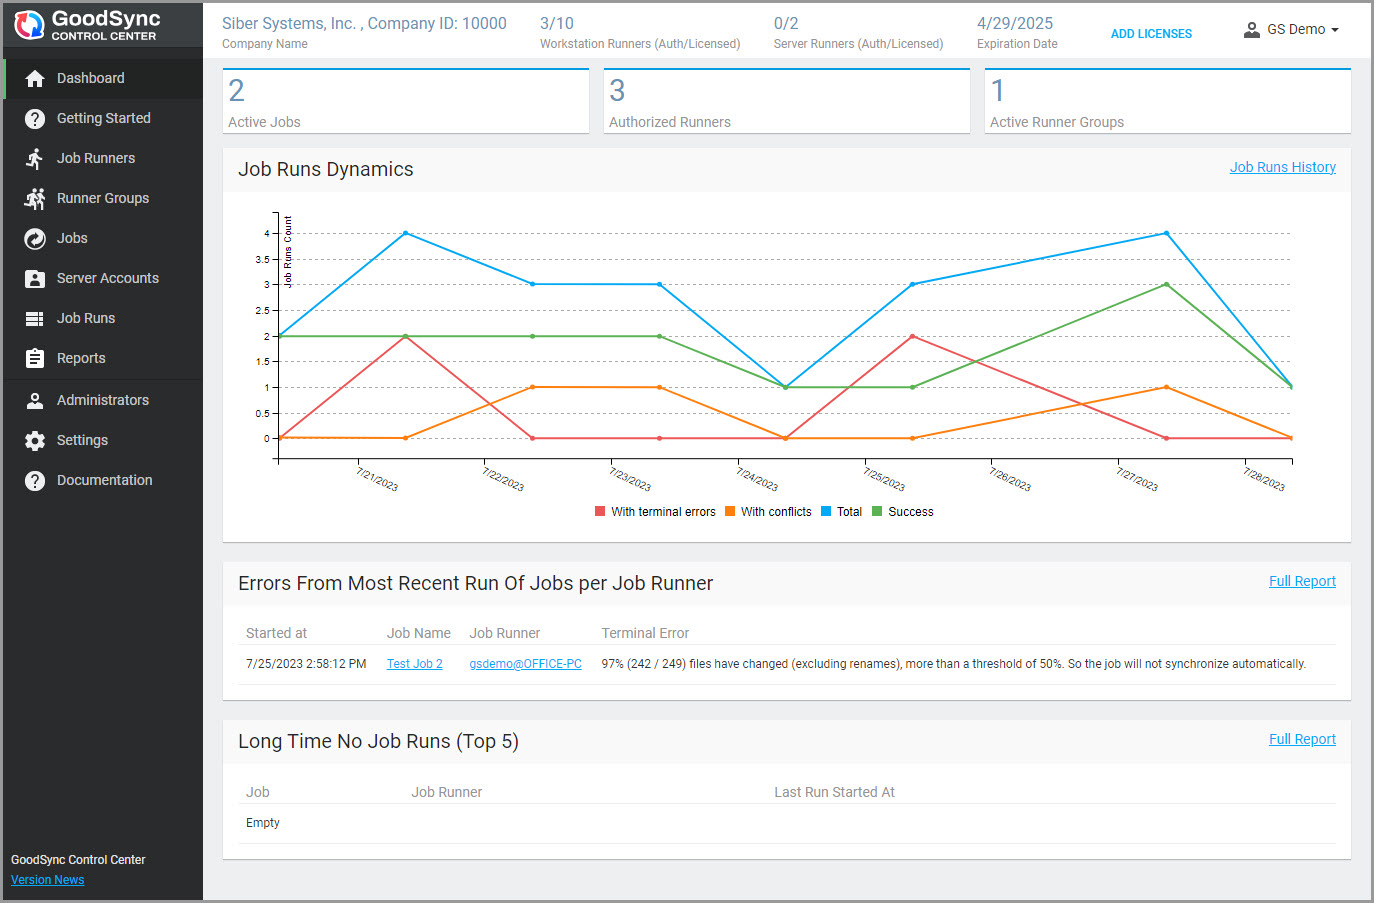
- After logging in, the Control Center Dashboard will be displayed. It presents with a navigation menu on the left:
- Dashboard contains global Company information, including Job Run errors, non-running Jobs, and basic Control Center Statistics.
- Getting Started introduces the GoodSync Control Center and provides quick-start instructions.
- Job Runners are a combination of a specific OS User on a specific Computer. So for Windows example of runner is 'John Smith@AccountingServer' where 'John Smith' is Windows user and 'Accounting Server' is a Windows machine. Runners are approved (authorized) by the Administrator before Jobs are sent to them.
- GoodSync Account may be assigned to Control Center Company, starting with CC ver 3.1.1. Then all Jobs and Server Accounts are taken from this GoodSync Account and there is no need in manual Job creation in Control Center.
- Jobs lists all GoodSync Jobs available through the Control Center. The Administrator may add/remove and edit all Job Options assign Runners to Jobs. A new and easier way is to create and edit Jobs in a regular GoodSync GUI client, then Sync Jobs to Control Center.
- Server Accounts lists all Server Accounts available for Jobs within the Control Center. Server Account constitute a Password Manager of sorts, used by Jobs. So if server credentials change in one Job, this change is automatically visible to another Job, because they refer to the same Server Account. Server Account are taken from GoodSync GUI client which is assigned to the same GoodSync Account as Company here in Control Center.
- Job Runs show list of all Runs of all Jobs on all Runners, so it is a history of what Runners did on all your Computers, with detailed logs.
- Reports show compiled Job information on specific backups and sync for all Runners.
- Administrators allow management of Company Administrators.
- Settings contain global settings for the Control Center, including Global Job Options, Authorization settings, Administrator settings, etc.
- Documentation refers to this Manual.
Dashboard
At the top, see the Control Center figures: the number of licensed and authorized Workstation and Server Runners and the license expiration date.
Purchase licenses directly by clicking the "Purchase" / "Add Licenses" button.
Clicking the Administrator's Name on the top-right allows the ability to edit the Profile (Name, Email address, and Password) or Log out of the Control Center.
Below, see a read-only glance at Job Runs statistics, including Errors From the Most Recent Run Of Jobs per Job Runner and Long Time No Job Runs.
A more detailed view of this information can be found under Reports.
Getting Started
The "Getting Started" section offers a concise introduction to the Control Center, outlines its features, and provides instructions on initiating your experience with the Control Center.
Click the "Start an Interactive Tour" button to start a tour that will provide step-by-step guidance.

Job Runners
A Runner consists of a particular User on a specific Computer. To be eligible to receive Jobs, each Runner must receive authorization from an Administrator.
The total count of Computers with established GoodSync service, combined with the total number of Users on those Computers, determines the overall requirement for GoodSync Runners in the system.
The Control Center will automatically incorporate Runners into its system as they are configured.
NOTE: For more details on setting up a Runner to receive Jobs from the Control Center, please see the Runner Deployment chapter.
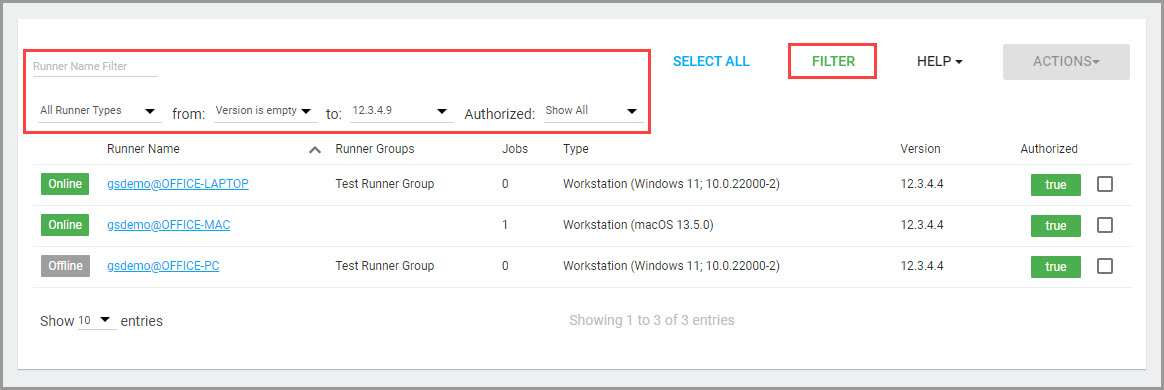
To start with this section, a List of all existing Runners will be displayed:
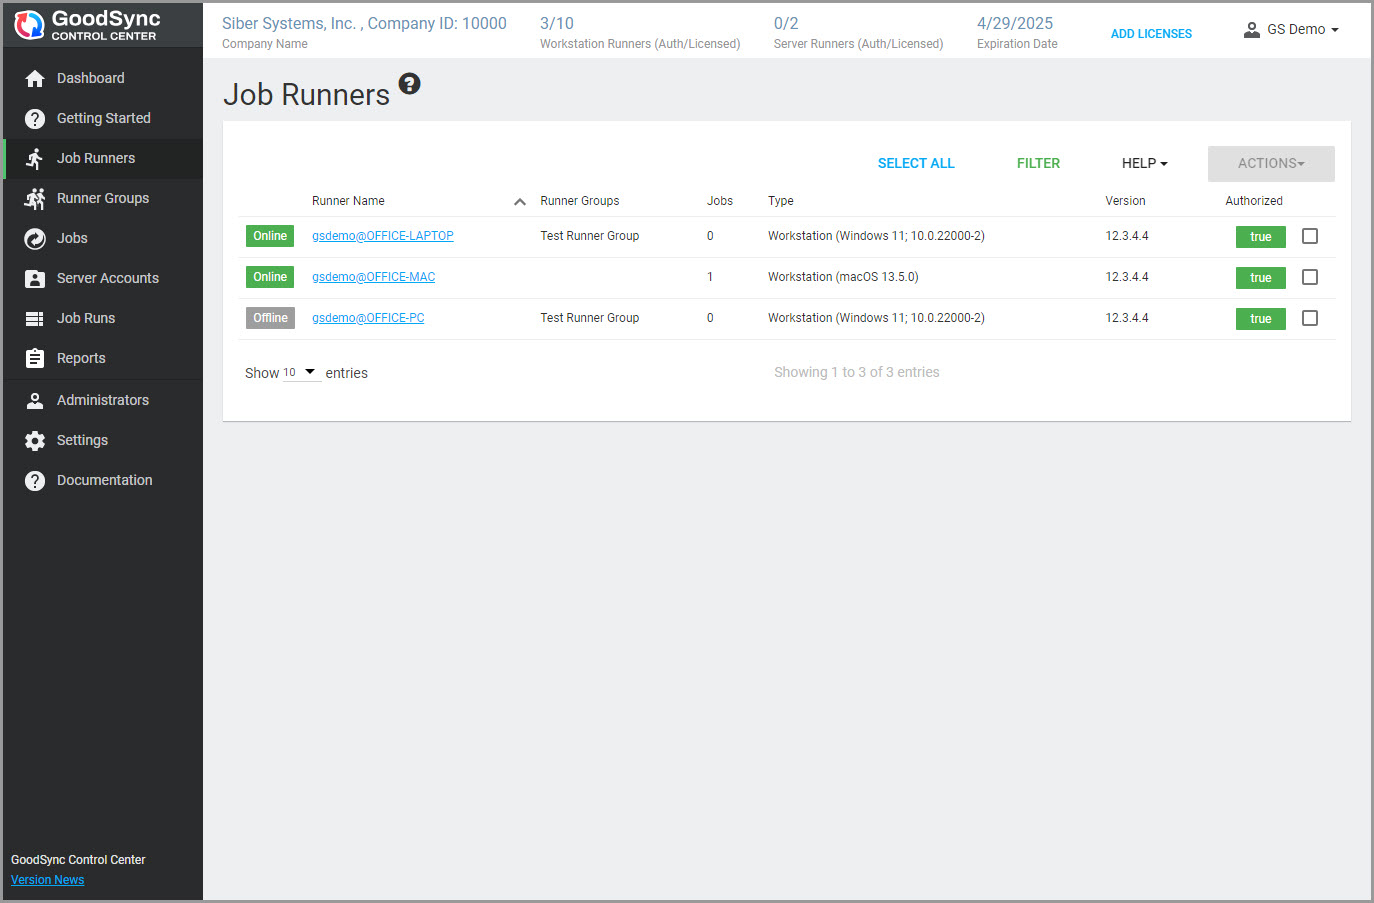
The List can be sorted by Runner Name, or Jobs assigned to the Runner, and Runner version by clicking the corresponding column header.
To find the necessary Runners within the List, click the "Filter" button. Filter by Runner Name, Runner Type (Workstation or Server), Runner version, and Authorization status (All/Authorized only/Disallowed only).
Authorizing Runners
Authorizing or Deauthorizing (Disallowing) a Runner means setting whether this Runner will or will not receive and run assigned Jobs.
Authorizing Runners in bulk using the "Actions" button within the Runner List or from the Runner details using the "Authorize/Disallow" button, as described below.
Runner Details
From the Runner List, click on the Name of a Runner. That will bring up the Runner details screen. Here, discover the tools for managing and tracking Runners.
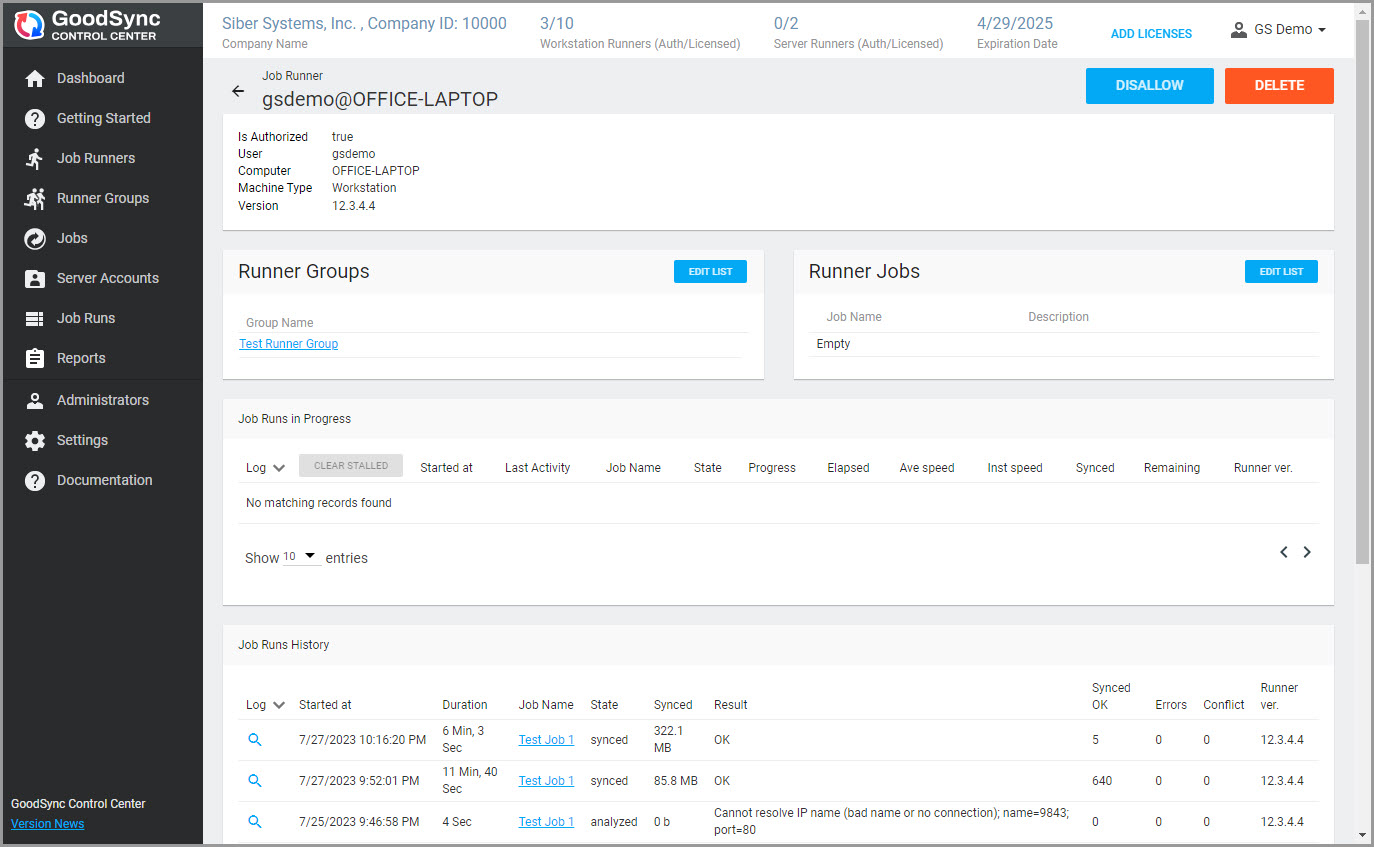
On the top right, the "Authorize/Disallow" and "Delete" buttons allow performing the corresponding actions.
NOTE: Deleting a Runner will delete it from the Control Center but not from the Computer it is installed on.
Below the buttons, a panel with information (Authorization status, User and Computer names, Runner Type, and version) about the Runner is shown.
The next panel, "Job Runs in Progress," displays a list of active Job Runs by this Runner (if any), their status, and progress. The list can be sorted by clicking the column header that serves as the sorting criteria.
At the bottom, in the "Job Runs History" panel, the history of Job Runs by this Runner is available. Click the magnifier icon in the "Log" column to view the detailed Job Run Log. Or click the Job Name to proceed to the Job details.
Assigning Runners to Jobs
To get a Job run, assign a Runner to it. For that:
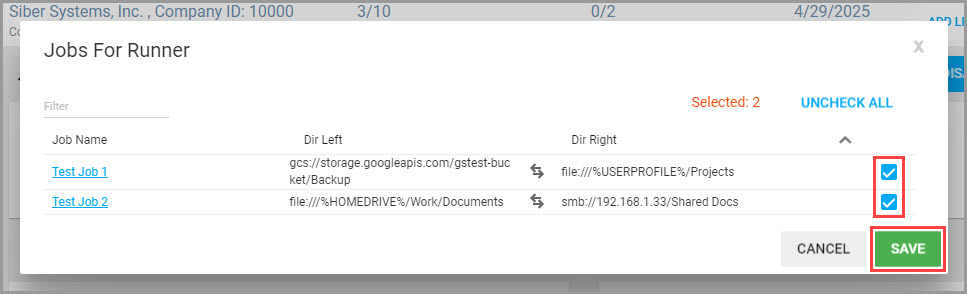
- Click the "Edit List" button on the "Runner Jobs" panel.
- This presents a list of all Jobs in the Control Center. Check the Jobs to assign to the Runner using the boxes on the right and click "Save" to apply the changes.
Runner Bulk Actions
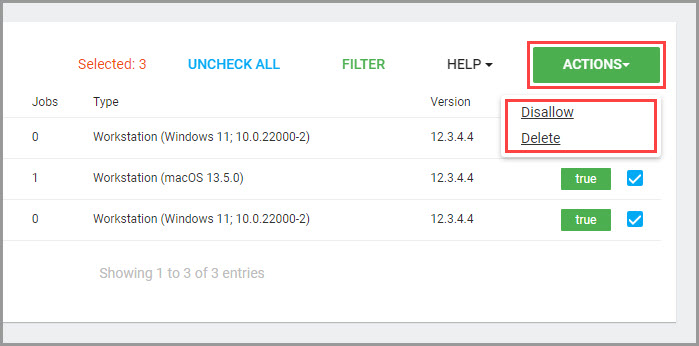
To Authorize or Deauthorize Runners in bulk, check the checkboxes on the right corresponding to the desired Runners, click the "Actions" button, and select "Authorize" or "Disallow," then click "Save."
Runners can be deleted from the Control Center by checking them and choosing "Delete" from the "Actions" menu.
Jobs
A Job is a fundamental unit of work in GoodSync that represents a synchronization or backup task. Each Job consists of a unique Job Name, optional Description, Left and Right Folders, and a wealth of fully configurable Job Options. The Job Options can be set to configure Versioning, Automatic Scheduling, Alerting, Scripting, and more.
A Job in the Control Center has all the same options as a Job created through the GoodSync GUI, except all Jobs assigned by the Control Center are run without a User Interface by default.
Learn more about GoodSync Jobs from the GoodSync Manual.
In this section, Jobs can be fully managed through the Control Center. Administrators may add/remove and edit all Job Options as well as assign Runners and Runner Groups to Jobs.
To start with the section, a List of all existing Jobs will be shown:
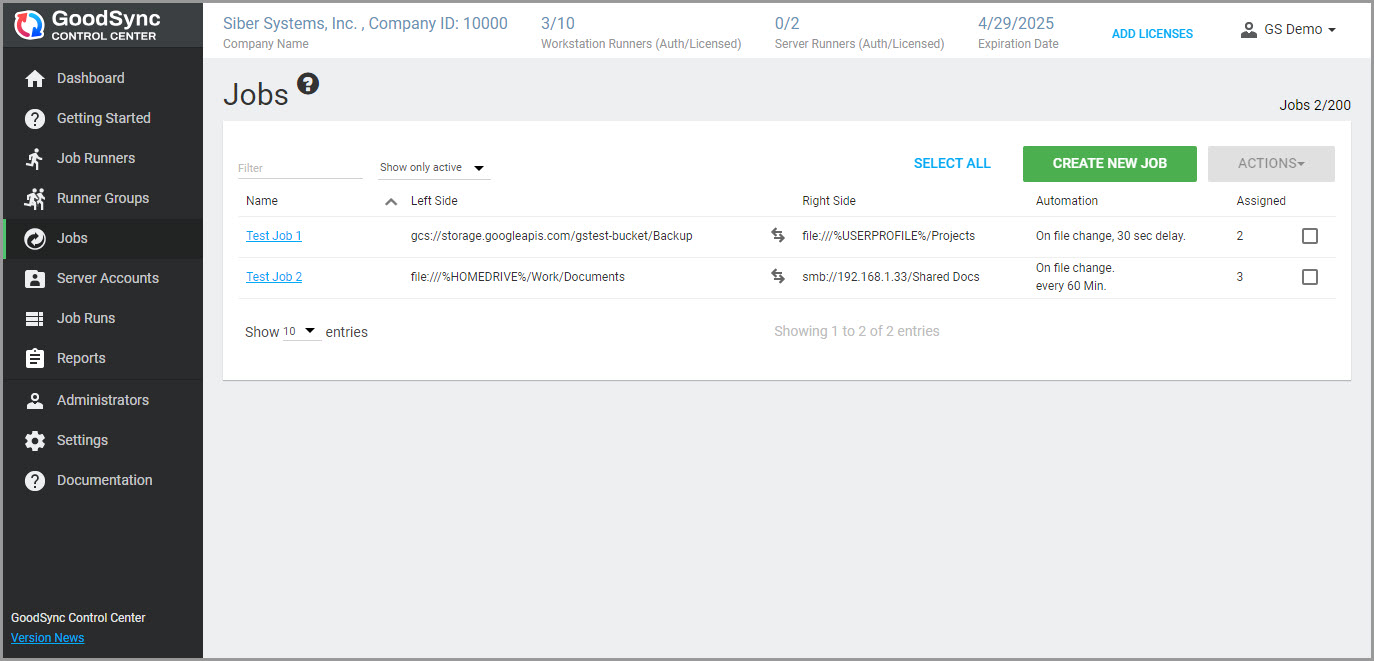
The Jobs can be filtered using the "Filter" field and the Jobs status drop-down. By default, only active Jobs are shown. To view all or only deactivated Jobs, click "Show only active" and select "Show All/Show only inactive."
Creating Jobs
- Now that Jobs can be synced from regular GoodSync GUI client, you do not have to Create them here, but you still can do it.
-
Click the "Create New Job" button in the Job List.
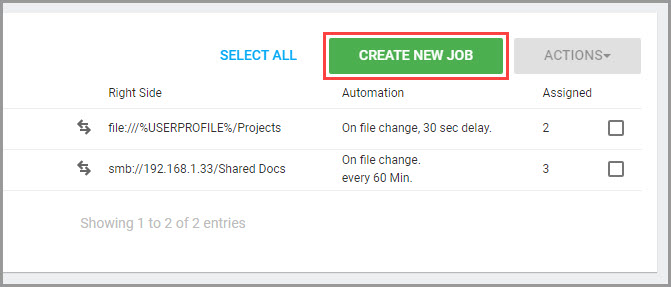
-
Next, a Job editing dialog that reflects all Job Options will be shown.
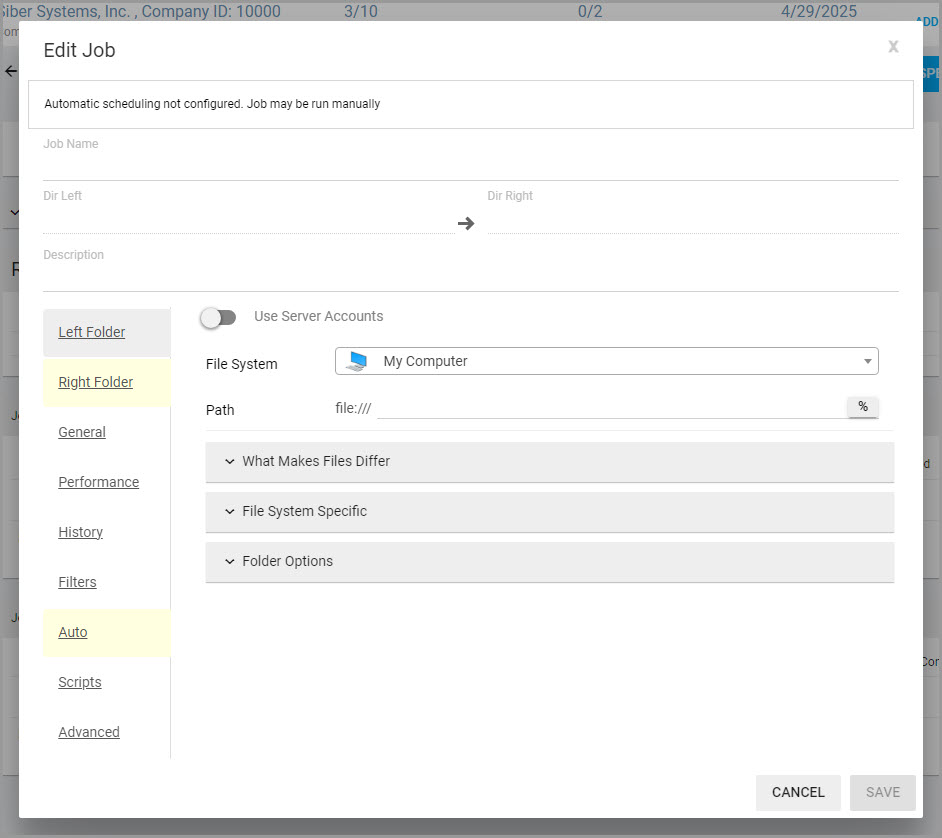
- Enter the Job Name and, optionally, the Job Description.
-
Set up the Left and Right Folders for the Job. The File System and Path can be specified manually, or a Server Account can be used.
A Server Account contains the address and credentials for a remote Server (like FTP, WebDAV, or cloud storage) stored in an encrypted format. Server Accounts may be configured in the GoodSync GUI application and synced to the Control Center.
NOTE: All Server Accounts available in the Control Center are displayed in the Server Accounts section. -
Next, on the "General" tab, set the Direction for the Job and other preferred Options such as Auto, Filters, and Scripts on their corresponding tabs.
NOTE: For detailed information about the GoodSync Job Options, please refer to the GoodSync Manual, which will lead through all the available options. -
When done, click the "Save" button to save the Job. Once the Job is created and saved, the Job Details screen will be shown.
NOTE: Jobs can also created only by local GoodSync GUI Client and then Syncing them to Control Center. Learn more from the Syncing Jobs to the Control Center chapter.
Job Details
On this screen, one can find the Job management and tracking tools.
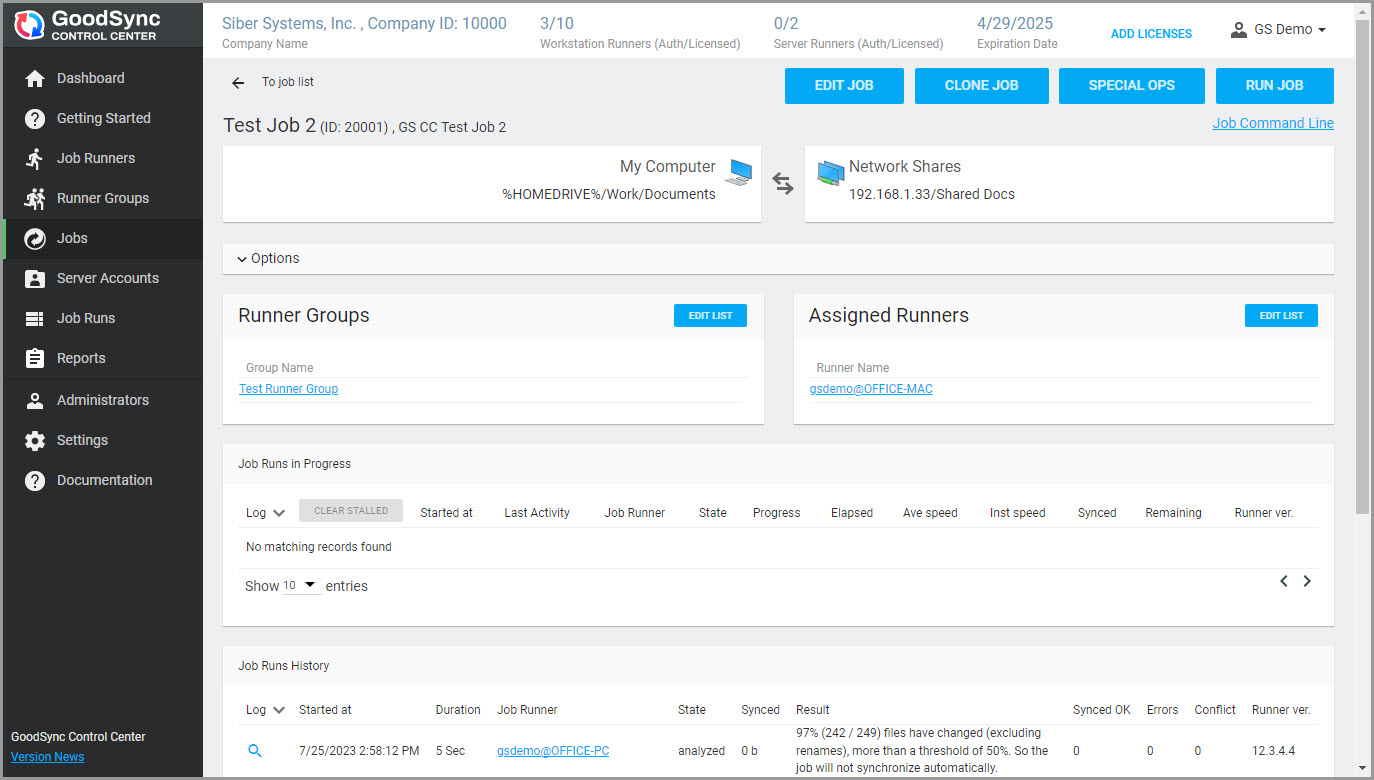
- At the top right, a group of buttons is visible:
- Edit Job. Open the Job editing dialog that allows changing the Job Options described above in the Creating Jobs chapter.
- Clone Job. Clone this Job and open the details of the cloned Job.
- Special Ops. Show the Special Operations window that provides options for performing some exotic Job actions (described below).
- Run Job. Run the Job manually on all Runners that this Job is assigned to.
Clicking the "Job Command Line" link will display a command that can be used to run this Job via a GoodSync command-line interface, for instance, via GSYNC.
Below the buttons, two panels reflecting the Left and Right Folders of the Job are displayed.
Further below, the "Options" panel shows the Options set for the Job.
Below the Options, there are two panels. The left panel displays the Runners Groups this Job is assigned to and allows editing of them. The right panel reflects the Runners this Job is assigned to and allows editing of them.
The next panel, "Job Runs in Progress," shows a list of active Runs of this Job, their status, and progress. The list can be sorted by clicking on the column header that corresponds to a preferred sorting criteria.
At the bottom, in the "Job Runs History" panel, the history of the Job Runs can be viewed. Clicking the magnifier icon in the "Log" column will open the detailed Job Run Log. Clicking the Job Runner Name will bring its details.
Assigning Jobs to Runners
- To assign Jobs to the Runner, click the "Edit List" button on the "Jobs Assigned to Runner" panel.
- This will display a list of all Runners in the Control Center.
- Check the boxes next to the Runners to which the Job should be assigned.
- When you check the box, you must select how to run the Job (WhatToDo), which is the same as Auto Option in GoodSync GUI client.
- Different Runners can have different WhatToDos for the same Job, to see them click Job name in the list.
- Finally click "Save" button to apply the changes (add screenshot here).
Timetable
Timetable represents summary of what Jobs will run on what Runner with what Automation option (WhatToDo).
You can change Automation option of every Job in this list.
To add new elements to Timetable, you should start with a Job and add Runners to it.
Or you can with a Runner and add Jobs to it.
(Add picture)
Running Jobs
If the Auto (scheduling) options are specified for a Job + Runner in Timetable, then Job will run as commanded by Automation option.
To run the Job manually once, click the "Run Job" button on the top right of the Job details screen.
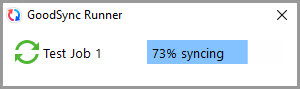
Here is an example of a Job Run by a Runner installed on Windows:
Job Bulk Actions
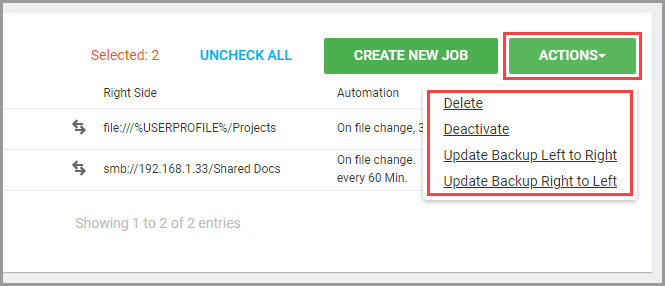
The "Actions" button in the Job List allows deleting, deactivating Jobs, or swapping their Left and Right Folders in bulk. Select the desired Jobs from the List by checking their boxes on the right, click "Actions," and click the appropriate menu item.
Deactivating a Job will prevent it from running by any Runners.
The "Update Backup Left to Right" and "Update Backup Right to Left" options allow swapping the Left and Right Folders for the backup Jobs.
Job Special Operations
Special Operations can be performed for Jobs to accomplish certain maintenance actions. These are primarily used for error resolution and/or cleanup.
A window will appear, allowing the selection of the Special Operation to perform, as well as the Runners to issue the operation to.
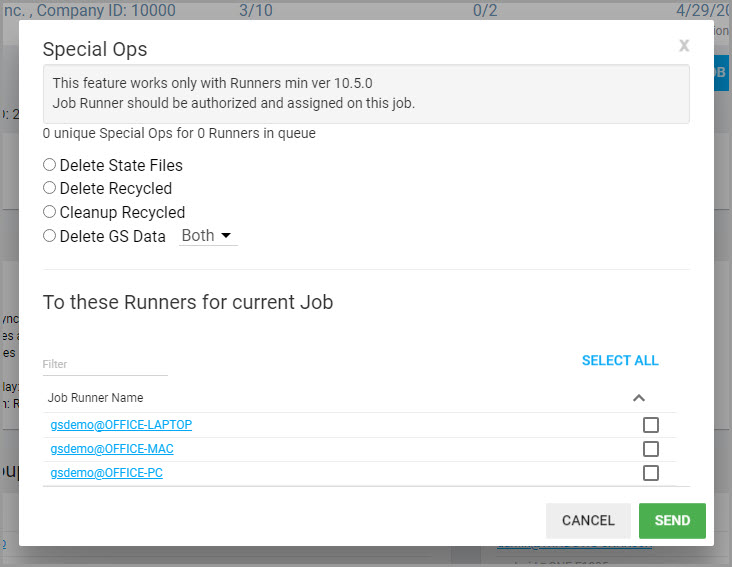
- The following options are available for Special Operation:
- Delete State Files. Delete GoodSync state files on both sides of this Job. If the state file becomes corrupted, this Special Operation may be used to clear the Job Run.
- Delete Recycled. Delete the recycled files located in the folder "_gsdata_/_saved_" and history files located in the folder "_gsdata_/_history_."
- Cleanup Recycled. Clean up the "_saved_" and/or "_history_" folders: delete any files that are older than the prescribed time (one month by default).
- Delete GS Data. Delete the GoodSync "_gsdata_" folder and all files contained in it on either side or both. Removes everything removed by "Delete Recycled" and "Delete State Files," plus all Job Log files.
Server Accounts
A Server Account contains the address and credentials used in the GoodSync GUI application to access any supported File System (e.g., an FTP server or a cloud storage).
Syncing Jobs and Server Accounts to the Control Center
Uploading of Server Accounts has been replaced with Account Sync of GoodSync Account to Control Center, via GoodSync Mediator, starting with Control Server v 3.1.1.
This way you can use GoodSync GUI Client on Windows or Mac to create and edit Jobs and Server Accounts in a GUI environment (not from web site), where you can easily Browse to folders deep inside various online and offline file systems, while providing complex authentications such as OAuth2 (none of which Control Center Web UI can do).
- This is how to perform Account Sync in Control Center:
- Control Center must refer to GoodSync Account in Company Settings
- GoodSync Account must allow its use by Control Center, by specifying 'GSCC Company' in Account Info of GoodSync Account (https://www.goodsync.com/manage/user-account/...)
- Click 'Sync with Mediator' button in Jobs tab.
- All changes that you performed in GoodSync Account Jobs and Server Accounts using GoodSync client will be synced to Control Center.
Using Server Accounts in Jobs
- Since Jobs and Server Accounts referred by Jobs are now Synced from Mediator, there is no need to specify Server Account in a Job -- it is already done by GoodSync GUI Client.
Job Runs
A Job Run is a specific GoodSync Job performing a specific instance of a backup or synchronization on a specific Runner.
That is, Job Runs together constitute complete history of what GoodSync Jobs did on all your Runners.
This is basic level of Job Reporting, as all other Job Reports are derivatives of this information.
Job Runs tab shows all Job Runs done in this Company.
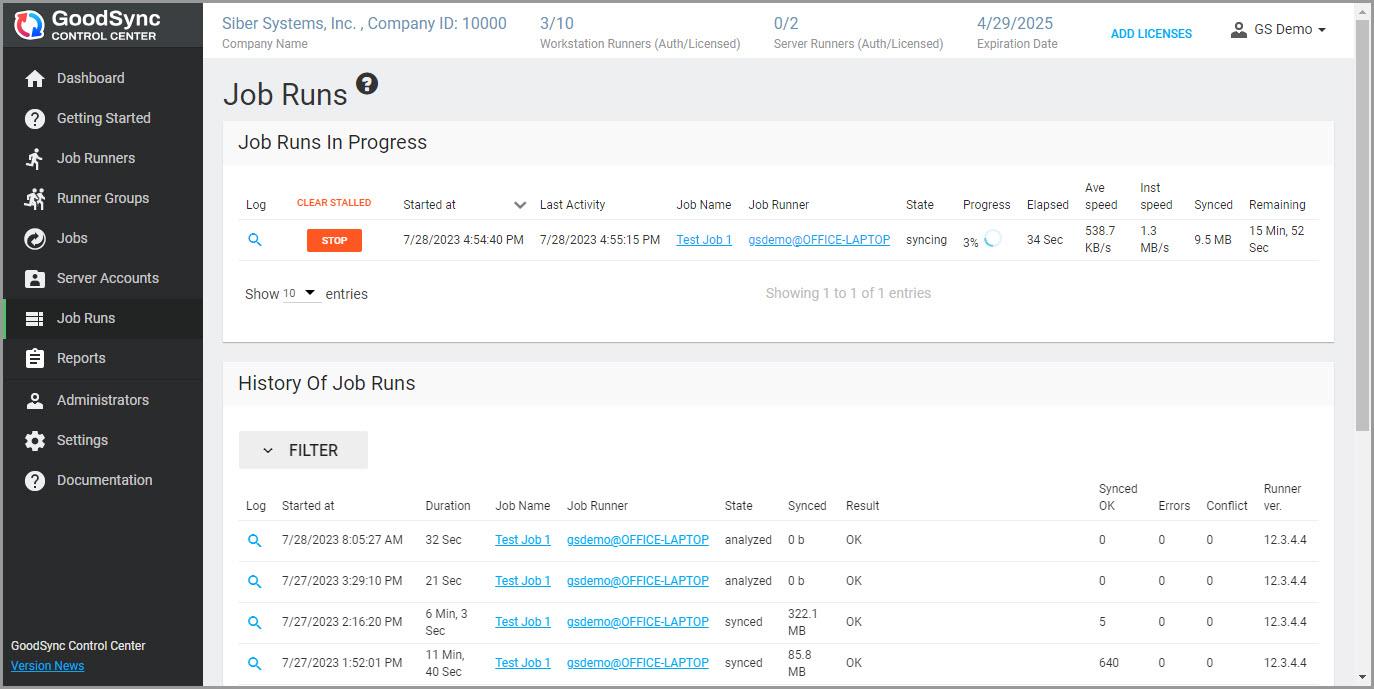
The "Job Runs In Progress" panel displays all currently running Jobs (if any), their status, and progress. The list can be sorted by clicking the column header that serves as the sorting criteria.
A Job Run can be stopped by clicking the "Stop" button on the second column. Possibly stalled Jobs Runs can be cleared by clicking on the "Clear Stalled" button in the header of this column.
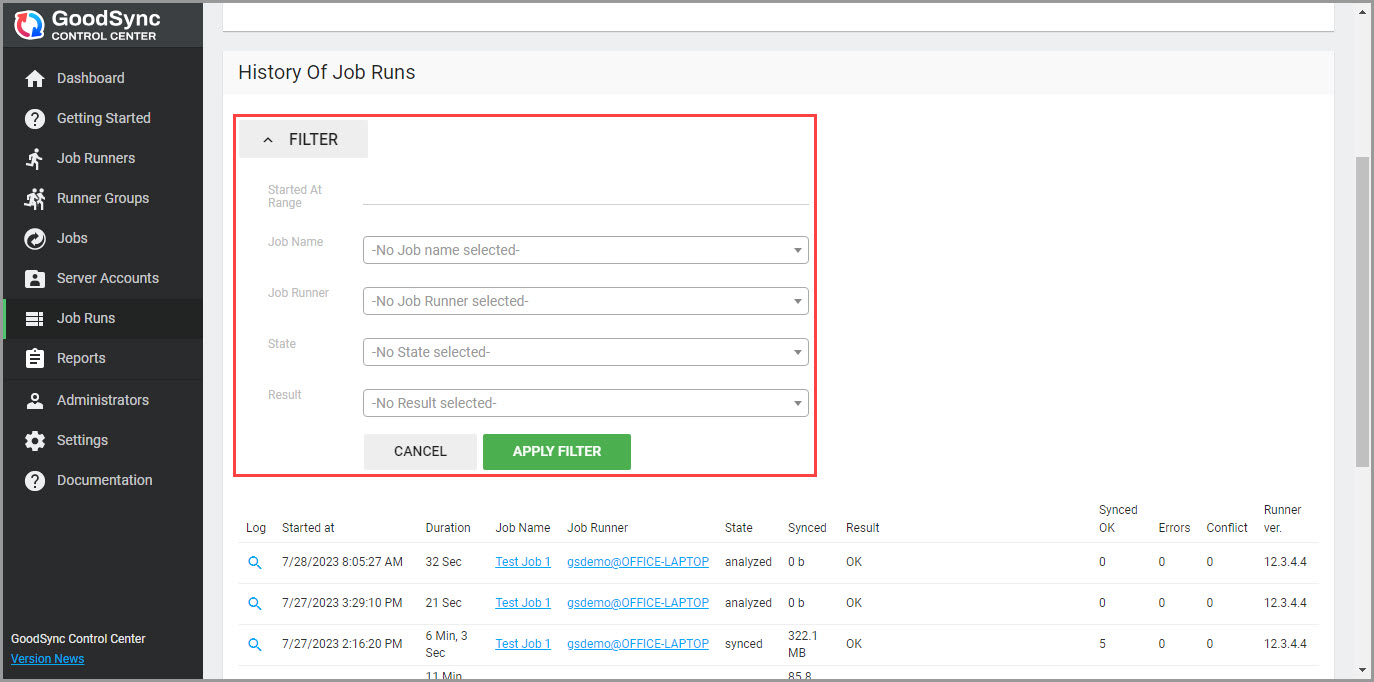
The "History of Job Runs" panel show all Job Runs that have finished.
Filters are available to refine the list of Job Runs, including time range, Job Name, Job Runner, Status, and Result.
To do so, click the "Filter" button, configure the desired filters, and select "Apply Filter."
Reports
The Control Center Reports show compiled GoodSync Job information on specific Backups and Synchronizations for all Runners.
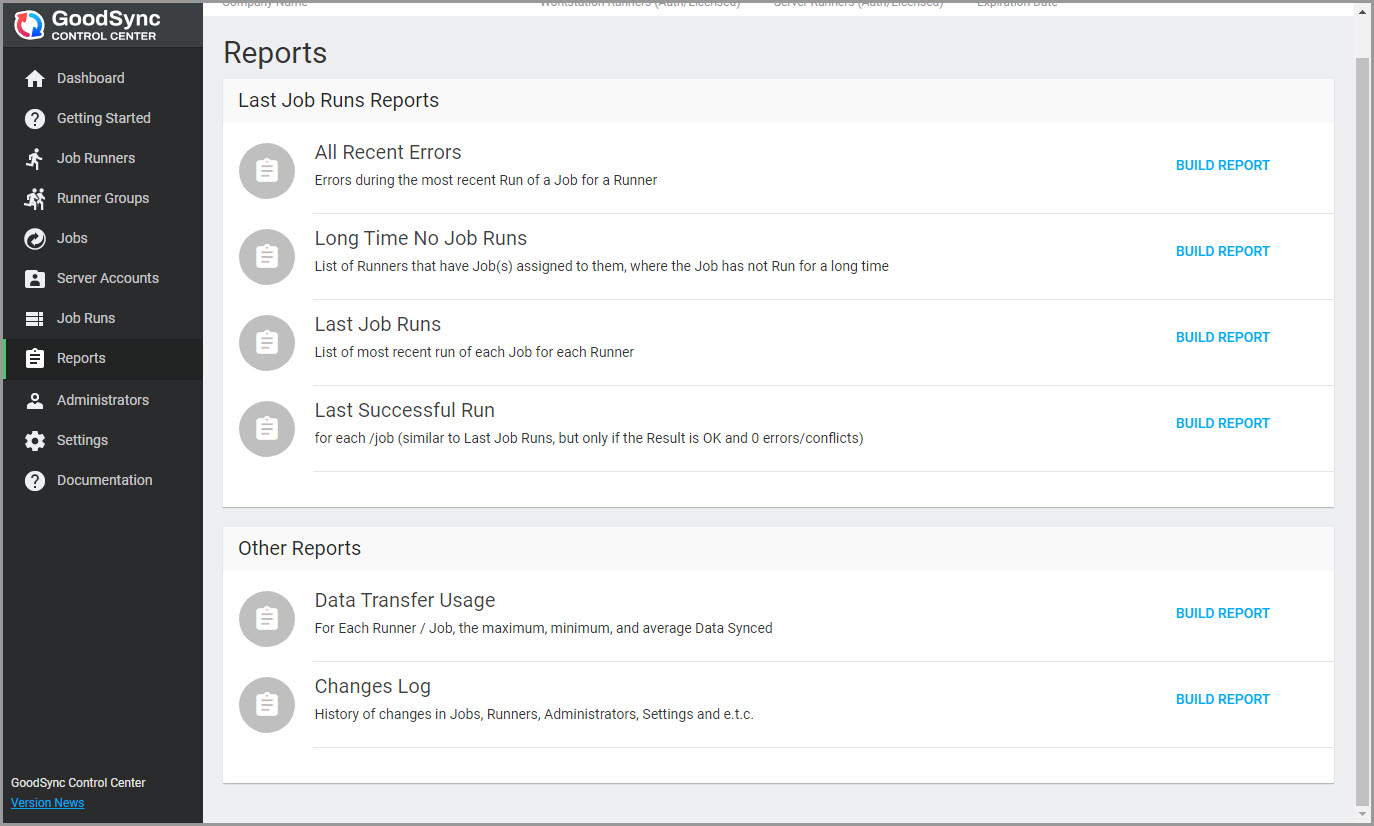
- Here are the available Types of Reports:
- All Recent Errors. Errors during the most recent Run of a Job for a Runner.
- Long Time No Job Runs. List of Runners that have Job(s) assigned to them, where the Job has not Run for a long time.
- Last Job Runs. List of the most recent Runs of each Job for each Runner.
- Last Successful Run. List of the most recent successful Runs of each Job for each Runner. This is similar to Last Job Runs, but only if the Result is OK and there were no errors or conflicts.
- Data Transfer Usage. The maximum, minimum, and average data transferred by each Runner/Job.
- Changes Log. History of changes in Jobs, Runners, Administrators, Settings, etc.
Click "Build Report" located to the right of the chosen Report Type, and the Report screen will be opened once it's prepared. Rearrange the entries in the list by selecting the column headers that serve as sorting criteria.
Administrators
The Administrators section allows the management of Company Administrators.
Company Administrators have full control over all aspects of the Control Center.
Initially, a List containing all Company Administrators is shown.
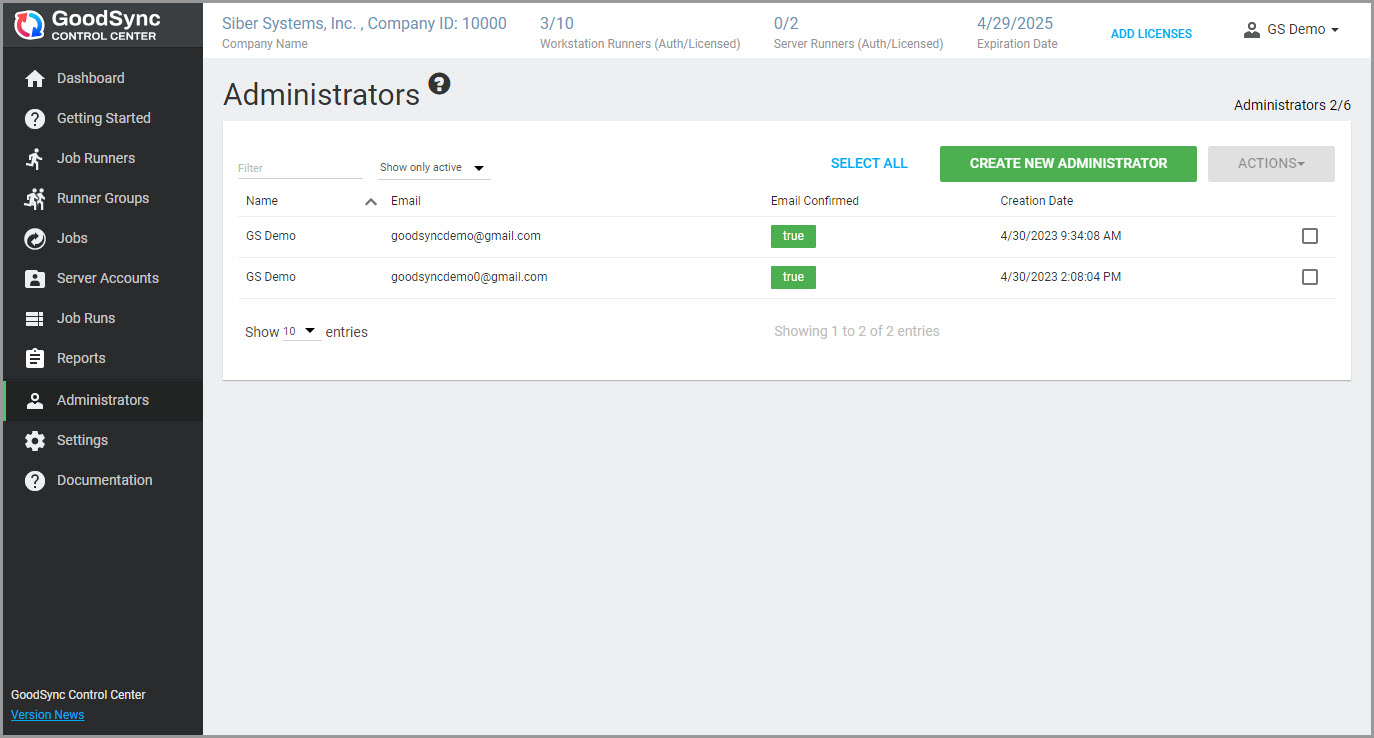
Administrators can be filtered using the "Filter" field and the drop-down for Administrator status. By default, only active Administrators are shown. To view all or only deactivated Administrators, click "Show only active" and select "Show All/Show only inactive."
Creating Administrators
-
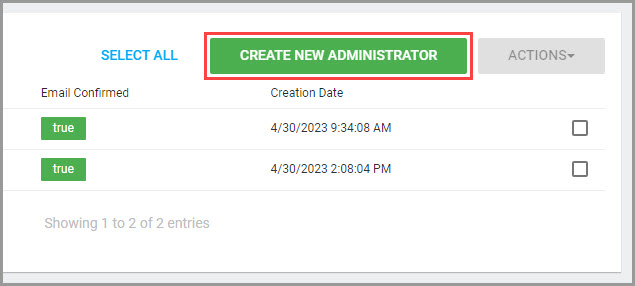
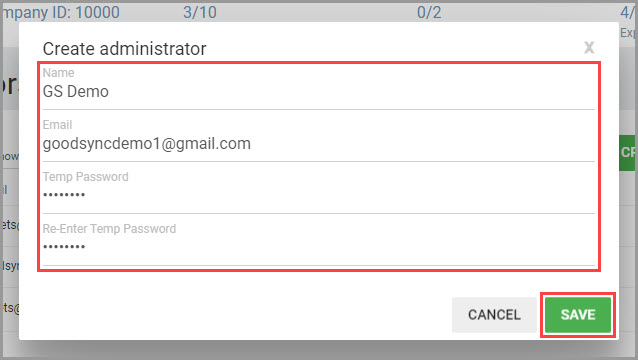
To create a new Company Administrator, click the green "Create New Administrator" button.
-
A window will appear, prompting to specify the Administrator Name, Email address, Temporary Password, and confirmation. Input these into the corresponding fields and click "Save."
- The new Company Administrator will then be added to the Administrators List. Click "Send Confirmation Email" to confirm the email address for the new Administrator. The confirmation email will be sent to the Email address provided.
Administrator Bulk Actions
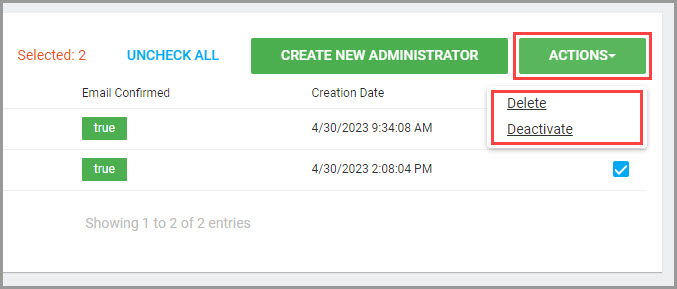
The "Actions" button in the Administrators List allows to Delete or Activate/Deactivate the Company Administrators in bulk. Select the desired Administrator accounts from the List by checking their boxes on the right, click "Actions," and select the appropriate action.
Settings
The Control Center Settings allow affecting how the Control Center behaves and setting Global Program Options for the Runners connecting to the Control Center.
Let's review each panel in this section:
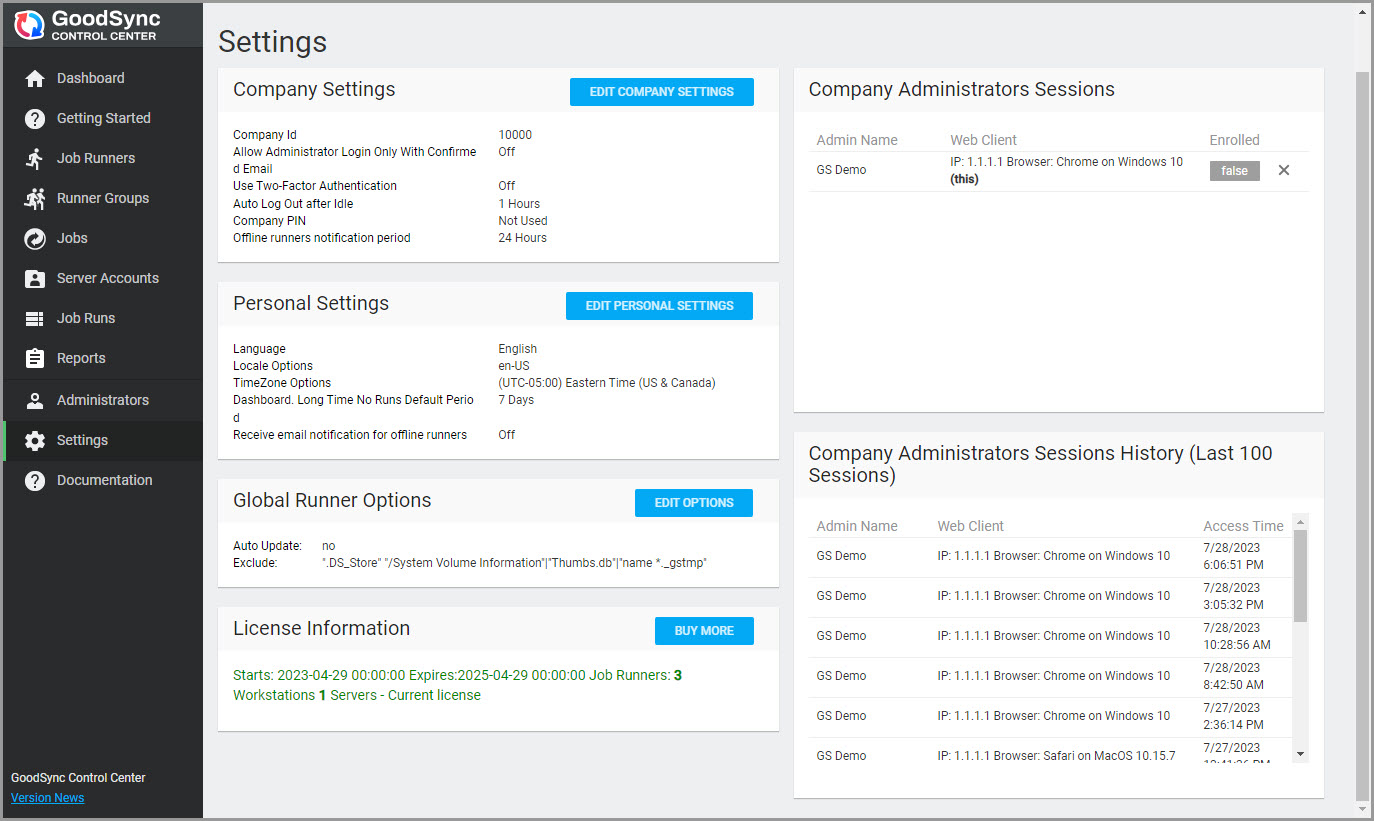
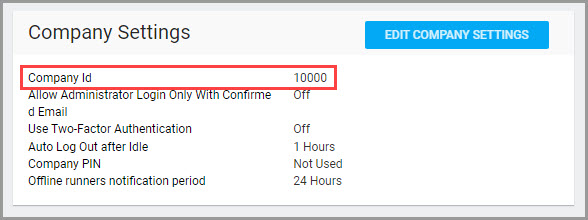
Company Settings
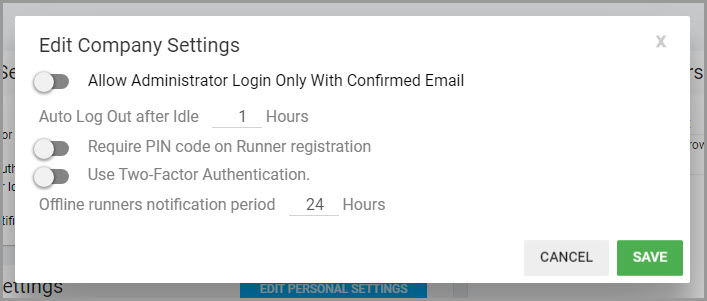
These reflect the Company's general and security settings. Click "Edit Company Settings" to edit them.
- Company ID. The Company ID denotes the specific instance of the Control Center. It tells the Runners which Company on the Control Center they should be receiving Jobs from. The Company ID is set when creating the Company and cannot be changed.
- Allow Administrator Login Only With Confirmed Email. If checked, only allow Administrators with a confirmed Email address to log in.
- Auto Log Out after Idle. Configure the auto logout time in hours.
- Require PIN code on Runner registration. A Company PIN can be set to act as a white list for newly installed runners. If a Company PIN is set, and an installed runner does not use the "/cc-copin" flag with the correct PIN during installation, it will not connect to the Control Center.
- Use Two-Factor Authentication. Turn on or off the One Time Password authentication (2FA).
NOTE: To use One Time Password authentication, all company Administrators must complete the email confirmation process.
Personal Settings
These are the personal settings of the currently logged-in Administrator. Click "Edit Personal Settings" to edit them.
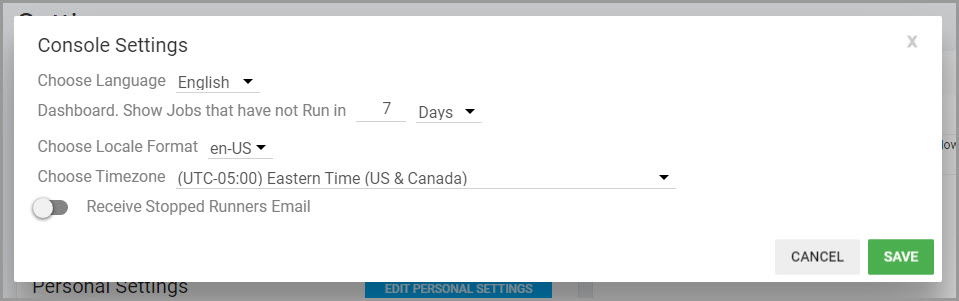
- Choose Language. Sets the display language for the Control Center UI.
- Dashboard. Show Jobs that have not Run in. If a scheduled Job does not Run in this many days for any reason, create a notification in the Dashboard under "Long Time No Runs."
- Choose Locale Format. Configure the Date/Time formatting for the Job Run display.
- Choose Timezone. Specify timezone settings for the Job Run display.
- Receive Stopped Runners Email. System checks for offline runners occur daily at 12 PM UTC. During these checks, the Control Center confirms the last activity of a Runner and subtracts it from the current time. If the runner has been offline for an amount of time equal to or greater than the notification period, an email alert will be sent to the Administrator.
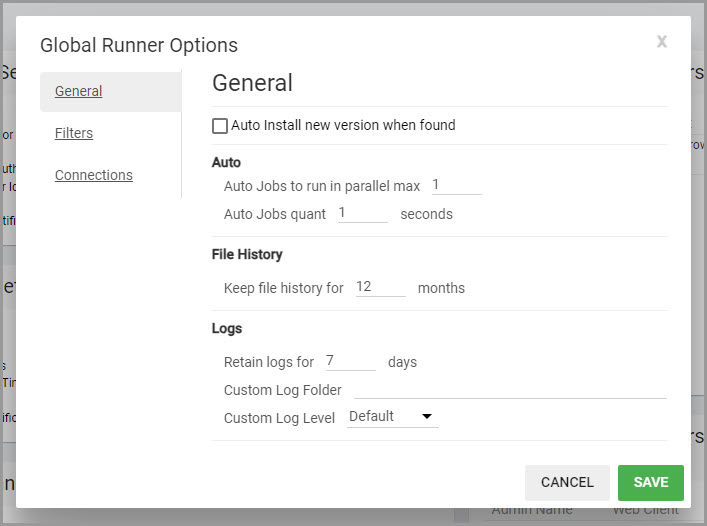
Global Runner Options
The settings on this panel allow configuring the global settings relating to the Update Management, Auto Job Runs, Logs and History, Global Job Filters, Proxy settings, and SMTP settings for alerting.
These are equal to the settings found under "Tools" >> "Program Options" ("GoodSync" >> "Preferences" on Mac) in GoodSync GUI.
An overview and description of these settings are available in the GoodSync Manual.
Note that not all Program Options can be set via Control Center.
For instance, Proxy options can be set only locally when you install CC-Runner.
License Information
Displays details concerning the current licenses. Click "Buy More" to get additional Runners for the Control Center.
Company Administrators Sessions
This panel shows the current Administrator sessions. A session may also be revoked for an Administrator anytime by clicking the "x" icon by the desired Administrator session.
Company Administrators Sessions History
A record of all Administrator sessions is logged for reference and auditing purposes. This record contains information including the Administrator's Name, IP address, browser type, operating system, and the last access time.
Runner Deployment
This guide will show how to deploy Windows, Mac, and Linux/NAS Runners that perform backups and syncs on command from the Control Center Server.
The Runners connect to the Control Center, receive Jobs, execute these Jobs, and report results to the Control Center.
Getting Company ID
Before deploying Runners to Client computers on any supported platform, it's essential to find the Company ID. This will enable the Runner installer to connect to a specific Control Center instance.
The Company ID is consistently indicated alongside the Company Name in the top bar.

- Alternatively, the Company ID can be found within the Company Settings:
- Log in to the Control Center.
- Navigate to the "Settings" section.
- On the "Company Settings" panel, locate the Company ID and copy it if needed.
Deploying Runners on Windows
GUI installer.
Using GUI installer is a simpler way to get started, if you need to deploy on a small number of computers.
GUI installer requests:
CC CompanyId,
CC CompanyPin,
GoodSync Account UserId,
GoodSync Account Password.
It also has an option of running CC-Runner as GUI client: Tray Icon only
or as Windows/Mac Service: No GUI, but CC-Runner runs even when user is logged out.
(Add Picture).
Command Line installer.
- Download the GoodSync CC Runner installer for Windows.
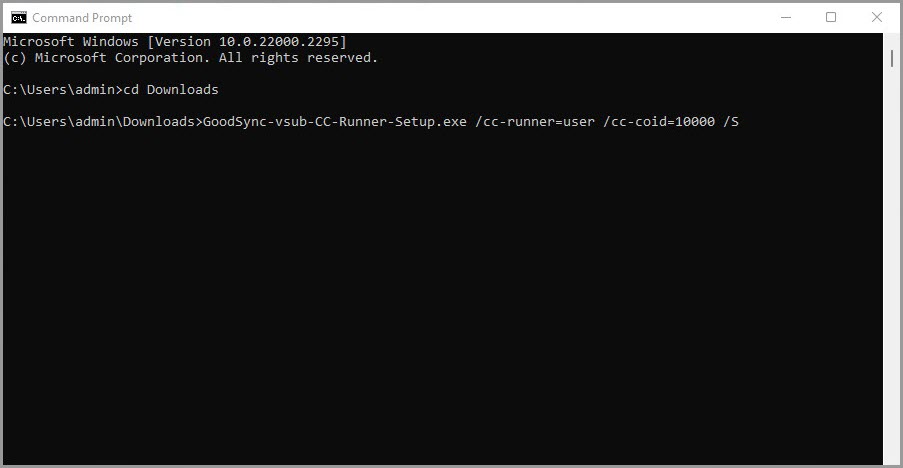
- Open a Command Prompt window and navigate to the folder that the installer has been downloaded. By default, this will typically be in the Downloads folder of the current User (C:\Users\Username\Downloads). The "cd" command can be used to move through the directory structure, and the "dir" command can be used to view the contents of the current location.
- Run the installer with the appropriate options. There are two approaches to user setup:
-
User space: The runner will run as a Tray Icon only while the user is logged on.
It will not require the Windows user account password, because user is already logged in.
Use the following command for user-space setup:
GoodSync-vsub-CC-Runner-Setup.exe /cc-runner=user /cc-coid=CompanyId /cc-copin=CompanyPin
-
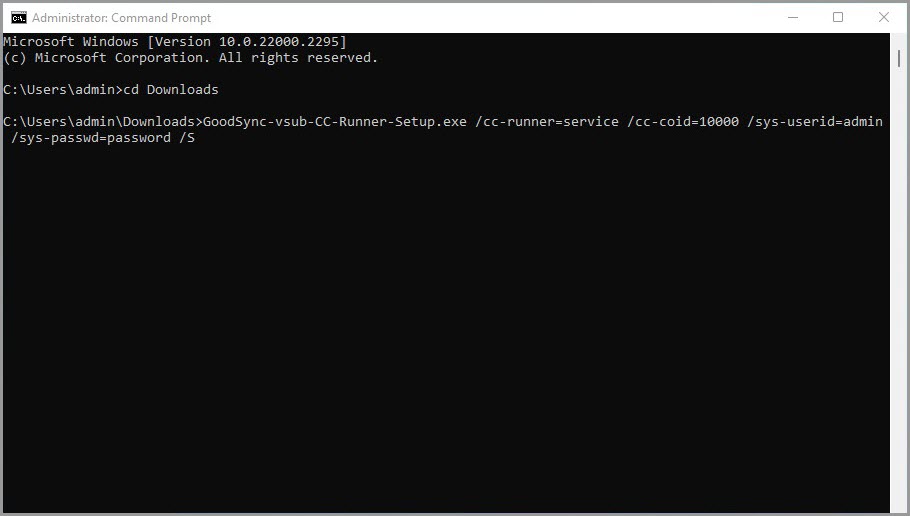
Service: The runner will run even if the user is logged off.
This cannot be used for mass deployment, as it will require the Windows user account credentials that should be specified using the "/sys-userid" and "/sys-passwd" options.
Use the following command for service setup:
GoodSync-vsub-CC-Runner-Setup.exe /cc-runner=service /cc-coid=CompanyId /cc-copin=CompanyPin /sys-userid=username /sys-passwd=userpassword
- You can add command line option /S for silent install.
-
User space: The runner will run as a Tray Icon only while the user is logged on.
It will not require the Windows user account password, because user is already logged in.
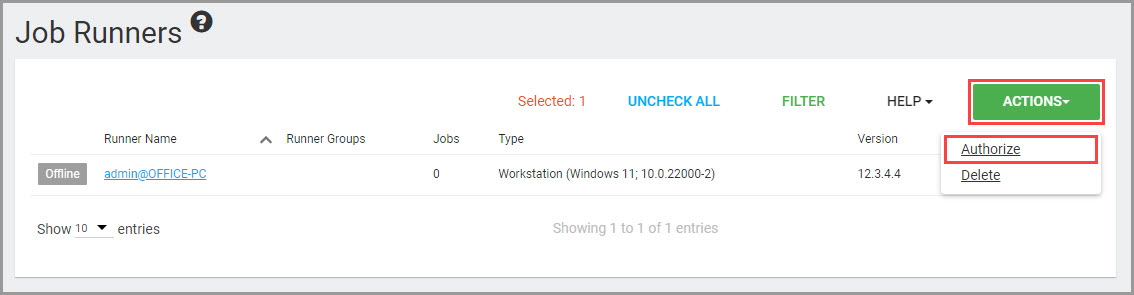
- Once setup is complete, navigate to the "Job Runners" section in the Control Center. There, the installed Runner will appear within the Runner List.
- From the List, check the box on the right corresponding to the newly installed Runner, click "Actions" and select "Authorize" to Authorize Runner, so it can get the assigned Jobs.
Installer Parameters and Options
/cc-runner=user|service
The "user" value specifies the intention to install a Control Center Runner in the user space.
NOTE: The "user" value is not to be replaced with an actual username.
The "service" value specifies the intention to install a service Control Center Runner.
/cc-coid=CompanyId
Sets the Company ID found in the Settings section on the Control Center UI.
/mini-progress=yes|no
Show (or not) a Mini Progress popup that shows the status and progress of a Job Run.
/user-close=yes|no
Allow the user (or not) to close the Runner via its Taskbar icon or Mini Progress popup.
/sys-userid=username
The username of a Windows User, under which the Runner service will run.
/sys-passwd=userpassword
The password of the Windows User, under which the Runner service will run.
/cc-url=serverURL
Sets the URL of a self-hosted Control Center Server instance from which this Runner gets Jobs. The default is https://jobs.goodsync.com
/cc-copin=CompanyPin
If a Company PIN is set in the Settings section of the Control Center, runners must provide the correct PIN to connect with it.
/cc-allow-bad-certs
Allow the Runner to talk to the Control Center Server that shows a self-signed certificate (TLS/SSL) -- not recommended.
/cc-proxy=host:port
Proxy Host and Port, used to connect to Control Center Server.
/cc-proxy-auth=user:password
Proxy Auth, used to connect to the Control Center Server.
/S
Run the installer in silent mode without any GUI. That allows it to function as an MSI for silent installation and mass deployment.
Runner Mass Deployment
For mass deployment to all or a batch of computers, the same user-space setup command, using the "/cc-runner=user" flag, may be used for all devices (and pushed via GPO, scheduled task, etc.).
After the initial install, the Runner will create its startup task, so this command only needs to run once for all devices.
Mass deployment through SCCM
Please refer to the Deployment Guide through SCCM.
Mass deployment through GPO
Please refer to the Deployment Guide through GPO.
Deploying Runners on Mac
CC-Runner GUI installer will be added soon at CC Runner GUI installer for Mac.
CC-Runner Command Line installer:
- Download the GoodSync CC Runner installer for Mac.
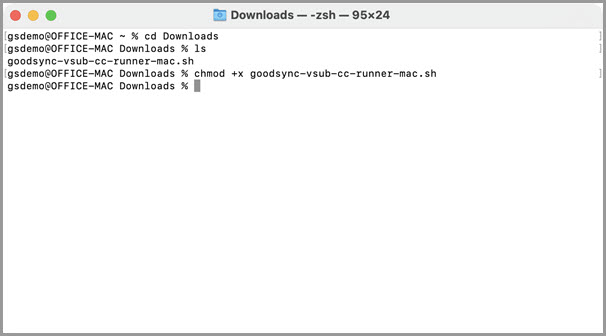
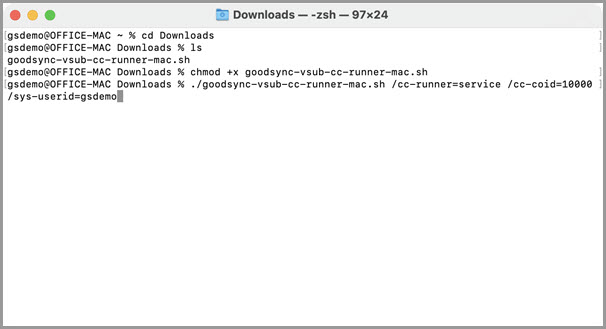
- Open a Terminal window and navigate to the folder that the installer has been downloaded. By default, this will typically be in the Downloads folder of the current User (/Users/Username/Downloads). The "cd" command can be used to move through the directory structure, and the "ls" command can be used to view the contents of the current location.
-
Grant the installer execution permissions with the following command:
chmod +x goodsync-vsub-cc-runner-mac.sh
If the command is successful, there will be no result or message shown.
-
Run the installer with the appropriate options. There are two approaches to user setup:
-
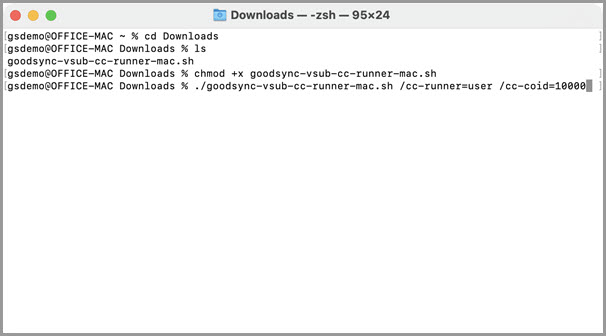
User space: The runner will run only while the user is logged on.
Use the following command for user-space setup:
./goodsync-vsub-cc-runner-mac.sh /cc-runner=user /cc-coid=CompanyId
-
Service: The runner will run even if the user is logged off.
Use the following command for service setup:
./goodsync-vsub-cc-runner-mac.sh /cc-runner=service /cc-coid=CompanyId /sys-userid=username
-
User space: The runner will run only while the user is logged on.
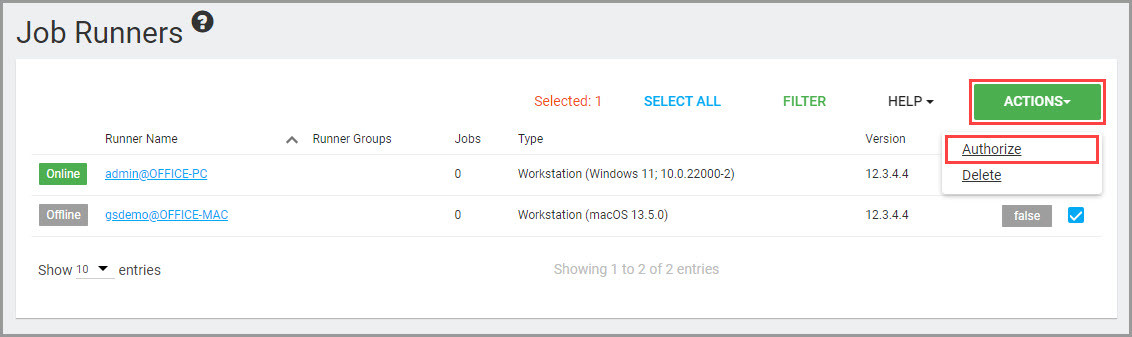
- Once setup is complete, navigate to the "Job Runners" section in the Control Center. There, the installed Runner will appear within the Runner List.
- From the List, check the box on the right corresponding to the newly installed Runner, click "Actions," and select "Authorize" to Authorize Runner so it can get the assigned Jobs.
Installer Parameters and Options
/cc-runner=user|service
The "user" value installs CC-Runner as a GUI client presented as a Tray Icon.
The "service" value installs Control Center Runner as a Service.
/cc-coid=CompanyId
Sets the Company ID found in the Settings section on the Control Center UI.
/sys-userid=username
The username of a macOS User under which the Runner service will run.
/cc-url=serverURL
Sets the URL of a self-hosted Control Center Server instance from which this Runner gets Jobs. The default is https://jobs.goodsync.com
/cc-copin=CompanyPin
If a Company PIN is set in the Settings section of the Control Center, runners must provide the correct PIN to connect with it.
/cc-acct-pwd=password
Sets the Server Account encryption password. Used by the Runner to decrypt Server Accounts.
/cc-allow-bad-certs
Allow the Runner to talk to the Control Center Server that shows a self-signed certificate (TLS/SSL).
/cc-proxy=host:port
Proxy Host and Port. Used to connect to Control Center Server.
/cc-proxy-auth=user:password
Proxy Auth. Used to connect to the Control Center Server.
Deploying Runners on Linux/NAS
-
Download the GoodSync CC Runner installer for Linux from
https://www.goodsync.com/download/cc-runner-install-x86_64-release.run -
Grant the downloaded installer execution permissions with the following command:
chmod +x cc-runner-install-x86_64-release.run
If the command is successful, there will be no result or message shown.

-
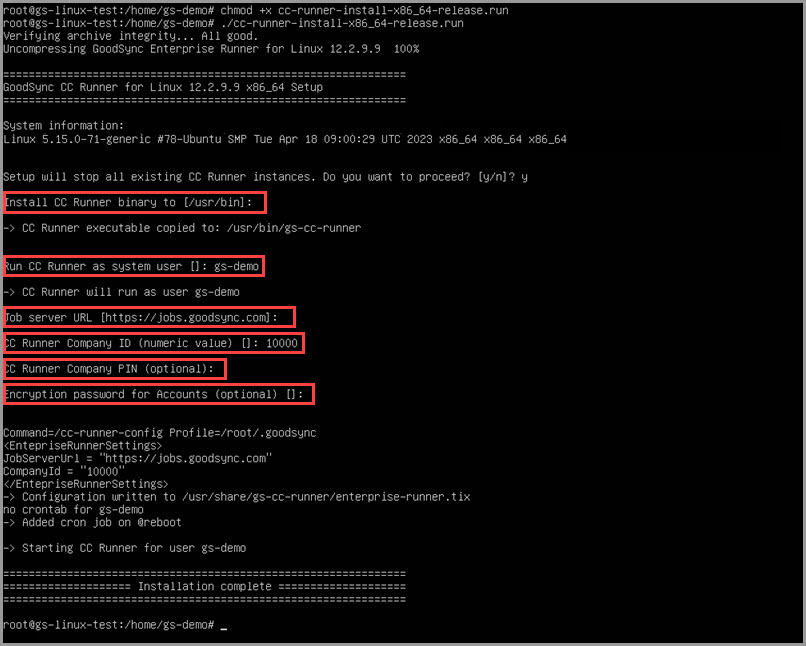
Run the installer:
./cc-runner-install-x86_64-release.run

The Runner installer will prompt the user for the following information:
Binary installation directory – path to the directory that the Runner will be installed. If no input is provided, the default path "/usr/bin/gs-cc-runner" will be used.
System user – Linux user account on behalf of which the Runner will be running.
Job server URL – Control Center URL. If no input is provided, the default URL "https://jobs.goodsync.com" will be used.
NOTE: If using a self-hosted Control Center, enter the IP of the self-hosted server.
Company ID – points the Runner to a particular Control Center instance.
Company PIN – PIN used to whitelist incoming runners (optional).
Encryption password – Server Account encryption password (optional). Used by the Runner to decrypt Server Accounts.
The installer will create a cron job to run the Runner instance on the system start automatically.
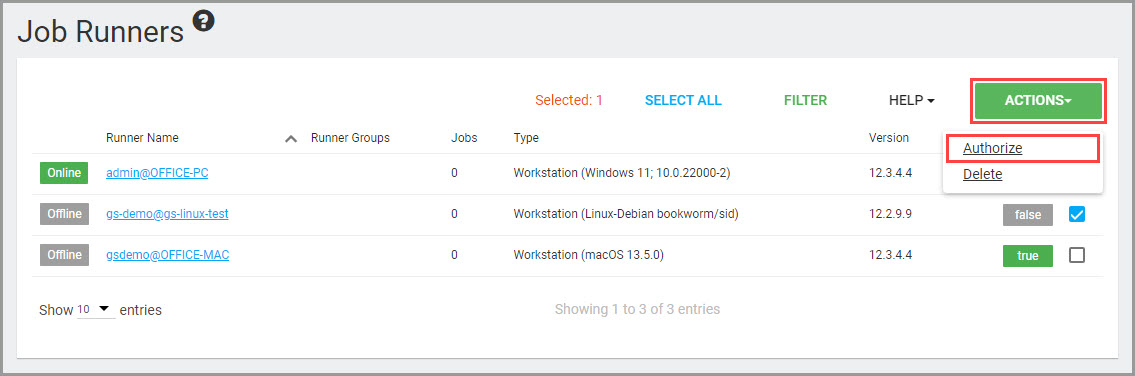
- Once setup is complete, navigate to the "Job Runners" section in the Control Center. There, the installed Runner will appear within the Runner List.
-
From the List, check the box on the right corresponding to the newly installed Runner, click "Actions," and select "Authorize" to Authorize Runner so it can get the assigned Jobs.
Deploying Runners on Android
For connecting an Android device to the Control Center, consider employing the GoodSync CC Runner app designed for Android.
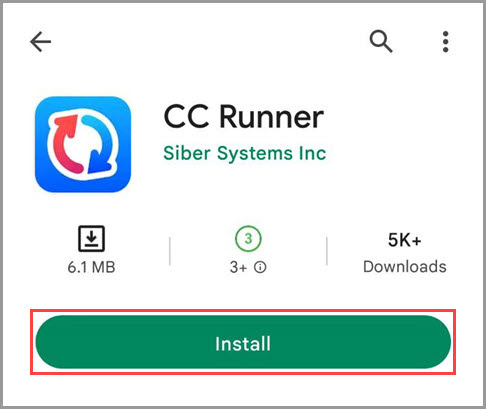
- In Google Play, search for "GoodSync Runner" and click the "CC Runner" item in the search results.
-
Once on the app page, click "Install."
-
After installation is complete, click "Open."

-
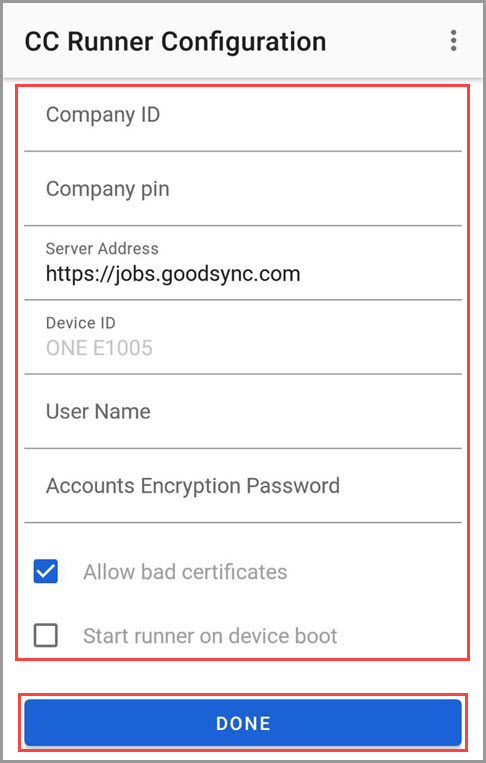
Enter the following information to connect the Runner to the Control Center:
Company ID – points the Runner to a particular Control Center instance.
Company PIN – a PIN used to white-list incoming runners (optional).
Server Address – Control Center URL. If no input is provided, the default URL "https://jobs.goodsync.com" will be used.
NOTE: If using a self-hosted Control Center, enter the IP of the self-hosted server.
User Name – the Runner will be identified by the provided user-name@device-id in the Control Center.
Accounts Encryption Password – Server Account encryption password (optional). Used by the Runner to decrypt Server Accounts.
Allow bad certificates – allow the Runner to talk to the Control Center Server that shows a self-signed certificate (TLS/SSL).
Start runner on device boot – ensure the Runner app begins on the device boot. Click "Done" after the appropriate information is provided.
- Once the Runner setup is complete, click "Start" to start it.
- Next, navigate to the "Job Runners" section in the Control Center. There, the installed Runner will appear within the Runner List.
-
From the List, check the box on the right corresponding to the newly installed Runner, click "Actions," and select "Authorize" to Authorize Runner so it can get the assigned Jobs.
